This was a gifted by a Rotarian. Sale proceeds will go to the Rotary Foundation.
Commodore 64C – Nice cosmetic condition. A little yellow on the rear panel and backs of keys. Loads up games. Sounded and looked good with my monitor and cable. No manual
Diagnostic cart identified faults with 6526 U2 6581 U17 and Control Port. Sound test sounded fine. Joystick test program showed ports, joysticks, and paddles working fine. I have not noticed any issues in use.
Power Supply – works.
1541 Disk Drive – passes Commodore performance test and loads games. A few small cable “melts” on the case. Includes box, cable, and manual.
Datasette – it would detect titles but would not start loading. Includes box and manual.
Accessories, games, and boxes including:
2x Joystick – One with a homemade replacement cable.
Paddle set
Cartridges: Le Mans, International Football (both worked for me)
Tapes: Armchair Cricket, America’s Cup, SWAT, Desert Hawke (I only got SWAT to load)
Back in about 2019 i picked up several Apple items at a garage sale. Amongst them were a Green Monitor, a Duodisk Drive, and a Platinum IIe. The Duodisk needed a little work as it had become as one with a termite mound during its storage prior to the sale. It all ended happily, although the platinum IIe never looked quite right with the rest of the system.
I have since bought a second platinum IIe which came with a colour monitor. I typically don’t like having two of something (there are a few exceptions) so i resolved to swap out the original platinum IIe for a beige IIe. Impatience is expensive, and so is “mint”, so i waited until one came up in the right condition and price. Six years later ….
This was a FB marketplace purchase, although it turned out that the seller did frequent the ARC meetings in Adelaide.
The only real mis-step was the “1” key on the keyboard, which was not doing its thing. This was resolved by the already well-documented process of removing the key switch, disassembling, bending out the metal leaf a little, and then reassembling. Line filter caps were replaced.
I have set this machine up to be workman-like by including printer card, super serial card, 80 column card, and a Microsoft Softcard clone for CP/M. In this configuration, it is similar to the Lingo clone that i used back in the eighties.
One of my favourite machines is the PC XT that landed on my desk in 1986. I really didn’t need another one, but this one came to me together with a couple of other machines.
The machine had been poorly stored and had suffered some corrosion.
I pulled it all down for inspection. The damage was fairly superficial, which was good news. I treated the corrosion on the case and resprayed with a colour that is “close enough”. One day somebody may like to better replicate the original finish, but cosmetics are not my priority.
The power supply had some water stains on the exterior, but inside it looked to be in good shape. I have previously recapped an xt power supply due to capacitor leakage, but i have left this one as-is for now.
The seller had a couple of monitors that i bought at the same time. One turned out to be quite specific to an Olivetti machine, so i passed it on to an Olivetti owner. The other was a Taxan amber MDA screen, which was curious because this machine had a CGA card. The screen works well.
There were several RAM errors from the motherboard, but they were quickly resolved. With that, the system booted up using the Tandon TM262 21MB hard disk.
Initially i used a spare monochrome adapter and then i tried the CGA adapter with a CGA screen. This also worked fine.
The Persyst Time Spectrum multifunction card included a battery for the real-time clock. Alas, the leakage had been quite severe.
With several sockets to be replaced and many more possibly hiding corroded tracks, and programmable logic that has potentially been penetrated, i considered this card a write-off. I put out a call to the Adelaide Retro Computer Group for a suitable replacement and Andrew came through as he so often does.
The system worked fine with a spare 360k drive, but the TM100 was not playing the game. Checking with an oscilloscope, there was no data output during a read and this was traced to the LM311 5B at I9.
This had clearly seen some water but, curiously, the rest of the drive seemed fine. Replacing it did not resolve the problem; the inductor L4 on the power line was open. Perhaps it had acted as a fuse. Once the inductor was replaced, the drive was fine.
Although the hard drive is still functioning, there is a certain inevitability about its failure. In this situation, i always add a XTIDE solid state drive for normal use. With DOS 5.0 an 8GB card can be used, yielding 4x 2GB drives. That allows a bucket load of software to be loaded. For whatever reason, though, i have not been able to access the original drive from DOS 5.0 – a surprise given that i have similar setups where this works fine.
The case cleaned up well despite the water ingress.
I settled on using a monochrome display for now, but because the IBM monochrome adapter is a little limited, i swapped it out for Hercules style card which gives nice sharp graphics and also maintains the crisp text mode. I squeezed it all back into the enclosure.
Autocad 2 provides a nice demonstration of the graphics.
This card seems to have been manufactured by Microlog, but to be fair, my only evidence of that is that Microlog appears in the ROM. And the sockets are blue like some other Microlog boards.
I have no manual for this card, and that’s a problem for what appears to be quite a complex card. It has 128kB of RAM which seems like a lot for what i assume is a monochrome card. The NEC uPD7220 graphics processor chip is particularly interesting.
Initially, this card appeared to me to be a graphics card – a processor would access it via the STD bus. In light of my experience with the Little Video Card, i had a closer look and the STD bus interface seemed to be limited to some I/O, and it did appear to have a serial port. A 6809 processor (itself a little unusual) seems to hold the thing together.
I popped the card into an STD backplane, and had a look at the video output. The syncs were clearly present and at 50Hz / 15kHz. I connected a monitor, and a cursor was visible in the top left corner.
Then i buzzed out the serial port. It appeared to be a similar setup to the Little Video Board, so i thought that it may play nicely with a Pulsar Little Big Board, but it just caused the LBB to hang. I tried the Microlog MC52 card instead, but this had the added complexity that it needed a couple of spaces to automatically set the baud rate. At this point, i realised that the card should have a keyboard input. I suspect that there is DIL header for an ASCII keyboard, which i don’t yet have.
I improvised and used my trusty IBM terminal with the MC52 and forked the transmit line from the MC52 to the Hi-Res Graphics Card. After the obligatory RS232 trial and error, i was happy to see the MC52 basic prompt come up on both the terminal and the monitor.
I had already dumped the ROM. I figured i would probably have to disassemble it to get all the answers, but there was one clue in plain sight:
There seemed to be a dialogue that would allow entry into the graphics mode. There were also some tantalising numbers that looked a lot like pixels.
I didn’t have a clue as to how to provoke the dialogue, though. I hoped the card might just emulate a Tektronix 4010 or something similar, but i could not get any of the sequences to do anything – other than move the text cursor as might be expected for, say, a televideo text terminal emulation.
Out of desperation, i prodded somewhat randomly and did indeed get the prompt to come up – and it was a very tidy graphics prompt. With some brute force, i discovered that ESC D was the magic key combination. I got no response from entering Q or E, but it was definitely in graphics mode.
Fortunately, the magic sequences in the ROM also worked through the serial port so they told me some of the graphics commands.
Eventually the penny dropped that the response to the prompt was not simply “Q” or “E” but “Q,” and “E,”. The comma is an important delimiter.
I worked out several of the commands through trial and error, and i used ChatGPT to help analyse the ROM to confirm/clarify them. ChatGPT could not find ASCII commands for an Arc or to set the fill pattern as might be expected from the uPD7220 manual. ChatGPT could not unravel the C command, but said that it was copying sections of memory.
B,
Bell
C,
Not sure. It does some funky stuff.
D,x0,y0,<x1,y1> ….
Draw line from current position to x,y to x1,y1 etc etc
E,
Erase screen
F,a,x,y,
As for R but with a filled rectangle.
H,
Home 0,0
L,p,
Changes the line pattern to the binary value from 0 to 255.
M,x,y
As per P but is there a subtle difference? Yes, it is relative.
O,r,
Draw a circle centred on current position and with a radius of r
P,x,y,
Set the current position to x,y
Q,
Quit to text mode
R,a,x,y,
Draw a rectangle starting at the current position with sides equal to x and y. A sets the orientation in 45 degree steps. At 45,135,225, 315 degrees the rectangle is bigger – the sides are set to the diagonal length.
W,<text><CR>
Writes text.
X,s,n,
Draw x axis. Space s, Number N
Y,s,n,
Draw y axis. Space s, Number N
Z,s,
Set text size. S= 0 to 15.
I wrote a little basic program to try out some of the commands. Having the character stream go to both the terminal and the card allows text mode at the same time as graphics mode, but with the side effect that just typing in or listing the program would create commands. Separate ports are probably a better idea.
I was able to connect a PS/2 keyboard to this card using and adapter described here. The pinout was much the same as the Little Video Board. Alas, i was unable to get the card to transmit characters to the serial port. There was sufficient activity to convince me that the key was received and that the software read the character. I tried changing configuration jumpers but no success was had. Perhaps the specific firmware verion does not support it.
I suppose a final observation is that this card does have a proper STD interface whereas the Little Video Board just drew power. I found that a Little Big Board would not boot if this card was on the bus. Perhaps this specific version of the firmware was intended to support the card in a graphics card mode rather than as a terminal. I have no further information.
I could still use this card as a terminal but i would need to build a PS/2 to RS232 adapter which is a simple enough job for an arduino. I am not sure that i will ever get to it though.
I have several of these cards in various states. The board clearly has a minimal STD bus interface; it only uses the bus for power. That made me think that they were probably terminal boards. They are marked with LVB and one card has a ROM labelled Little Video Board.
Comparing the cards, i could see only one that was fully populated. Of the six cards, three were never completed, two were completed but have been used as spares boards. The complete card has been modified with extra connectors.
Having lots of other things to do and no doco for these cards, they sat around for several years in the “too hard” basket. While wading through a box of manuals looking for something else, i found an information sheet that shed a little light on their purpose.
The Little Video Board (LVB) is a terminal card intended for use with Pulsar Little Big Boards. The LVB emulates a Televideo 912 terminal. It operates with an ASCII keyboard and a video monitor. Communication parameters are set by the DIP switch.
The video output was obvious, so i powered the card up and had a look with the scope. The syncs were there at 50Hz/15kHz so i connected a monitor and got a blank screen with a cursor in the top left corner. This all seemed quite positive.
I traced out the video port and connected it to a Little Big Board and after messing around a little i got the TurboDOS prompt to appear on the monitor. At that point, proceedings were terminated because i don’t have an ASCII keyboard!
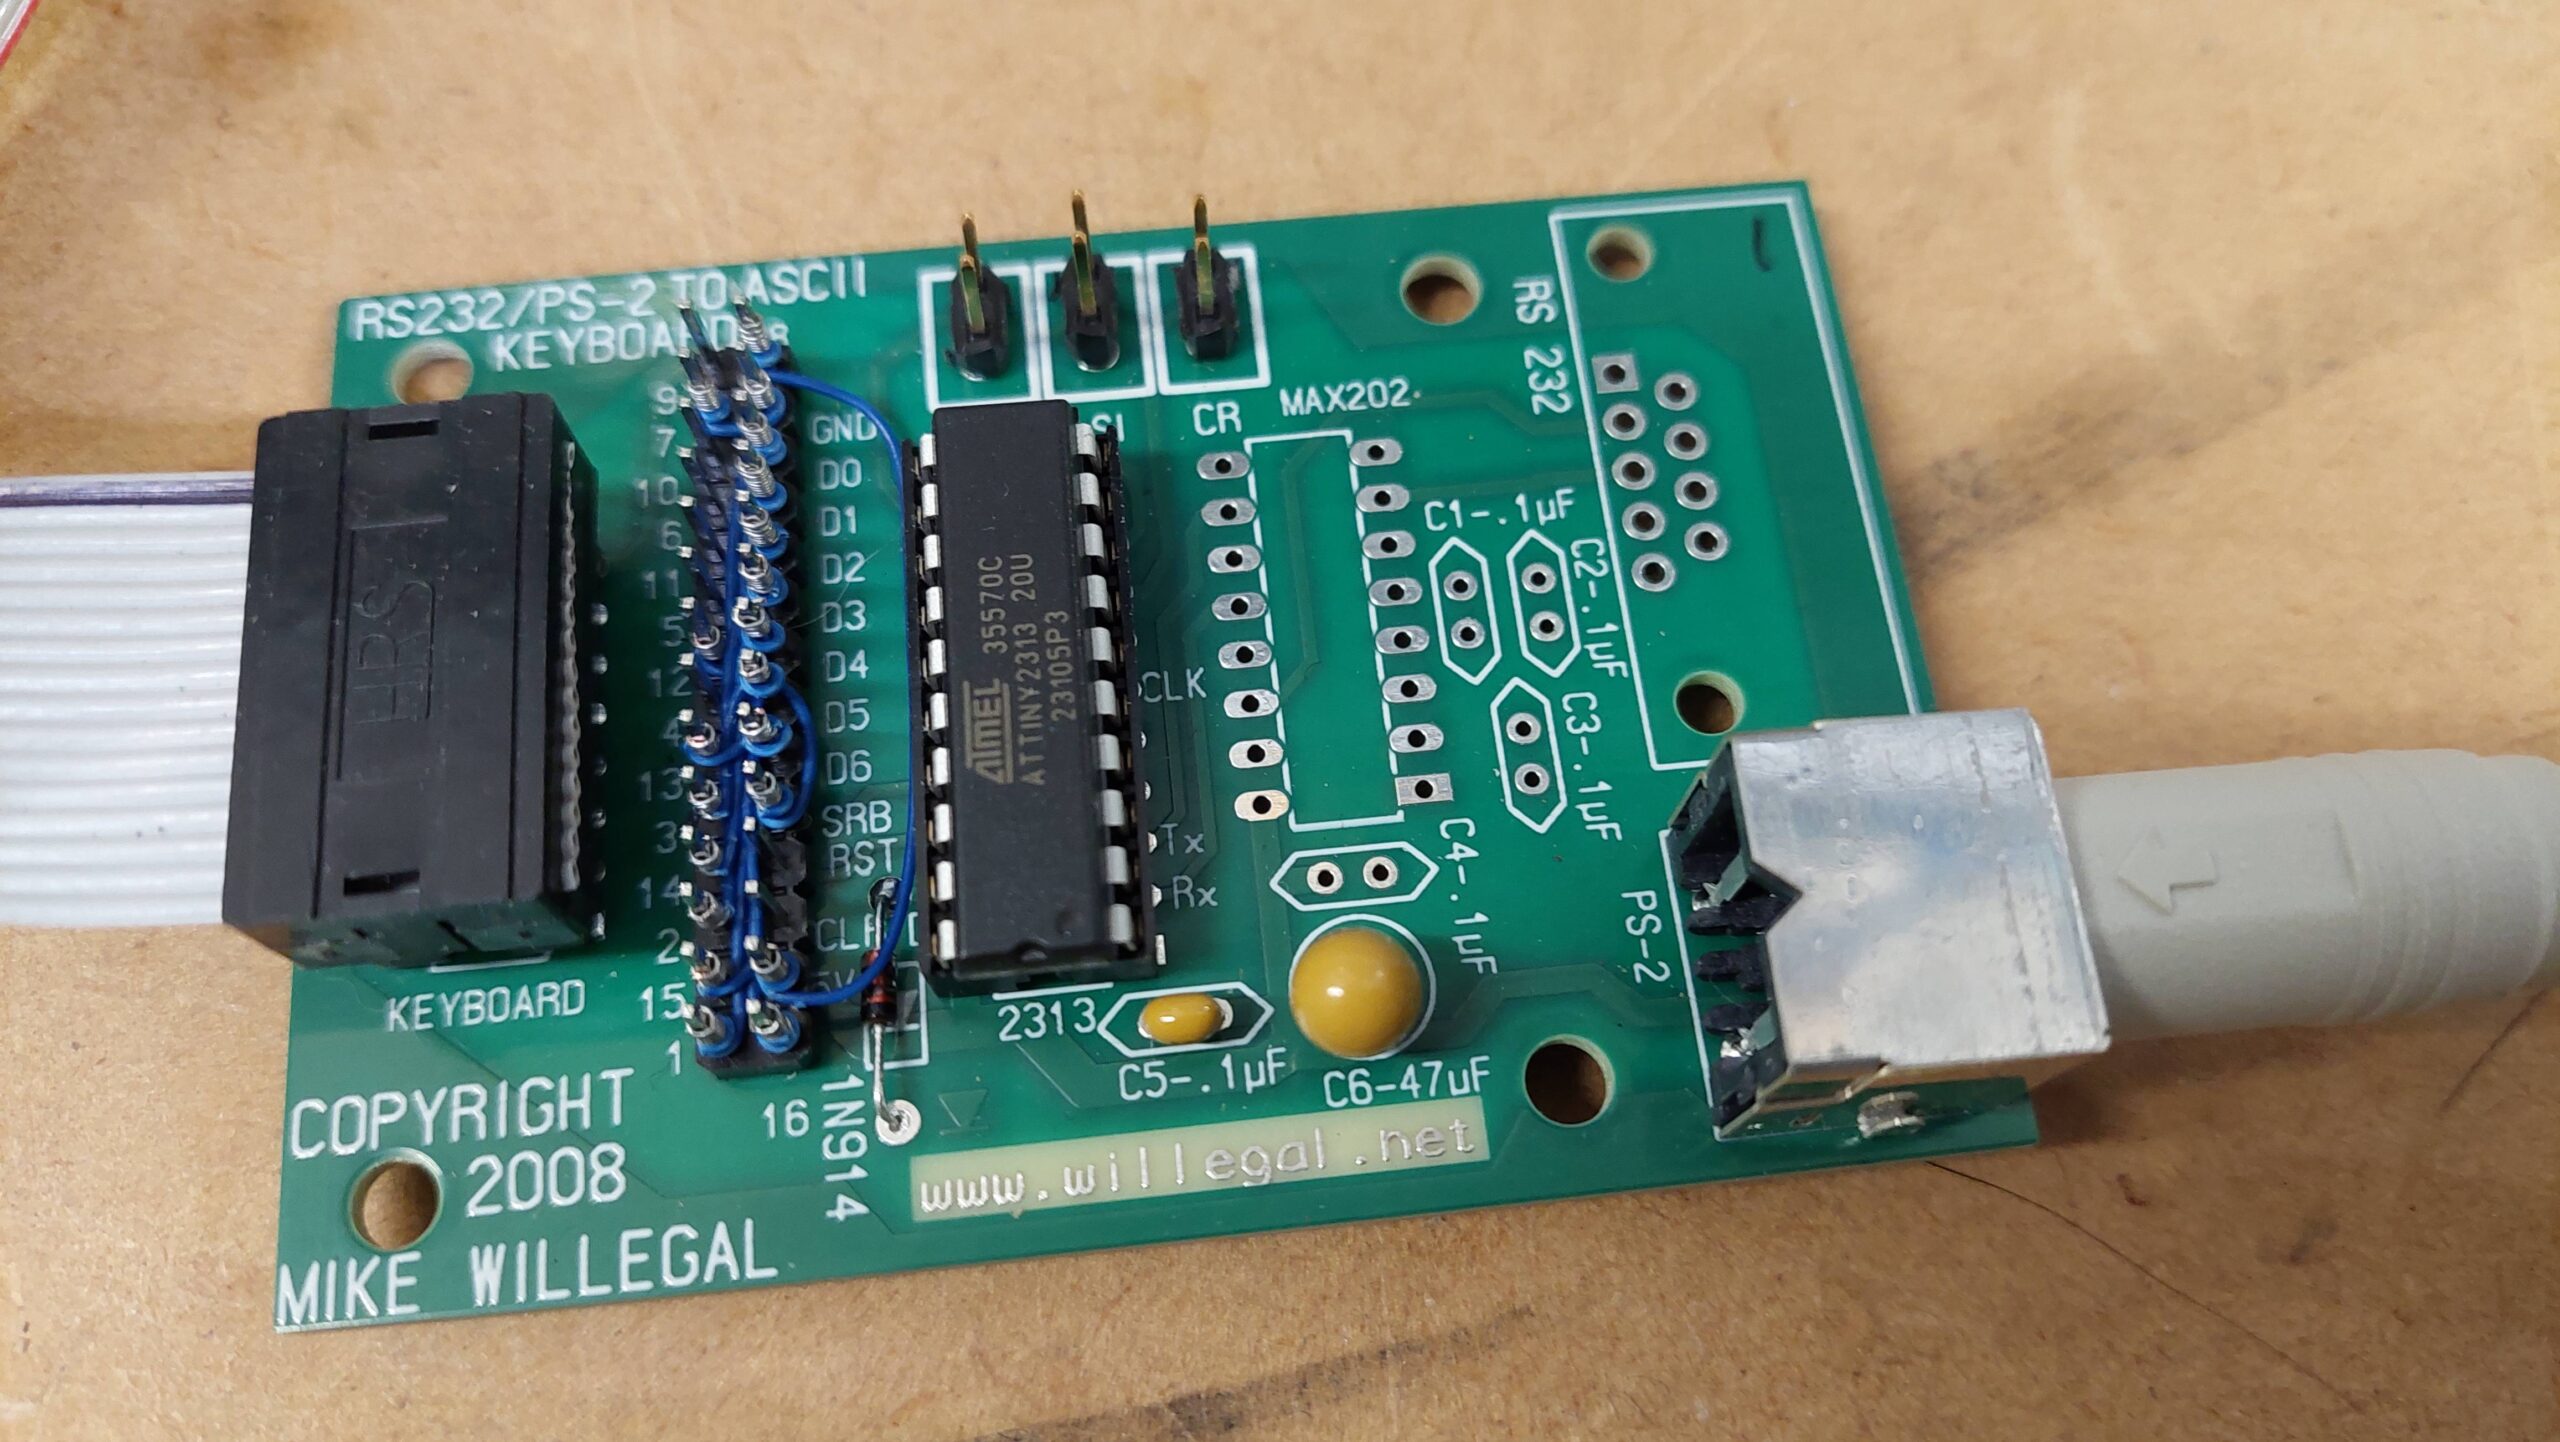
ASCII keyboards were apparently quite common at one time, but that seems no longer to be the case. Fortunately, a kind soul has developed and published a project that turns a PS/2 Keyboard into an ASCII keyboard:
Thanks Mike, for taking the time to do the design and for publishing it.
The project PCB is available from PCBway so i got 10 boards made for not much. It uses an attiny microcontroller which was easy to program with the provided hex file.
The PCB is setup to allow for any pinout. I buzzed out terminal board to find the pins that were used. The data lines were connected to the MC6821. The order of the data pins wasn’t obvious, so i took a guess and jumped up an initial configuration. Then i watched the terminal serial output on the scope to see what i got. After sorting out the bit order it was good to go. Then i replaced the jumpers with wire-wrap.
Terminal Header Pin
6821 Pin Function
6821 Pin Number
Adapter DIP Pin
Pin Function
1
8
+5V
2
9
3
7
GND
4
10
GND
5
6
6
11
7
CB2
19
5
8
CB1
18
12
STB
9
4
10
PB0
16
13
D6
11
PB1
15
3
D5
12
PB2
14
14
D4
13
PB3
13
2
D3
14
PB4
12
15
D2
15
PB5
11
1
D1
16
PB6
10
16
D0
The Little Video Board is now a going concern. It can be used standalone or placed in the STD rack with the host computer. I have a few of these cards so it has been worth the time to get this going.
The 7864 is an 8088 processor card with RAM and ROM intended for a multiprocessor environment. The ROM may contain a monitor, but i have no information on it. It is even possible that it uses the 7303 Keyboard & Display Card.
I do have a manual for this board, but with so much undisclosed programmable logic it would be difficult to find faults. I would probably start with an off the shelf monitor and customise it for this board and a suitable serial card.
This card was originally set up as a slave, but i have converted it to a master. The resistor pack is a bit rough.
I tried this card with the only likely serial card match, but i did not get a prompt.
The 7885 is a 8085A card with 2k of static RAM expandable to and provision for an 8k EPROM.
I have not been able to find a lot of information on this card. It appears to be an enhanced 7801 with higher density and, perhaps, bus sharing.
It includes a serial port that uses the 8085 serial channel. It did have an EPROM installed but, i suspect that like the other cards, it requires a 7303 Keyboard & Display Card.
I attempted to use the SDK-85 ROM as per the 7801 card, but to date i have not achieved a sign-on message. There may be some additional initialisation required.