MicroVAX I Software

My impressionwas that getting software to run on the MicroVAX would be challenging.

The base operating system includes a simple editor and a macro assembler.

The hard disk is predominantly filled with Security Toolkit development stuff which was written in assembler and is of most interest to security specialists. There were three games disks, but the first had deteriorated badly. I was able to retrieve the Startrek game from the others.

There are several text games (including StarTrek) at:

https://www.openvmshobbyist.com/downloads.php?cat_id=3

These would need to be put on to a disk image or transferred in some other way.

There are several versions of MicroVMS available in RX50 format which is a good start. There is also a set of diagnostics available in RX50 format.

VAX C 2.2, 2.3, and 2.4 are available in RX50 format. I was able to install 2.2:

There are a few other items in TAP format for a TK50 but i would need to be able to convert them to disks on an emulator – perhaps the Microvax II simh emulator. These tapes include BASIC (3.3), Cobol (5.2), and Fortran (4.7). I think both the BASIC and Cobol require VMS 5. The Fortran may be ok with MicroVMS 4.

I also have about 50 TK50 tapes which could contain anything. I have no means to read them. The Australian Computer Museum is set up to read these tapes, but it would be quite an exercise to archive them all and may yield not much.

A lot of possibilities opened up when i realised a “Rosetta VAX” could be built as an emulation.

MicroVAX I VAX C Installation

I discovered a VAX C compiler on bitsavers:

https://ftpmirror.your.org/pub/misc/bitsavers/bits/DEC/vax/vms/RX50

Failed installations can be problematic so i did a rehearsal on simh using an image of the physical disk. I had to clear some space by deleting files in dua0:[development].

The first disk has to be mounted as foreign.

$ mount /foreign dua1:
$ @sys$update:vmsinstal vaxc022 dua1:


        VAX/VMS Software Product Installation Procedure V4.4


It is 28-APR-2026 at 17:46.
Enter a question mark (?) at any time for help.

* Are you satisfied with the backup of your system disk [YES]?

Please mount the first volume of the set on DUA1:.
* Are you ready? y
%MOUNT-I-MOUNTED, VAXC01       mounted on _ANJIN$DUA1:

The following products will be processed:

  VAXC V2.2


        Beginning installation of VAXC V2.2 at 17:46

%VMSINSTAL-I-RESTORE, Restoring product saveset A...
%BACKUP-I-READYREAD, mount volume 2 on _ANJIN$DUA1: for reading
Enter "YES" when ready:
Simulation stopped, PC: 80008B1F (BRB 80008B1F)
sim> at rq1 v22d2_BL-CS92D-BE.dsk
sim> c
y
%BACKUP-I-READYREAD, mount volume 3 on _ANJIN$DUA1: for reading
Enter "YES" when ready:
Simulation stopped, PC: 80008B1F (BRB 80008B1F)
sim> at rq1 v22d3_BL-CS93D-BE.dsk
sim> c
y
%BACKUP-I-READYREAD, mount volume 4 on _ANJIN$DUA1: for reading
Enter "YES" when ready:
Simulation stopped, PC: 80008B1F (BRB 80008B1F)
sim> at rq1 v22d4_BL-ey93c-BE.dsk
sim> c
y

        VAX C V2.2-015 Installation is commencing ...

* Do you want to run the IVP after the installation [YES]?
* Do you want to purge files replaced by this installation [YES]?
* Do you want to extract .H files from the text library [YES]?
        VAX C V2.2-015 : copying images and libraries.
        VAX C V2.2-015 : extracting .H files.

        A summary of the Software Performance Reports (SPRs) for this release
        can be found in the file SYS$LIBRARY:VAXCSPR.DAT.


        Your VMS system will now be updated to inculde the following new
        and modified files:

        SYS$SYSTEM:VAXC.EXE             [new]
        SYS$LIBRARY:VAXCDEF.TLB         [new]
        SYS$LIBRARY:VAXCSPR.DAT         [new]
        SYS$MESSAGE:VAXCERR.EXE         [new]
        SYS$MESSAGE:VAXCVCGERR.EXE      [new]
        SYS$MESSAGE:VAXCCRXERR.EXE      [new]
        SYS$HELP:HELPLIB.HLB            [modified]
        SYS$LIBRARY:DCLTABLES.EXE       [modified]
        SYS$EXAMPLES:VAXCIVPP.C         [new]
        SYS$EXAMPLES:VAXCIVPC.C         [new]

        VAX C V2.2-015 Installation completed successfully.

%VMSINSTAL-I-MOVEFILES, Files will now be moved to their target directories...

        VAX C V2.2-015 Installation Verification Procedure commencing ...


****** VAX C Installation Certification Procedure SUCCESSFUL ******


        VAX C V2.2-015 Installation Verification Procedure completed successfull
y.


        Installation of VAXC V2.2 completed at 17:47


        VMSINSTAL procedure done at 17:47


$ cc
_File: fghgf
%CC-F-OPENIN, error opening SYS$SYSROOT:[SYSMGR]FGHGF.C; as input
-RMS-E-FNF, file not found

$ ls dua0:[000000]
%DCL-W-IVVERB, unrecognized command verb - check validity and spelling
 \LS\
$ dir dua0:[000000]

Directory DUA0:[000000]

000000.DIR;1        ANJIN.DIR;1         BACKUP.SYS;1        BADBLK.SYS;1
BADLOG.SYS;1        BITMAP.SYS;1        CONTIN.SYS;1        CORIMG.SYS;1
DEVELOPMENT.DIR;1   INDEXF.SYS;1        JEFF.DIR;1          JENNY.DIR;1
LEND_LEASE.DIR;1    NONPRIV.DIR;1       ORMR.DIR;1
OTHER_DEVELOPMENT.DIR;1                 PAPERS.DIR;1        QUOTES.DIR;1
REXONA.DIR;1        SALES.DIR;1         SECURE.DIR;1        SECURITY.DIR;1
STKV2.DIR;1         SYS0.;1             SYS0.DIR;1          SYSEXE.DIR;1
SYSMAINT.DIR;1      SYSWORK.DIR;1       TAPE_LIBRARY.DIR;1  TESTS.DIR;1
TRAINING.DIR;1      USER.DIR;1          V5_DEVELOPMENT.DIR;1
VOLSET.SYS;1

Total of 34 files.
$ dir [000000...]*.c

Directory SYS$SYSROOT:[000000.SYSHLP.EXAMPLES]

VAXCIVPC.C;1        VAXCIVPP.C;1

Total of 2 files.
$ set def SYS$SYSROOT:[000000.SYSHLP.EXAMPLES]
$ cc vaxcivpc
$ dir

Directory SYS$SYSROOT:[000000.SYSHLP.EXAMPLES]

VAXCIVPC.C;1        VAXCIVPC.OBJ;1      VAXCIVPP.C;1        XADRIVER.MAR;1
XALINK.MAR;1        XAMESSAGE.MAR;1     XATEST.COM;1        XATEST.FOR;1

Total of 8 files.
$ cc vaxcivppp
%CC-F-OPENIN, error opening SYS$SYSROOT:[000000.SYSHLP.EXAMPLES]VAXCIVPPP.C; as
input
-RMS-E-FNF, file not found

$ cc vaxcivpp
$ dir /size

Directory SYS$SYSROOT:[000000.SYSHLP.EXAMPLES]

VAXCIVPC.C;1              2
VAXCIVPC.OBJ;1            2
VAXCIVPP.C;1             69
VAXCIVPP.OBJ;1           37
XADRIVER.MAR;1           93
XALINK.MAR;1              5
XAMESSAGE.MAR;1          21
XATEST.COM;1              1
XATEST.FOR;1             10

Total of 9 files, 240 blocks.
$

I think i can be fairly confident that VAX C V2.2 will install on the physical system.

MicroVAX I Kermit Installation

I have not found (so far) a utility that can write a file to a Files-11 ODS 2 disk format. There are some that can extract files, but not none that can inject them. I’d like to be wrong on this.

It is possible to transfer text files to the simh Microvax by simply using the Create command and then pouring text in at the command line eg by copy and paste in the emulation. Source code for a hex-to-bin converter can be sent as assembly code and then assembled and linked on the MicroVAX I to create the EXE. Binary files can then be transferred as hex and that program used to reconstitute the original binary file.

Once on simh they can be written to floppy disk and transferred to the physical MicroVAX.

In practice, the size of the text files that can be poured into the command line without error is too small, so a better solution is required.

Kermit provides a potential solution:

https://www.kermitproject.org

It is a very handy communications program with clients for a vast number of operating systems. Most (perhaps all) implementations support the transfer of text files. Some implementations support the transfer of binary files. For those that only support text, binary files must be converted to text eg as an intel hex format, transferred, and then converted back to binary.

The first version of kermit (kermit32) for VMS supports binary transfers, but apparently VMS binary files don’t always survive the experience. I don’t really understand why, but it reminds me of the Apple Mac experience with file forks.

Anyway, it is able to transfer a large hex file, and its own hex file is small enough that it can be successfully poured into a create command, together with an assembly language program that allows it to be reconstituted as an EXE.

Kermit32 can then be used to transfer a later kermit version (196) which does fully support binary transfers. After that the sky is the limit. (Spoiler alert – this didn’t work out well.)

Doing all this on a PC has some advantages – not least of which is that i can mount a second disk so that i have more working space – hex files are quite large and the available space on the system disk is small.

Simh allows a Microvax serial port to be allocated a host serial port. That port could be connected to another PC running Kermit. However, with the aid of com0com it is possible to create and link two virtual serial ports and connect one to the simh Microvax and the other to Kermit running on the same PC. I linked two virtual ports: Com5 and Com6.

In this context, i’m not sure that changing the baud rate makes any difference at all, but just in case, i used a baud rate of 19200.

I adapted the instructions here for the simh environment:

https://www.kermitproject.org/ckvins.html

Importantly, i found that kermit32 processes ascii lines as records, each of which is terminated in a CR/LF. Unfortunately, the hex files must have come from a unix system so there was a LF but no CR. This resulted in random CRLFs appearing in the transferred file.

I added the CR using the CR utility that comes with CPMTools:

c:> cr ckermit196.hex ckermit196cr.hex

I find that no two kermit implementations are ever the same, so even with instructions, there is always a little experimenting to be done.

At the PC i did:

C-Kermit> set line COM5
C-Kermit> set carrier-watch off
C-Kermit> server

On simh:

simh> SHOW SERIAL
Serial devices:
 ser0   CNCA0 (\Device\com0com10)
 ser1   CNCB0 (\Device\com0com20)
 ser2   COM1  (\Device\Serial0)
 ser3   COM5  (\Device\com0com21)
 ser4   COM6  (\Device\com0com11)
simh> AT DZ LINE=0, CONNECT=SER4

On VMS:

$ SET TERMINAL /PERMANENT /SPEED=(19200,19200) TTA0:
$ SET DEF DUA3:[kermit]
$ RUN K32

On kermit (K32):

Kermit-32> SET LINE TTA0:
Kermit-32> GET ckermit196cr.hex

Back to VMS:

$ run vmsdeh
Please type the file name: CKERMIT196CR.HEX;1

ckv196-vax-vms55-nonet.exe

$ run ckv196-vax-vms55-nonet.exe
%DCL-W-ACTIMAGE, error activating image SORTSHR
-CLI-E-IMGNAME, image file DUA0:[SYS0.][SYSLIB]SORTSHR.EXE
-SYSTEM-F-SHRIDMISMAT, ident mismatch with shareable image

And that, folks, is why one should read the fine print. This executable really needs open VMS 5.5. In this game of snakes and ladders, i am now proceeding down a very long snake.

There is a version of ckermit196 available for VMS 4.4, but it is in the form of an executable archive which i cannot transfer with kermit32.

I would either need to find and download the sources and build it on the microvax, or transfer it on to another simh machine that is setup with a TCP/IP stack and an FTP program. This probably implies OpenVMS 5 which has no licensing facility at present. I am snookered.

For now i will need to be content with transferring c sources via kermit32.

MicroVAX I A Rosetta VAX

I started searching for hard disk images that might hold some interesting software and i happened upon this gem: VAX/VMS v4.7 “Turnkey” Distribution.

This site provides a simh setup for a very sophisticated VMS 4.7 VAX. It is fully featured – so fully featured that it is a struggle for a mortal like me to do the simplest of operations. Two distributions are required – one for the VAX 8650 setup and the other with all the distribution media.

My eye lit up when i saw the distribution media which includes various programming languages and the All-In-One office programs. This is the best collection of installation media that i have found so far. It comes in various forms though including CDs, floppy disks, TK50 tapes, TU58 tapes, and 9 track tapes.

To exploit this variety of media, the 8650 setup has to have a lot of I/O devices and this makes it the rosetta stone for DEC media. My current options for reading media are limited. The physical MicroVAX I has only an RX50 floppy drive but one day it may have a solid state hard drive. Similarly, the MicroVAX I simh emulation has an RX50 and two hard drives. Conveniently though these hard drives can accept images from some other systems – even CDs.

My thought was that, if i instantiate this turnkey system, then i might be able to transfer some installation kits from the media library to a hard disk image. Then i could move the hard disk image from the emulated 8250 to the emulated MicroVAX I (or even a solid state hard disk on the physical MicroVAX I). I may also be able to move the kits to RX50 floppy disks for installation on the physical machine.

The first step was to instantiate the 8650 system above. I downloaded the two archives and copied the dist folder from the media tree into the turnkey system tree. I added the 8650 simh executable from the simh distribution. The 8650.ini file was provided as part of the turnkey system.

The setup procedure is provided in a readme.txt file. You fire up the 8650 executable and then initiate the installation. Then you stand back as it all happens. There’s a lot going on!

Eventually there is a setup dialog for passwords and networking – i won’t lie – much of this was completely overwhelming. I wasn’t losing too much sleep over the networking as that’s not my goal at the moment.

At the end, i could log in as “system” using the default password.

Show devices revealed a beast.
$ sh dev

Device                  Device           Error    Volume         Free  Trans Mnt
 Name                   Status           Count     Label        Blocks Count Cnt
795VAX$DDA0:            Online               0
795VAX$DDA1:            Online               0
795VAX$DJB2:            Online               0
795VAX$DMA0:            Online               0
795VAX$DMA1:            Online               0
795VAX$DRA0:            Mounted              0  HOM0           1005738     1   1
795VAX$DRA1:            Mounted              0  HOM1           1005741     1   1
795VAX$DRA2:            Online               0
795VAX$DUA0:            Mounted              0  VAXVMSRL4       233458   272   1
795VAX$DUA1:            Mounted              0  SHARE0         1213896     6   1
795VAX$DUA2:            Mounted              0  SHARE1         1198935    12   1
795VAX$DUA3:            Mounted              0  SHARE2         1181223     9   1
795VAX$DUB0:            Mounted              0  SPOOL0          244566     2   1
795VAX$DUB1:            Mounted              0  SPOOL1          244623    11   1
795VAX$DUC0:            Online               0
795VAX$DUD0:            Online               0
795VAX$DUD1:            Online               0

Device                  Device           Error    Volume         Free  Trans Mnt
 Name                   Status           Count     Label        Blocks Count Cnt
795VAX$MSA0:            Mounted alloc        0     PASCAL            0     1   1
795VAX$MTA0:            Online alloc         0
795VAX$MTA1:            Online alloc         0
795VAX$MTA2:            Online alloc         0
795VAX$MTA3:            Online alloc         0

Device                  Device           Error
 Name                   Status           Count
OPA0:                   Online               0
RTA0:                   Offline              0
RTB0:                   Offline              0
TDA0:                   Offline              0
TXA0:                   Online               0
TXA1:                   Online               0
TXA2:                   Online               0
TXA3:                   Online               0
TXA4:                   Online               0
TXA5:                   Online               0
TXA6:                   Online               0
TXA7:                   Online               0
TXA8:                   Online               0
TXA9:                   Online               0
TXA10:                  Online               0
TXA11:                  Online               0
TXA12:                  Online               0
TXA13:                  Online               0
TXA14:                  Online               0
TXA15:                  Online               0
TXB0:                   Online               0
TXB1:                   Online               0
TXB2:                   Online               0
TXB3:                   Online               0
TXB4:                   Online               0
TXB5:                   Online               0
TXB6:                   Online               0
TXB7:                   Online               0
TXB8:                   Online               0
TXB9:                   Online               0
TXB10:                  Online               0
TXB11:                  Online               0
TXB12:                  Online               0
TXB13:                  Online               0
TXB14:                  Online               0
TXB15:                  Online               0
TXC0:                   Online               0
TXC1:                   Online               0
TXC2:                   Online               0
TXC3:                   Online               0
TXC4:                   Online               0
TXC5:                   Online               0
TXC6:                   Online               0
TXC7:                   Online               0
TXC8:                   Online               0
TXC9:                   Online               0
TXC10:                  Online               0
TXC11:                  Online               0
TXC12:                  Online               0
TXC13:                  Online               0
TXC14:                  Online               0
TXC15:                  Online               0
TXD0:                   Online               0
TXD1:                   Online               0
TXD2:                   Online               0
TXD3:                   Online               0
TXD4:                   Online               0
TXD5:                   Online               0
TXD6:                   Online               0
TXD7:                   Online               0
TXD8:                   Online               0
TXD9:                   Online               0
TXD10:                  Online               0
TXD11:                  Online               0
TXD12:                  Online               0
TXD13:                  Online               0
TXD14:                  Online               0
TXD15:                  Online               0
TZA0:                   Offline              0

Device                  Device           Error
 Name                   Status           Count
LPA0:                   Online alloc         0

Device                  Device           Error
 Name                   Status           Count
CRA0:                   Online               0
PUA0:                   Online               1
PUB0:                   Online               1
PUC0:                   Online               1
PUD0:                   Online               1
PYA0:                   Offline              0
XEA0:                   Online               0
XEA1:                   Online               0
XEA2:                   Online               0
XEA3:                   Online               0
XEA5:                   Online               0
XMA0:                   Online               0
XMB0:                   Online               0
XMC0:                   Online               0
XMD0:                   Online               0
$

I found it quite tricky to correlate the VMS devices with the simh devices. I’m sure this is obvious to the more experienced operators but in frustration i turned to AI (Gemini):

Device mapping
1. The MSCP Disks (DU)
In SIMH, you had four controllers (RQ, RQB, RQC, RQD). VMS has mapped them as follows:
•	DUA0 - DUA3: These are attached to SIMH's RQ controller. DUA0 is your system boot disk (VAXVMSRL4).
•	DUB0 - DUB1: These are attached to SIMH's RQB controller (labeled as SPOOL disks).
•	DUC0: This is the first unit on your SIMH RQC controller.
•	DUD0 - DUD1: These are the first two units on your SIMH RQD controller.
2. The Massbus Disks (DR)
•	DRA0 - DRA2: These map to your SIMH RP device (Massbus Adapter 0).
o	Note: VMS is calling them DR (typical for RP07/RM05) rather than DB because of the specific drive type set in SIMH. DRA0 and DRA1 are currently mounted as HOM0 and HOM1.
3. The Tapes (MT and MS)
•	MTA0 - MTA3: These map to your SIMH TU device (Massbus Adapter 1). VMS shows these as "Online alloc," meaning they are likely allocated to a process or initialized for use.
•	MSA0: This maps to your SIMH TS device (the TS11 tape emulator).
4. The "Old School" Disks (DA and DM)
•	DMA0 - DMA1: These map to your SIMH HK device (RK611/RK07).
•	DDA0 - DDA1: These map to your SIMH TDC device (the RX211/RX02 floppy controller).
5. The Oddball (DJB2)
•	DJB2: This is an RA-series disk on a KDJ11-B or similar controller. In your SIMH list, this corresponds to your CS (Console Storage) unit.

Actually, i also found that it was in the installation script for the turnkey installation.

I tried some experiments and found that the 8650 DUA3: hard disk Shared2 could be copied, and the image mounted on the emulated Microvax I. This opened up a transfer mechanism between the two machines.

I have struggled to get my head around the Storage Library System which seems to have control of MTA*:. The MSA0: device which is for 9 track tapes is unallocated and good to go.

I could then mount a 9 track tape image on MSA0 eg pascal.
$
Simulation stopped, PC: 80008B1F (BRB 80008B1F)
>>> at ts0 "L:\Users\Graham\Onedrive\Computers\_Other\Microvax I\telegraphics2\vms47\dist\media\16mt9\BB-Z912L-BE.tap"
>>> c
mount msa0: pascal
%MOUNT-I-MOUNTED, PASCAL mounted on _795VAX$MSA0:
$ dir msa0:

Directory MSA0:[]

PASCAL037.A;1             6  27-MAR-1988 00:00
PASCAL037.B;1            91  27-MAR-1988 00:00
PASSTR034.A;1            20  27-MAR-1988 00:00
PASCAL037.A;1             6  27-MAR-1988 00:00
PASCAL037.B;1            91  27-MAR-1988 00:00
PASSTR034.A;1            20  27-MAR-1988 00:00

Total of 6 files, 234 blocks.

Note that Ctrl-P is required to exit to the simh >>> prompt. By default, it is Ctrl-E.

The tape identifier can be found by mounting the tape with the/foreign option or just having a look at the media file with a hex editor.

The media distribution includes a spreadsheet that makes the association between media images and product identifiers. In this case pascal V3.7 is BB-Z912L-BE.tap. It also includes the volume labels.

Then the kit can be copied over to the transfer disk.
$ create/dir dua3:[kits]
$ create/dir dua3:[kits.pascal037]
$ copy msa0:*.* dua3:[kits.pascal037]*.* /log
%COPY-S-COPIED, MSA0:[]PASCAL037.A;1 copied to DUA3:[KITS.PASCAL037]PASCAL037.A;1 (6 records)
%COPY-S-COPIED, MSA0:[]PASCAL037.B;1 copied to DUA3:[KITS.PASCAL037]PASCAL037.B;1 (91 records)
%COPY-S-COPIED, MSA0:[]PASSTR034.A;1 copied to DUA3:[KITS.PASCAL037]PASSTR034.A;1 (20 records)
%COPY-S-COPIED, MSA0:[]PASCAL037.A;1 copied to DUA3:[KITS.PASCAL037]PASCAL037.A;2 (6 records)
%COPY-S-COPIED, MSA0:[]PASCAL037.B;1 copied to DUA3:[KITS.PASCAL037]PASCAL037.B;2 (91 records)
%COPY-S-COPIED, MSA0:[]PASSTR034.A;1 copied to DUA3:[KITS.PASCAL037]PASSTR034.A;2 (20 records)
%COPY-S-NEWFILES, 6 files created
$
Then the hard disk image, share2_795.vhd, can be copied and dropped into the Microvax I simh folder and mounted.
$
Simulation stopped, PC: 80008B1F (BRB 80008B1F)
sim> at rq3 share2_795.vhd
sim> c
$ mount dua3: share2
%MOUNT-I-MOUNTED, SHARE2       mounted on _ANJIN$DUA3:
%MOUNT-I-REBUILD, volume was improperly dismounted; rebuild in progress
$ dir dua3:[kits.pascal037]

Directory DUA3:[KITS.PASCAL037]

PASCAL037.A;2       PASCAL037.A;1       PASCAL037.B;2       PASCAL037.B;1
PASSTR034.A;2       PASSTR034.A;1

Total of 6 files.
And then the installation can proceed.
$ @sys$update:vmsinstal pascal037 dua3:[kits.pascal037]


        VAX/VMS Software Product Installation Procedure V4.4


It is 4-MAY-2026 at 19:37.
Enter a question mark (?) at any time for help.

* Are you satisfied with the backup of your system disk [YES]?


The following products will be processed:

  PASCAL V3.7


        Beginning installation of PASCAL V3.7 at 19:37

%VMSINSTAL-I-RESTORE, Restoring product saveset A...


        *-----------------------------------------*
        *    Installation Command Procedure for   *
        *             VAX PASCAL V3.7             *
        *-----------------------------------------*


* Do you want to purge files replaced by this installation [YES]?


    This kit contains a file summarizing the new features, changes,
    restrictions, and compatibility issues in this release of VAX
    PASCAL.  This file is named PASCAL037.RELEASE_NOTES and is
    placed in SYS$HELP:.

    This file contains information valuable to VAX PASCAL programmers.
    Please inform your user community of this file's existence.


    All questions regarding the installation have now been asked.
    The installation of VAX PASCAL V3.7 will now continue for
    approximately 5 to 120 minutes depending on your configuration.

%VMSINSTAL-I-RESTORE, Restoring product saveset B...

  Your VMS system will now be updated to include the following new and
  modified files:

    SYS$HELP:HELPLIB.HLB                   [modified]
    SYS$HELP:PASCAL037.RELEASE_NOTES       [new]
    SYS$LIBRARY:DCLTABLES.EXE              [modified]
    SYS$LIBRARY:LIBDEF.PAS                 [new]
    SYS$LIBRARY:MTHDEF.PAS                 [new]
    SYS$LIBRARY:PASDEF.PAS                 [new]
    SYS$LIBRARY:PASSTATUS.PAS              [new]
    SYS$LIBRARY:SIGDEF.PAS                 [new]
    SYS$MESSAGE:PASCALER1.EXE              [new]
    SYS$MESSAGE:PASCALER2.EXE              [new]
    SYS$SYSTEM:PASCAL.EXE                  [new]

%VMSINSTAL-I-MOVEFILES, Files will now be moved to their target directories...


        *-----------------------------------------*
        * Installation Verification Procedure for *
        *            VAX PASCAL V3.7              *
        *-----------------------------------------*


%PASCAL-F-SENDSPR, Internal Compiler Error
%PASCAL-I-SENDSPR, while processing routine PASCTEST at line 27
%PASCAL-F-ENDDIAGS, PASCAL completed with 1 diagnostic
%VMSINSTAL-F-UNEXPECTED, Installation terminated due to unexpected event.

        VMSINSTAL procedure done at 19:37

This process should work for the other 9 track tapes which include:

  • VAX C v2.4
  • VAX CDD v3.4-1
  • VAX CDD/Plus v4.0
  • VAX/VMS v4.6
  • VAX COBOL v4.1
  • DEC/MMS v2.4
  • VAX-11/RSX v2.3
  • VAX FORTRAN v4.8
  • DEC/CMS v3.0
  • VAX BLISS-32 v4.4
  • Data Interchange Library v2.0
  • VAX DATATRIEVE v4.1
  • VAX DATATRIEVE v4.2
  • VAX ALL-IN-1 v2.1
  • VAX Pascal v3.7
  • VAX Rdb/VMS V2.3-0
  • Matlab
I added two more TU devices in the 8650.ini file.
set TU4 enable, TU77
set TU5 enable, TU77

That got me tape devices MTA4: and MTA5: which are not captured by the Storage Library Service. I found i could mount both TU58 and TK50 cartridges on these devices. The TU58 tapes don’t seem to have a file structure but the TK50 cartridges bring in:

  • VAX BASIC v3.2 (needs >=VMS 4.5)
  • VAX/VMS v4.x 1–8 Users License
  • VAX/VMS v4.x 1–8 Users License
  • VAX/VMS v4.x 3–8 Users License
  • VAX GKS v3.0
  • VAX DBMS v4.0
  • Local Area VAXcluster v1.0

These are some that are on the openvms 5.0 CDs that are still good on VMS4, including:

  • RPG
  • LISPdel
  • APL
  • CDD
  • DIBOL

These distributions work with 4.7; they may not work with 4.4 that is currently on the physical MicroVAX I.

MicroVAX I Creating a New Image

Noting that some of the available software requires at least MicroVMS 4.5 i thought i would just create a new installation image to install of the physical machine.

This can be done using simh with the benefit of progressive backups. V4.7 seemed like the obvious candidate given that it seems to be well-supported by the VAX/VMS community.

There is a gnarly issue in that the available distribution seems to only be available in TK50 tape format and the Microvax I (even the emulated simh MicroVAX I) does not have a tape drive.

The solution suggested by https://microvax2.org, is to install on an emulated Microvax II and then migrate to the Microvax I. This can be done in one step by doing a standalone backup and restore, or in two steps by moving the disk image to the Microvax I emulation, adjusting it, and then using the standalone backup/restore to migrate to the physical device.

This last step, using the RQDX1 disk controller card and RX50 disk drive in the physical Microvax I, requires about 75 400kB floppy disks. It is a process that grows old quickly!

I opted for the two-step process so i could do some testing on the emulated MicroVAX I before doing the huge backup/restore.

Noting also that the physical Microvax has a 30MB RD52 hard disk and the RQDX1 disk controller i changed the MicroVAX II configuration to use the smaller RD52 drive rather than the RD54.

The migration from MicroVax II to MicroVAX I seemed to work ok. I ran sysgen in the hope that it would tidy up any residual issues.

$ run sys$system:sysgen
SYSGEN>  AUTOCONFIGURE ALL
SYSGEN>  EXIT
I also found that disk space with the RD52 is very tight. I reduced the pagefile.sys and swapfile.sys files to 4000 blocks (2MB) each and bravely ran a purge over the entire disk.
$ sh dev

Device                  Device           Error    Volume         Free  Trans Mnt
 Name                   Status           Count     Label        Blocks Count Cnt
DUA0:                   Mounted              0  MICROVMS          7360    25   1
DUA1:                   Online               0
DUA2:                   Online               0
DUA3:                   Mounted alloc        0  SHARE2         1160898     1   1

Device                  Device           Error
 Name                   Status           Count
OPA0:                   Online               0
RTA0:                   Offline              0
RTB0:                   Offline              0
TTA0:                   Online               0
TTA1:                   Online               0
TTA2:                   Online               0
TTA3:                   Online               0

Device                  Device           Error
 Name                   Status           Count
PUA0:                   Online               1
XQA0:                   Online               0
XQA1:                   Online               0$ sh mem
              System Memory Resources on  6-MAY-2026 15:26:40.61

Physical Memory Usage (pages):     Total        Free      In Use    Modified
  Main Memory (2.00Mb)              4096        1659        2166         271

Slot Usage (slots):                Total        Free    Resident     Swapped
  Process Entry Slots                 27          20           7           0
  Balance Set Slots                   24          19           5           0

Fixed-Size Pool Areas (packets):   Total        Free      In Use        Size
  Small Packet (SRP) List            101          21          80          96
  I/O Request Packet (IRP) List       68           6          62         208
  Large Packet (LRP) List             11           1          10        1584

Dynamic Memory Usage (bytes):      Total        Free      In Use     Largest
  Nonpaged Dynamic Memory         242176       34416      207760       30224
  Paged Dynamic Memory            138240       56528       81712       55520

Paging File Usage (pages):                      Free      In Use       Total
  DISK$MICROVMS:[SYS0.SYSEXE]SWAPFILE.SYS       7040        1056        8096
  DISK$MICROVMS:[SYS0.SYSEXE]PAGEFILE.SYS      12628         164       12792

Of the physical pages in use, 1508 pages are permanently allocated to VMS.
$ run sys$system:sysgen
SYSGEN>  CREATE DISK$MICROVMS:[SYS0.SYSEXE]SWAPFILE.SYS /SIZE=4000
%SYSGEN-I-CREATED, DISK$MICROVMS:[SYS0.SYSEXE]SWAPFILE.SYS;2 created
SYSGEN>  CREATE DISK$MICROVMS:[SYS0.SYSEXE]PAGEFILE.SYS /SIZE=4000
%SYSTEM-W-DEVICEFULL, device full - allocation failure
SYSGEN>  EXIT
$ delete DISK$MICROVMS:[SYS0.SYSEXE]SWAPFILE.SYS;1
$ run sys$system:sysgen
SYSGEN>  CREATE DISK$MICROVMS:[SYS0.SYSEXE]PAGEFILE.SYS /SIZE=4000
%SYSGEN-I-CREATED, DISK$MICROVMS:[SYS0.SYSEXE]PAGEFILE.SYS;2 created
SYSGEN>  EXIT
$ delete DISK$MICROVMS:[SYS0.SYSEXE]PAGEFILE.SYS;1
$ sh dev

Device                  Device           Error    Volume         Free  Trans Mnt
 Name                   Status           Count     Label        Blocks Count Cnt
DUA0:                   Mounted              0  MICROVMS         20260    25   1
DUA1:                   Online               0
DUA2:                   Online               0
DUA3:                   Mounted alloc        0  SHARE2         1160898     1   1

Device                  Device           Error
 Name                   Status           Count
OPA0:                   Online               0
RTA0:                   Offline              0
RTB0:                   Offline              0
TTA0:                   Online               0
TTA1:                   Online               0
TTA2:                   Online               0
TTA3:                   Online               0

Device                  Device           Error
 Name                   Status           Count
PUA0:                   Online               1
XQA0:                   Online               0
XQA1:                   Online               0
$ dir sys$system:*.sys /size

Directory SYS$SYSROOT:[SYSEXE]

PAGEFILE.SYS;2         4000
SWAPFILE.SYS;2         4000

Total of 2 files, 8000 blocks.
$ dir sys$system:*.sys;* /size

Directory SYS$SYSROOT:[SYSEXE]

PAGEFILE.SYS;2         4000
SWAPFILE.SYS;2         4000

$ sh dev

Device                  Device           Error    Volume         Free  Trans Mnt
 Name                   Status           Count     Label        Blocks Count Cnt
DUA0:                   Mounted              0  MICROVMS         23178    25   1
DUA1:                   Online               0
DUA2:                   Online               0
DUA3:                   Mounted alloc        0  SHARE2         1160898     1   1

Device                  Device           Error
 Name                   Status           Count
OPA0:                   Online               0
RTA0:                   Offline              0
RTB0:                   Offline              0
TTA0:                   Online               0
TTA1:                   Online               0
TTA2:                   Online               0
TTA3:                   Online               0

Device                  Device           Error
 Name                   Status           Count
PUA0:                   Online               1
XQA0:                   Online               0
XQA1:                   Online               0

Hopefully, the 10MB or so that is now available is enough to install some languages.

A better solution maybe a second hard drive, but that will involve a very expensive solid state option. An alternative may be to network with an emulated server. That would be a steep learning curve, and it will require a significant investment in an ethernet card.

This gave me a basic working image for MicroVMS 4.7 on the MicroVAX I.

I started by installing the 4 languages that i had chosen: pascal, basic, fortran and C. These were installed automatically on the 8650 emulation so i used following extract from the 8650 installation log as a guide.
 $ @sys$update:vmsinstal basic032 MTA0:


        VAX/VMS Software Product Installation Procedure V4.7    


It is 3-MAY-1998 at 20:01.
Enter a question mark (?) at any time for help.

* Are you satisfied with the backup of your system disk [YES]? yes

Please mount the first volume of the set on MTA0:.
* Are you ready? yes

%MOUNT-I-MOUNTED, BASIC mounted on _795VAX$MTA0:

The following products will be processed:

  BASIC V3.2


        Beginning installation of BASIC V3.2 at 20:01

%VMSINSTAL-I-RESTORE, Restoring product saveset A...
%VMSINSTAL-I-RELMOVED, The products release notes have been successfully moved to SYS$HELP.

                VAX BASIC V3.2 Installation Procedure

   There are three possible installation options. They are described
   as follows: 

   1) Perform a normal installation of BASIC. 

   2) Install VAX/VMS system definitions text library only (10-45 minutes).

   3) Obtain a copy of the BASIC message text for modification. 

* Which option do you want to use [1]: 1
* Do you want to install the BASIC HELP files [YES]? yes
* Do you want to install the VAX/VMS system definitions [YES]? yes
* Do you want to install the sample graphics programs [YES]? yes
* Do you want to purge files replaced by this installation [YES]? yes

%VMSINSTAL-I-RESTORE, Restoring product saveset B...

    ************************************************************************
    If you have VAX GKS V2.0 or later on your system, VAX BASIC V3.2 allows 
    you to use graphics language statements.  The procedure:

        SYS$UPDATE:BASIC$GRAPHICS_IVP.COM

    will verify that VAX BASIC graphics capabilities work on your system.
    You must execute this procedure on a terminal with graphics capabilities.
    ************************************************************************

%VMSINSTAL-I-INSHELP, Installing BASIC Help files
%VMSINSTAL-I-RESTORE, Restoring product saveset C...
%VMSINSTAL-I-INSSTARLET, Installing BASIC system definitions
%VMSINSTAL-I-INSSTARLT1, Requires approximately 10 to 45 minutes
%VMSINSTAL-I-RESTORE, Restoring product saveset D...
%VMSINSTAL-I-INSSAMPLE, Installing sample programs and PICTURE libraries
%VMSINSTAL-I-RESTORE, Restoring product saveset E...
%VMSINSTAL-I-RESTORE, Restoring product saveset F...
%VMSINSTAL-I-SYSDISK, This product creates system disk directory VMI$ROOT:[SYSHLP.EXAMPLES.BASIC].

    *********************************************************************
    A number of sample programs demonstrating BASIC graphics statements
    have been copied to [SYSHLP.EXAMPLES.BASIC].  

    Read [SYSHLP.EXAMPLES.BASIC]BASIC_EXAMPLES.TXT for information on the 
    sample programs provided.
    *********************************************************************

%VMSINSTAL-I-MOVEFILES, Files will now be moved to their target directories...
%VMSINSTAL-I-RUNIVP, Executing installation verification procedure

%VMSINSTAL-I-IVPSUCCESS, VAX BASIC V3.2 Installation test PASSED

        Installation of BASIC V3.2 completed at 20:01


********************************************

        VMSINSTAL procedure done at 20:01


 $ @sys$update:vmsinstal pascal037,passtr034 MTA0:


        VAX/VMS Software Product Installation Procedure V4.7    


It is 3-MAY-1998 at 20:01.
Enter a question mark (?) at any time for help.

* Are you satisfied with the backup of your system disk [YES]? yes

Please mount the first volume of the set on MTA0:.
* Are you ready? yes

%MOUNT-I-MOUNTED, PASCAL mounted on _795VAX$MTA0:

The following products will be processed:

  PASCAL V3.7
  PASSTR V3.4


        Beginning installation of PASCAL V3.7 at 20:01

%VMSINSTAL-I-RESTORE, Restoring product saveset A...
%VMSINSTAL-I-RELMOVED, The products release notes have been successfully moved to SYS$HELP.
 
 
        *-----------------------------------------*
        *    Installation Command Procedure for   *
        *             VAX PASCAL V3.7             *
        *-----------------------------------------*
 
 
* Do you want to purge files replaced by this installation [YES]? yes


    This kit contains a file summarizing the new features, changes,
    restrictions, and compatibility issues in this release of VAX 
    PASCAL.  This file is named PASCAL037.RELEASE_NOTES and is
    placed in SYS$HELP:.  

    This file contains information valuable to VAX PASCAL programmers.  
    Please inform your user community of this file's existence.


    All questions regarding the installation have now been asked.  
    The installation of VAX PASCAL V3.7 will now continue for 
    approximately 5 to 120 minutes depending on your configuration.

%VMSINSTAL-I-RESTORE, Restoring product saveset B...

  Your VMS system will now be updated to include the following new and 
  modified files:

    SYS$HELP:HELPLIB.HLB                   [modified]
    SYS$HELP:PASCAL037.RELEASE_NOTES       [new]
    SYS$LIBRARY:DCLTABLES.EXE              [modified]
    SYS$LIBRARY:LIBDEF.PAS                 [new]
    SYS$LIBRARY:MTHDEF.PAS                 [new]
    SYS$LIBRARY:PASDEF.PAS                 [new]
    SYS$LIBRARY:PASSTATUS.PAS              [new]
    SYS$LIBRARY:SIGDEF.PAS                 [new]
    SYS$MESSAGE:PASCALER1.EXE              [new]
    SYS$MESSAGE:PASCALER2.EXE              [new]
    SYS$SYSTEM:PASCAL.EXE                  [new]

%VMSINSTAL-I-MOVEFILES, Files will now be moved to their target directories...
 
 
        *-----------------------------------------*
        * Installation Verification Procedure for *
        *            VAX PASCAL V3.7              *
        *-----------------------------------------*
 
 
** Successful Installation of VAX Pascal V3.7-254 on  3-May-1998 at 20:01 **

        Installation of PASCAL V3.7 completed at 20:01


        Beginning installation of PASSTR V3.4 at 20:01

%VMSINSTAL-I-RESTORE, Restoring product saveset A...
%VMSINSTAL-I-RELMOVED, The products release notes have been successfully moved to SYS$HELP.
 
 
        *-----------------------------------------------*
        * Installation Command Procedure for VAX PASCAL *
        *     libraries STARLET.PAS and STARLET.PEN     *
        *-----------------------------------------------*
 
 
* Do you want to purge files replaced by this installation [YES]? yes

    This kit contains a file summarizing the new features, changes,
    restrictions, and compatibility issues in this release of the
    VAX PASCAL STARLET library.  This file is named
    PASSTR034.RELEASE_NOTES and will be placed in SYS$HELP:.

    This file contains information valuable to VAX PASCAL programmers.
    Please inform your user community of this file's existence.


    All questions regarding the installation have now been asked.
    The installation of VAX PASCAL STARLET.PAS and STARLET.PEN
    will now continue for approximately 20 to 25 minutes.


    Your VMS system will now be updated to include the following new files.

         SYS$HELP:PASSTR034.RELEASE_NOTES
         SYS$LIBRARY:STARLET.PAS
         SYS$LIBRARY:STARLET.PEN

%VMSINSTAL-I-MOVEFILES, Files will now be moved to their target directories...
 
 
        *-----------------------------------------------*
        *    Installation Verification Procedure for    *
        *            VAX PASCAL STARLET V3.4            *
        *-----------------------------------------------*
 
 
** Successful Installation of VAX PASCAL STARLET libraries **

        Installation of PASSTR V3.4 completed at 20:01


        VMSINSTAL procedure done at 20:01


*****************************************************************


 $ @sys$update:vmsinstal fort048,fhlp048 MTA0:


        VAX/VMS Software Product Installation Procedure V4.7    


It is 3-MAY-1998 at 20:02.
Enter a question mark (?) at any time for help.

* Are you satisfied with the backup of your system disk [YES]? yes

Please mount the first volume of the set on MTA0:.
* Are you ready? yes

%MOUNT-I-MOUNTED, FORT mounted on _795VAX$MTA0:

The following products will be processed:

  FHLP V4.8
  FORT V4.8


        Beginning installation of FHLP V4.8 at 20:02

%VMSINSTAL-I-RESTORE, Restoring product saveset A...

        +-------------------------------------------------------+
        |          Installation of VAX FORTRAN V4               |
        |                     FORTRAN HELP                      |
        +-------------------------------------------------------+


        This  kit  contains two separate  HELP  files,  a  large
        version (approximately 600 blocks) including information
        on FORTRAN  language  features,  and  a  smaller version
        (approximately 100 blocks)  describing only the  FORTRAN
        command.  Both versions contain on-line release notes.

* Do you want to install the larger version of FORTRAN HELP [YES]? yes

        Your  VMS  system  will now be updated  to  include  the
        following new and modified file(s):

        SYS$HELP:HELPLIB.HLB            [modified]

%VMSINSTAL-I-MOVEFILES, Files will now be moved to their target directories...

        Installation of FHLP V4.8 completed at 20:02


        Beginning installation of FORT V4.8 at 20:02

%VMSINSTAL-I-RESTORE, Restoring product saveset A...
%VMSINSTAL-I-REWIND, The tape will be rewound to try again.
* Do you want to purge files replaced by this installation [YES]? yes
* Do you wish to have the VAX FORTRAN compiler installed [YES]? yes

        +-------------------------------------------------------+
        |          Installation of VAX FORTRAN V4               |
        |                       Compiler                        |
        +-------------------------------------------------------+


        This kit contains an Installation Verification Procedure
        to  verify the correct installation of the  VAX  FORTRAN
        compiler.

* Do you want to run the IVP after the installation [YES]? yes

        This kit contains a file, VAXFORUPD.MEM, summarizing the
        changes made  to the VAX FORTRAN compiler since its last
        release.

* How many copies would you like to print [0]: 0

        A new FORSYSDEF.TLB is available with this installation.

        In order to build your FORSYSDEF library, this procedure
        requires at least 5500 blocks of available  disk  space,
        most  of  which  is  used for temporary work files.  The
        FORSYSDEF library itself will  take  approximately  1500
        blocks  of  disk space upon completion of this procedure
        and will be placed in your SYS$LIBRARY area. 

                                  Note

        Before installing the kit, be sure to have read  section
        1.5.1.1, UPDATING FORSYSDEF.  It addresses  the question
        of when a new FORSYSDEF.TLB should be built.  

* Do you wish to build a new FORSYSDEF.TLB [NO]? yes

        Building FORSYSDEF.  This should take about 20 minutes.


        Your  VMS  system  will now be updated  to  include  the
        following new and modified file(s):


        SYS$SYSTEM:FORTRAN.EXE          [new]
        SYS$MESSAGE:FORTERR1.EXE        [new]
        SYS$MESSAGE:FORTERR2.EXE        [new]
        SYS$LIBRARY:FORTV4CLD.CLD       [new]
        SYS$TEST:FORTTEST.COM           [new]
        SYS$TEST:FORSYSDEFTST.COM       [new]
        SYS$LIBRARY:DCLTABLES.EXE       [modified]
        SYS$UPDATE:VAXFORUPD.MEM        [new]
        SYS$LIBRARY:FORSYSDEF.TLB       [new]

%VMSINSTAL-I-MOVEFILES, Files will now be moved to their target directories...

        +-------------------------------------------------------+
        |           Verification Command Procedure for          |
        |                      VAX FORTRAN                      |
        +-------------------------------------------------------+

VAX FORTRAN V4.8-276 TEST PASSED

        Installation of FORT V4.8 completed at 20:02


        VMSINSTAL procedure done at 20:02


*******************************************************************************
 $ @sys$update:vmsinstal vaxc024 MTA0:


        VAX/VMS Software Product Installation Procedure V4.7    


It is 3-MAY-1998 at 20:29.
Enter a question mark (?) at any time for help.

* Are you satisfied with the backup of your system disk [YES]? yes

Please mount the first volume of the set on MTA0:.
* Are you ready? yes

%MOUNT-I-MOUNTED, VAXC02 mounted on _795VAX$MTA0:

The following products will be processed:

  VAXC V2.4


        Beginning installation of VAXC V2.4 at 20:29

%VMSINSTAL-I-RESTORE, Restoring product saveset A...
%VMSINSTAL-I-RELMOVED, The products release notes have been successfully moved to SYS$HELP.
 
        VAX C V2.4-026 Installation is commencing ...
 
* Do you want to run the IVP after the installation [YES]? no
* Do you want to purge files replaced by this installation [YES]? yes
* Do you want to extract .H files from the text library [YES]? yes

 
 All the questions regarding the installation have 
 now been asked.  The installation will now continue
 for another 20 minutes.
 
%VMSINSTAL-I-RESTORE, Restoring product saveset B...
        VAX C V2.4-026 : copying images, libraries and release notes.
        VAX C V2.4-026 : extracting .H files.
 
        A summary of the Software Performance Reports (SPRs) for this release
        can be found in the file SYS$LIBRARY:VAXCSPR.DAT.
 
 
        VAX C V2.4-026 Installation is completed.
 
 
        Your VMS system will now be updated to include the following new
        and modified files:
 
        SYS$SYSTEM:VAXC.EXE             [new]
        SYS$LIBRARY:VAXCDEF.TLB         [new]
        SYS$LIBRARY:VAXCSPR.DAT         [new]
        SYS$MESSAGE:VAXCERR.EXE         [new]
        SYS$HELP:VAXC024.RELEASE_NOTES  [new]
        SYS$HELP:HELPLIB.HLB            [modified]
        SYS$LIBRARY:DCLTABLES.EXE       [modified]
        SYS$EXAMPLES:VAXCIVPP.C         [new]
        SYS$EXAMPLES:VAXCIVPC.C         [new]
%VMSINSTAL-I-MOVEFILES, Files will now be moved to their target directories...

        Installation of VAXC V2.4 completed at 20:29


        VMSINSTAL procedure done at 20:29

VAX Basic and VAX Fortran played nicely right from the start. VAX pascal 3.7 failed test compilations with an internal error. VAX C 2.4 required configuration files to link – apparently because of the absence of a library in a particular format. I tried different versions but got the same result. The C issue does have a workaround; it seems that the VMSCRTL.OBJ file is absent from the system – perhaps because i am using MicroVMS rather than VMS.

$ create test.c
#include <stdio.h>

int main() {
    printf("Hello, World! In C\n");
    return 1;
}
 Exit
$ cc test


$ link test
%LINK-W-NUDFSYMS, 2 undefined symbols:
%LINK-I-UDFSYM,         C$MAIN
%LINK-I-UDFSYM,         PRINTF
%LINK-W-USEUNDEF, undefined symbol C$MAIN referenced
        in psect $CODE offset %X00000006
        in module TEST file SYS$SYSROOT:[SYSMGR]TEST.OBJ;2
%LINK-W-USEUNDEF, undefined symbol PRINTF referenced
        in psect $CODE offset %X00000013
        in module TEST file SYS$SYSROOT:[SYSMGR]TEST.OBJ;2

$ create test.opt
SYS$LIBRARY:VAXCRTL/SHAREABLE

$ link test, test/options

$ run test
Hello, World! In C

The pascal issue was a mystery; i wondered if it was related to using a MicroVAX II installation on a MicroVAX I. I started reading about autogen and sysgen, and found a myriad of options described in what felt like a foreign language. It was overwhelming.

I am not proud, but i chose a 2026 solution in the form of AI – Gemini. It was not always correct, but i was able to paste in screen dumps which it used to make further corrections. In a couple of cases it broke the system, but that was ok because, working with an emulator, it is easy to take system disk snapshots and backtrack. Gemini gave quite specific instructions about what parameters to change and the process for updating the system. After a couple of hours it had seemingly resolved the issue with the pascal compiler internal issue.

The changes were as follows.
Comparing files working_params.dat and OLD_PARAMS.DAT
***** working_params.dat
!
VERSION="V4.7    "
CPUTYPE=7
SID=117441793
WSTYPE=0
MEMSIZE=4096
DISKSPEED=1
***** OLD_PARAMS.DAT
!
VERSION=" KG     "
CPUTYPE=8
SID=134217728
WSTYPE=0
MEMSIZE=32768
DISKSPEED=1
*****

***** working_params.dat
DISKSIZE=60480
NUM_DISK=4
NUM_TAPE=0
NUM_SCOM=2
NUM_CARD=0
NUM_TERM=7
NUM_LP=0
***** OLD_PARAMS.DAT
DISKSIZE=60480
NUM_DISK=3
NUM_TAPE=0
NUM_SCOM=1
NUM_CARD=0
NUM_TERM=15
NUM_LP=0
*****

***** working_params.dat
NUM_REALTIME=0
NUM_BUS=1
NUM_MAILBOX=0
***** OLD_PARAMS.DAT
NUM_REALTIME=0
NUM_BUS=2
NUM_MAILBOX=0
*****

***** working_params.dat
NUM_CI=0
NUM_ETHERNET=2
NUM_SERVER=1
NUM_HOST=1
DRIVER_NPAGEDYN=93886
DECNET="true"
***** OLD_PARAMS.DAT
NUM_CI=0
NUM_ETHERNET=1
NUM_SERVER=2
NUM_HOST=1
DRIVER_NPAGEDYN=107671
DECNET="true"
*****

***** working_params.dat
PEDRIVER_LOADED="false"
! Parameters specified in SYS$SYSTEM:OLDSITE2.DAT
! Parameters specified in SYS$SYSTEM:OLDSITE3.DAT
ACP_SWAPFLGS=14
TIMEPROMPTWAIT=65535
! Parameters specified in SYS$SYSTEM:OLDSITE4.DAT
DISK_QUORUM="                "
SCSNODE="        "
TTY_DEFCHAR2=4106
! Parameters specified in SYS$SYSTEM:VMSPARAMS.DAT
***** OLD_PARAMS.DAT
PEDRIVER_LOADED="false"
! Parameters specified in SYS$SYSTEM:VMSPARAMS.DAT
*****

***** working_params.dat
VMS$ACP_DATACHECK=2
VMS$ACP_MAXREAD=6
VMS$ACP_SWAPFLGS=14
***** OLD_PARAMS.DAT
VMS$ACP_DATACHECK=2
VMS$ACP_MAXREAD=12
VMS$ACP_SWAPFLGS=14
*****

***** working_params.dat
VMS$ACP_SYSACC=4
VMS$DUMPFILE=0
VMS$GBLPAGES=1415
VMS$GBLSECTIONS=52
VMS$IJOBLIM=8
VMS$IRPCOUNT=30
VMS$IRPCOUNTV=800
VMS$LGI_BRK_TMO=0
***** OLD_PARAMS.DAT
VMS$ACP_SYSACC=4
VMS$IRPCOUNT=30
VMS$IRPCOUNTV=2000
VMS$LGI_BRK_TMO=0
*****

***** working_params.dat
VMS$LGI_HID_TIM=0
VMS$LOCKIDTBL=40
VMS$LRPCOUNT=8
***** OLD_PARAMS.DAT
VMS$LGI_HID_TIM=0
VMS$LRPCOUNT=8
*****

***** working_params.dat
VMS$MPW_LOLIMIT=120
VMS$NPAGEDYN=120000
VMS$NPAGEVIR=256000
VMS$RESHASHTBL=20
VMS$RJOBLIM=10
VMS$SCSBUFFCNT=3
VMS$SCSRESPCNT=20
VMS$SRPCOUNT=60
VMS$SRPCOUNTV=1200
VMS$SWPOUTPGCNT=80
***** OLD_PARAMS.DAT
VMS$MPW_LOLIMIT=120
VMS$SRPCOUNT=60
VMS$SRPCOUNTV=3000
VMS$SWPOUTPGCNT=80
*****

***** working_params.dat
VMS$VMSIMAGES_GBLSECTIONS=17
! Parameters specified in SYS$SYSTEM:MODPARAMS.DAT
ADD_VIRTUALPAGECNT = 10000  ! Give the compiler more "virtual" room
MIN_PGFLQUOTA = 10000       ! Ensure your user account can use it
MIN_GBLPAGES = 3000
MIN_GBLSECTIONS = 100
MIN_VIRTUALPAGECNT = 12000
!
***** OLD_PARAMS.DAT
VMS$VMSIMAGES_GBLSECTIONS=17
!
! This data file should NOT be modified.  Users wishing to alter the
! data in this file should modify SYS$SYSTEM:MODPARAMS.DAT instead.
!
*****

***** working_params.dat
! This data file should NOT be modified.  Users wishing to alter the
! data in this file should modify SYS$SYSTEM:MODPARAMS.DAT instead.
!
***** OLD_PARAMS.DAT
*****

Memory size and CPU Type were obvious ones, but others were beyond me. MIN_GBLSECTIONS=100 was the last change that i made to get the Pascal compiler working.

But then, maybe it was not actually fixed. At random the error would return, and then, just as randomly, fix itself. A different conversation with Gemini suggested that the emulation was potentially part of the issue.

Throttle SIMH (The "Race Condition" Fix):If your host PC is very fast, SIMH can process instructions faster than the emulated VMS 4.7 clock/interrupt handlers expect, causing internal timing errors in the compiler's memory management.In your SIMH configuration file (or at the sim> prompt), try:

textsim> SET THROTTLE 1M

Use code with caution.(This slows the virtual VAX down to ~1 MIPS, closer to a real MicroVAX I speed, which often stabilizes older compilers).

Remarkably, this does seem to have settled the issue down. I have set the throttle to 300k as per the option in the microvax1.ini file. I cannot be sure whether the various other “optimisations” mattered at all!

I ended up sticking with earlier versions of C and Pascal just to minimise consumption of disk space.

I turned off networking via the SYS$SYSTEM:SYSTARTUP.COM file. The networking component could be removed. Practically, the system is already struggling so it is unlikely that i will add a network card unless i find more disk space and memory at a sensible cost.

I have less than 5MB of disk space left, but that should be enough to play with the compilers.

For the record, my microvax1.ini file is:
; ================================================
; microvax1.ini
; ================================================
;
; KD32 CPU
; 2 MSV11-QA = 2MB Memory (or 4 MSV11-PL)
; DZV11 Four-Channel Asynchronous Serial Interface
; RQDX1 Floppy/Fixed Disk Controller
; RX50 400KB 5.25" Dual Floppy Drive
; RD52 31MB 5.25" Fixed Disk
; DEQNA Ethernet Network Adapter

SET QUIET

SET CONSOLE LOG=uVMS_gen_installed_001.log

SET CPU IDLE=VMS

; Uncomment the next line if you want a more realistic MicroVAX I speed
SET THROTTLE 300K 
; This seems to help reduce pascal compiler errors.

SET CPU 2M

; The RD52 at 30MB is the largest drive supported by the RQDX1 Floppy/Fixed Disk Controller
SET RQ0 RD52
; Becomes DUA0:   
        
ATT RQ0 MicroVMS_47.rd52 
; This originally came from the MicroVAX II emulation.

SET RQ1 RX50
; Becomes DUA1:

SET RQ2 RX50
; Becomes DUA2:

SET RQ3 ENABLE
SET RQ3 RD52
; Becomes DUA3:

; This image is a copy of a drive on the 8650 emulation.  
; It has the software kits.

ATT RQ3 share2_795.vhd 

SET DZ ENABLE  
; The real machine does not have this card.
SET DZ LINES=4
ATT DZ 6666

SET LPT DIS
SET RL DIS 

SET XQ ENA    
; The real machine does not have this card.
SET XQ TYPE=DEQNA

BOOT RQ0

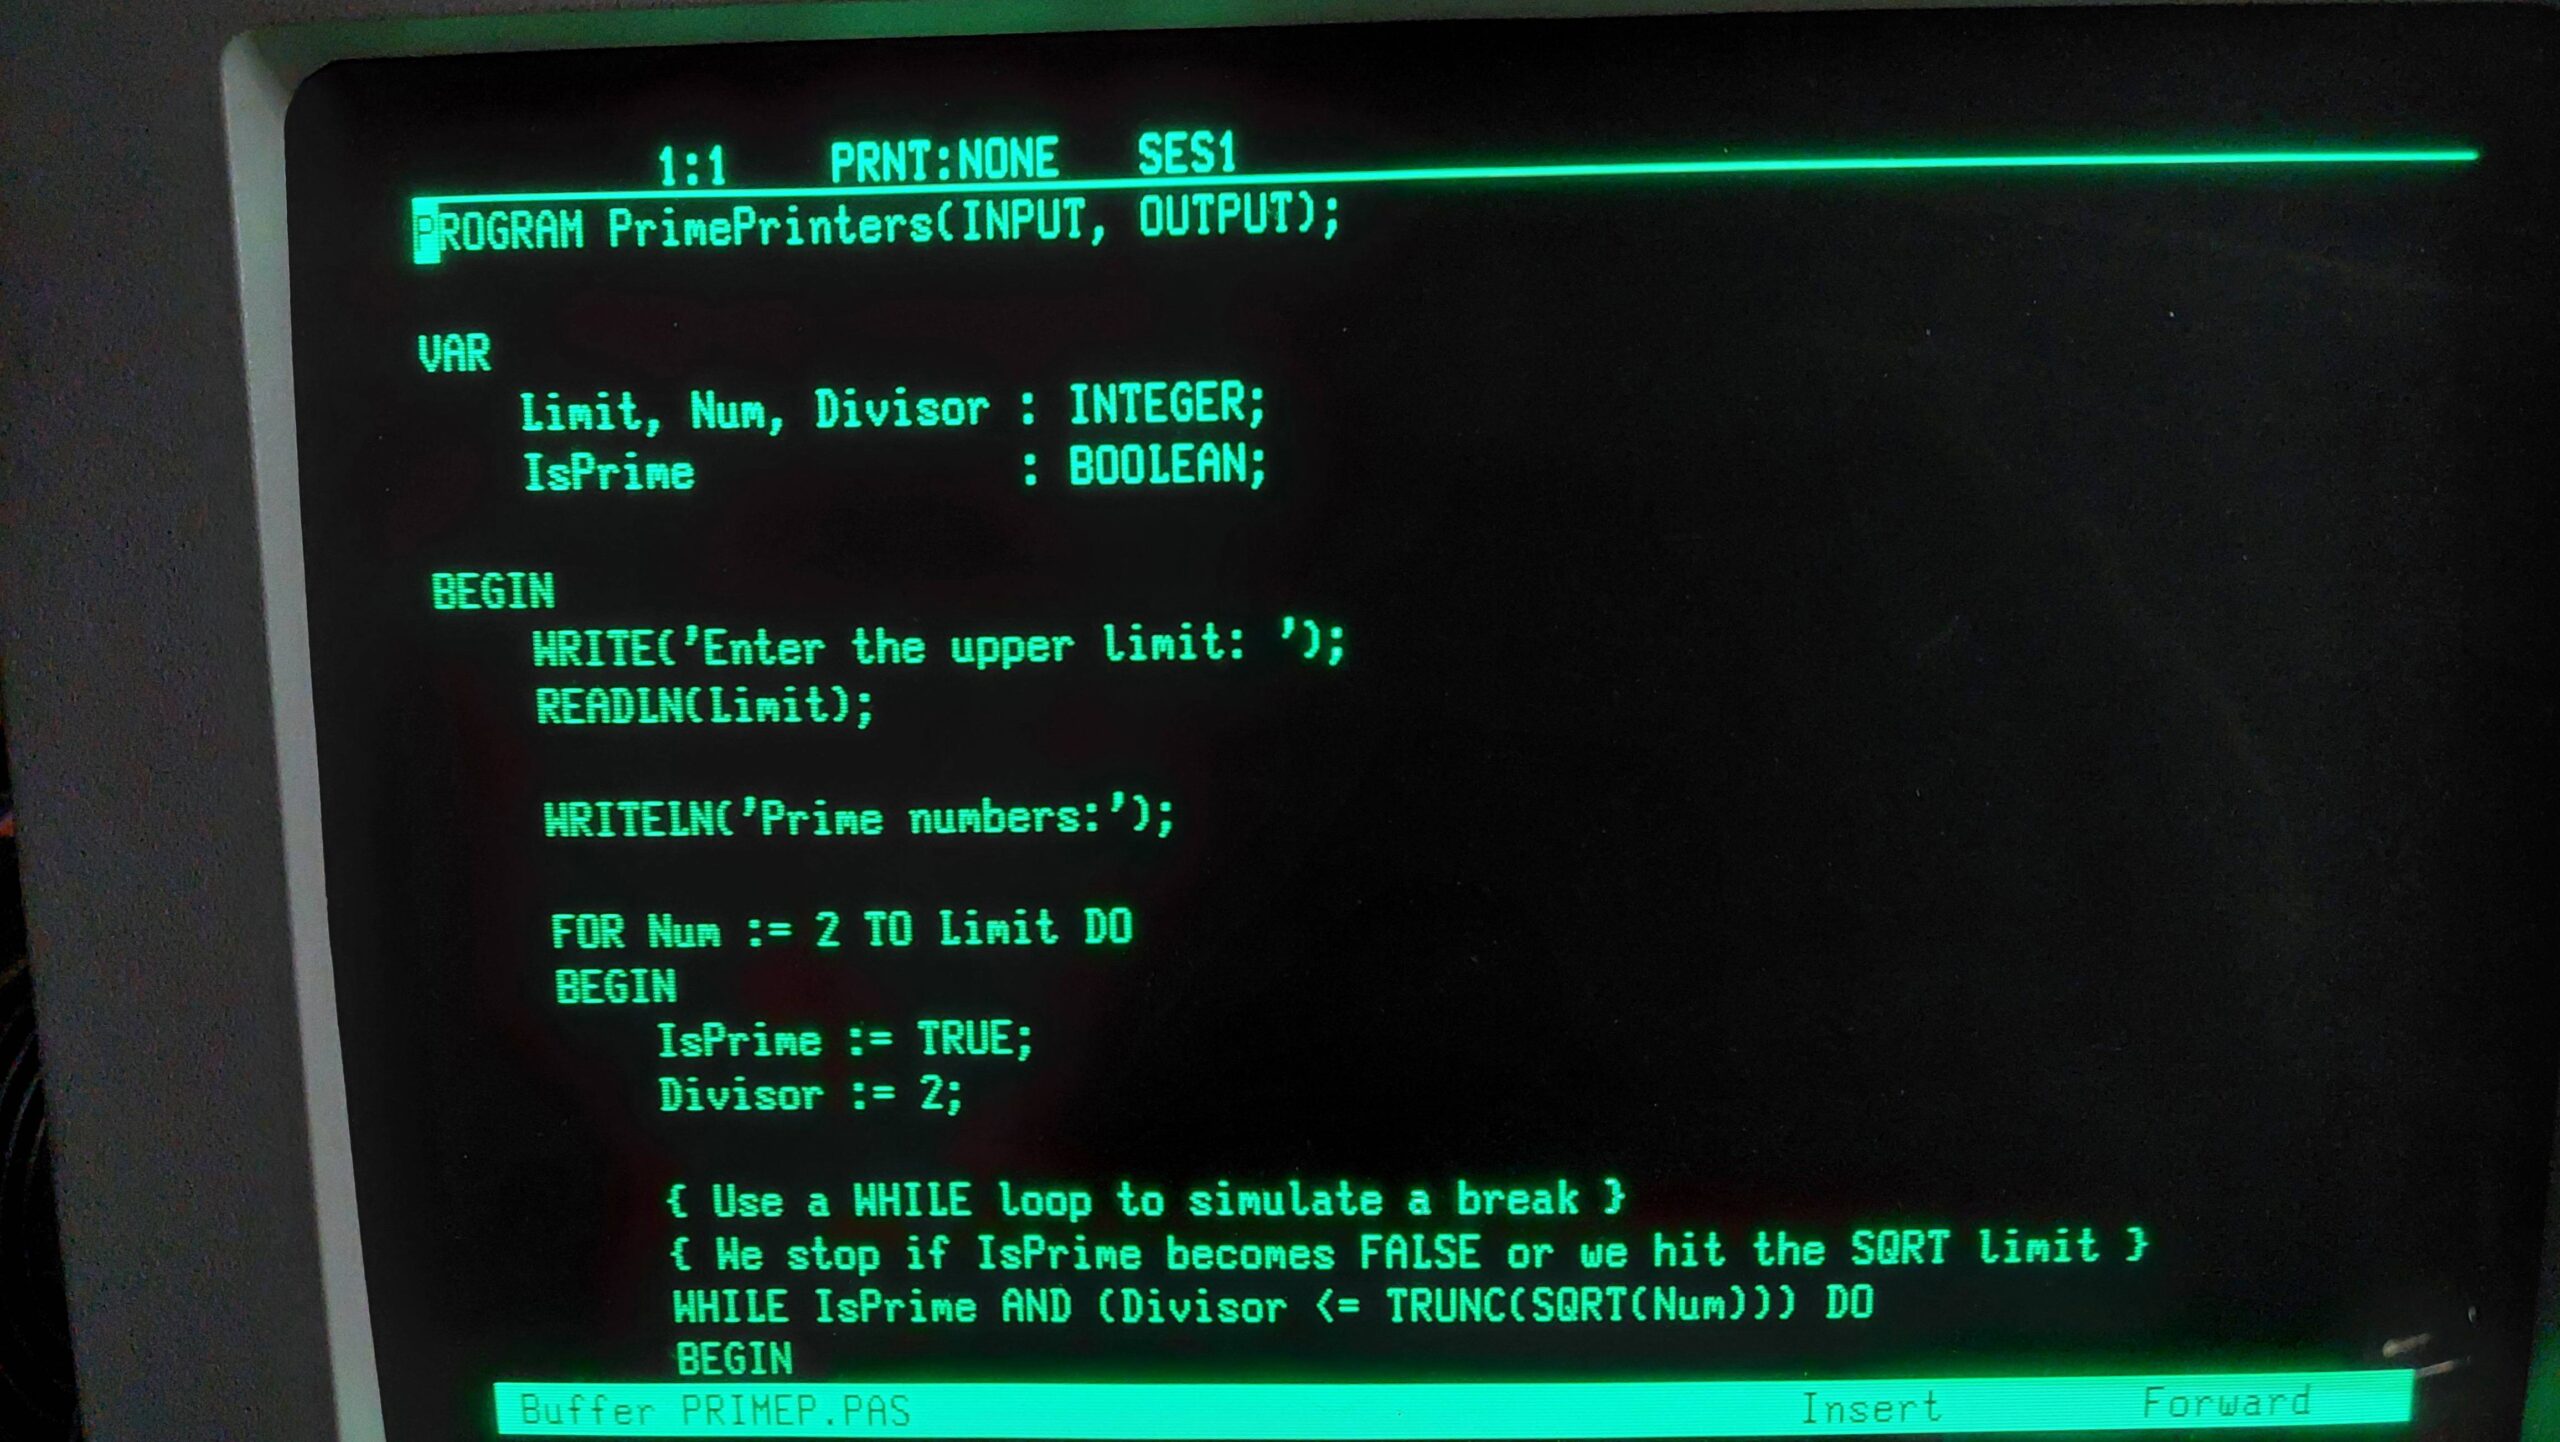
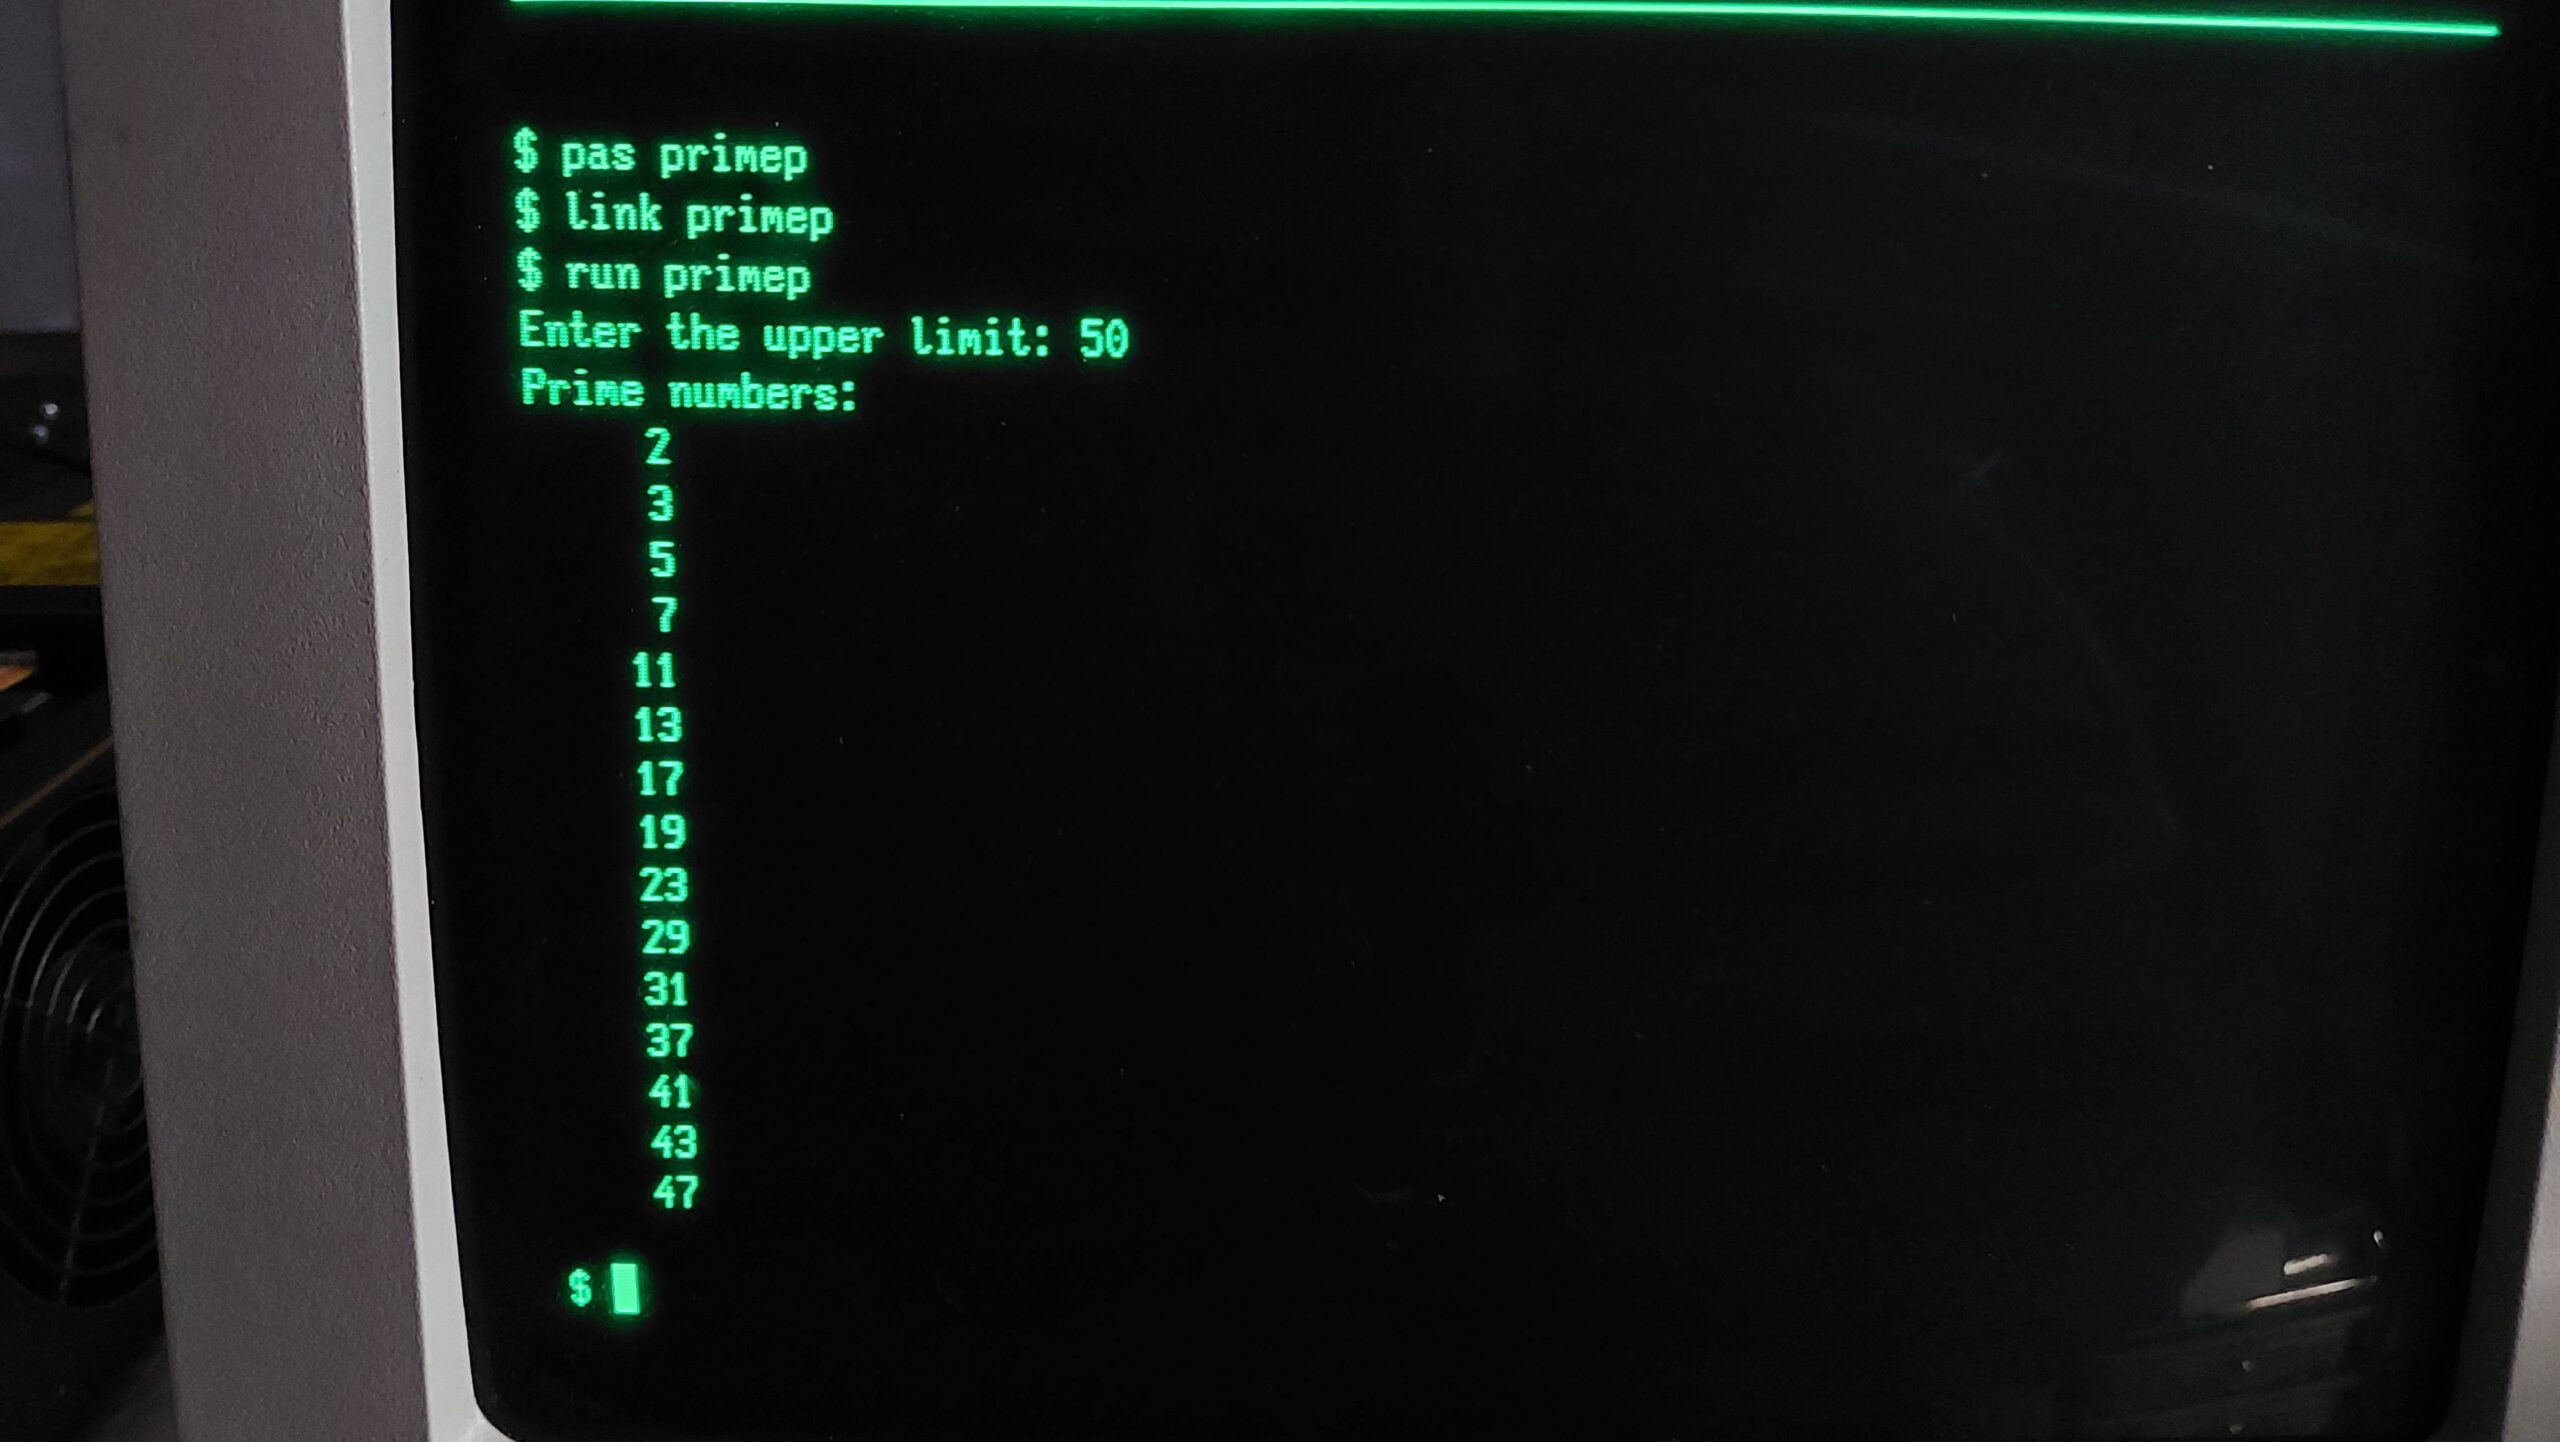
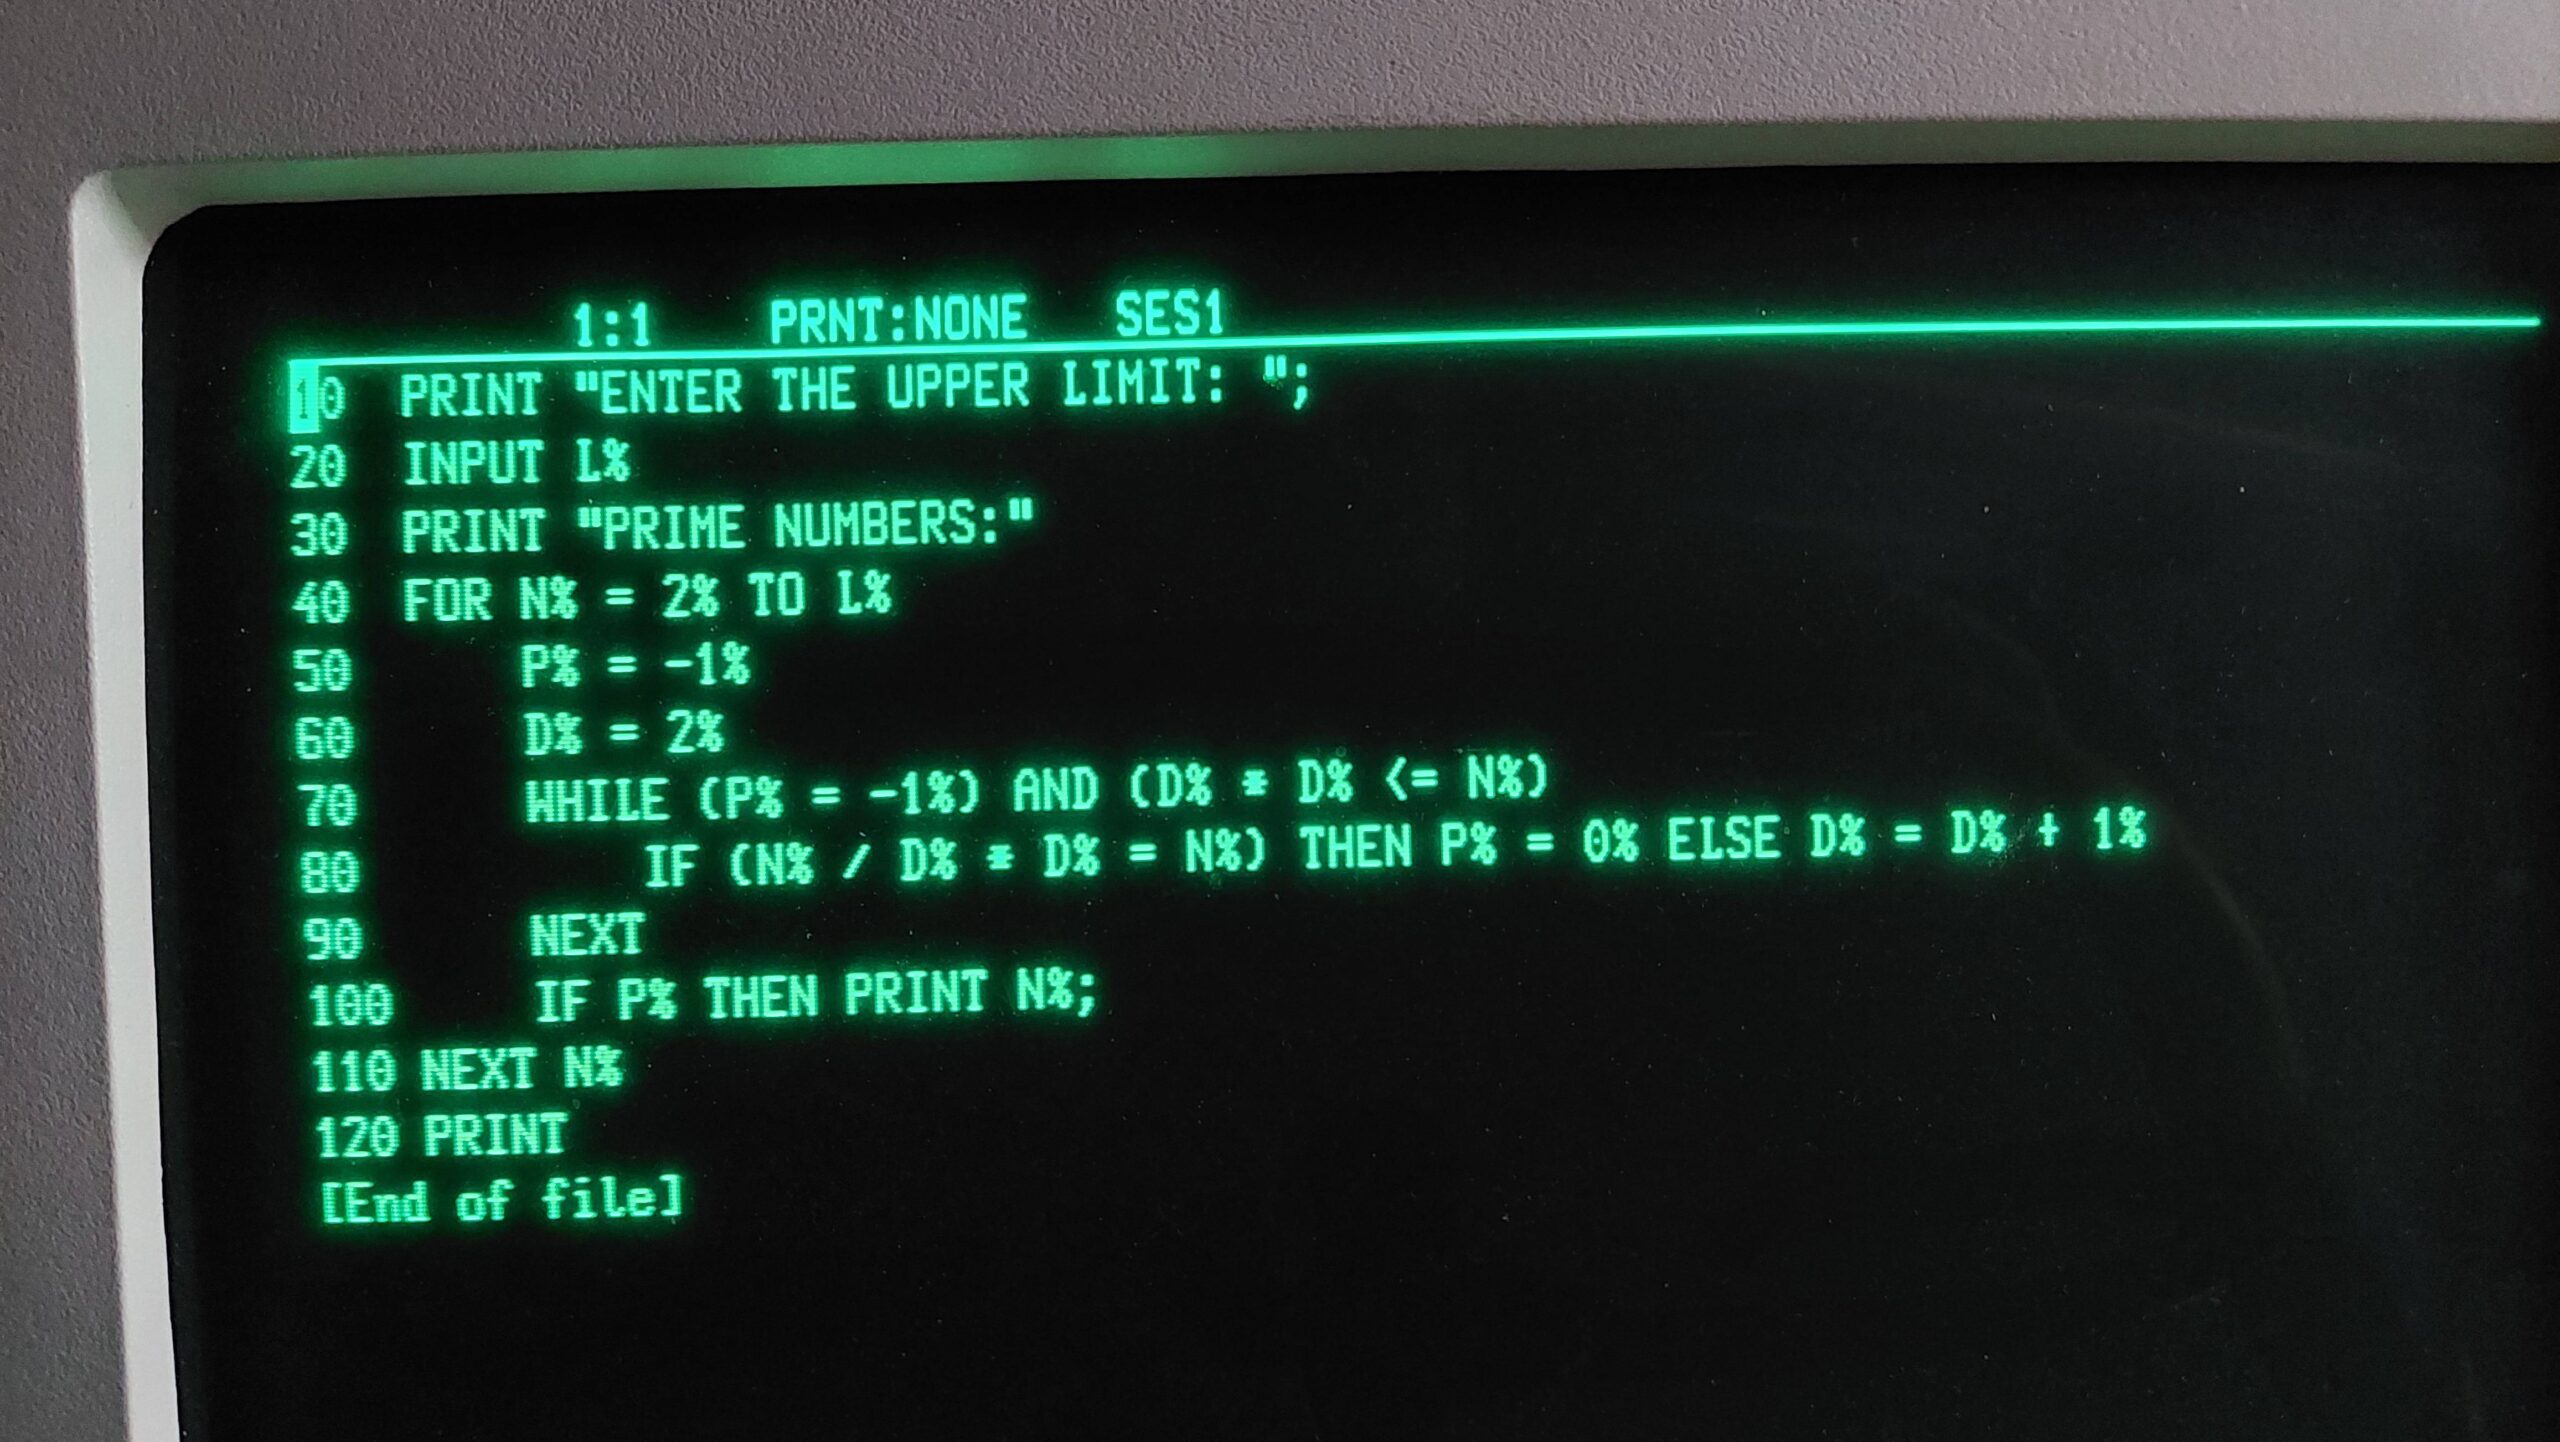
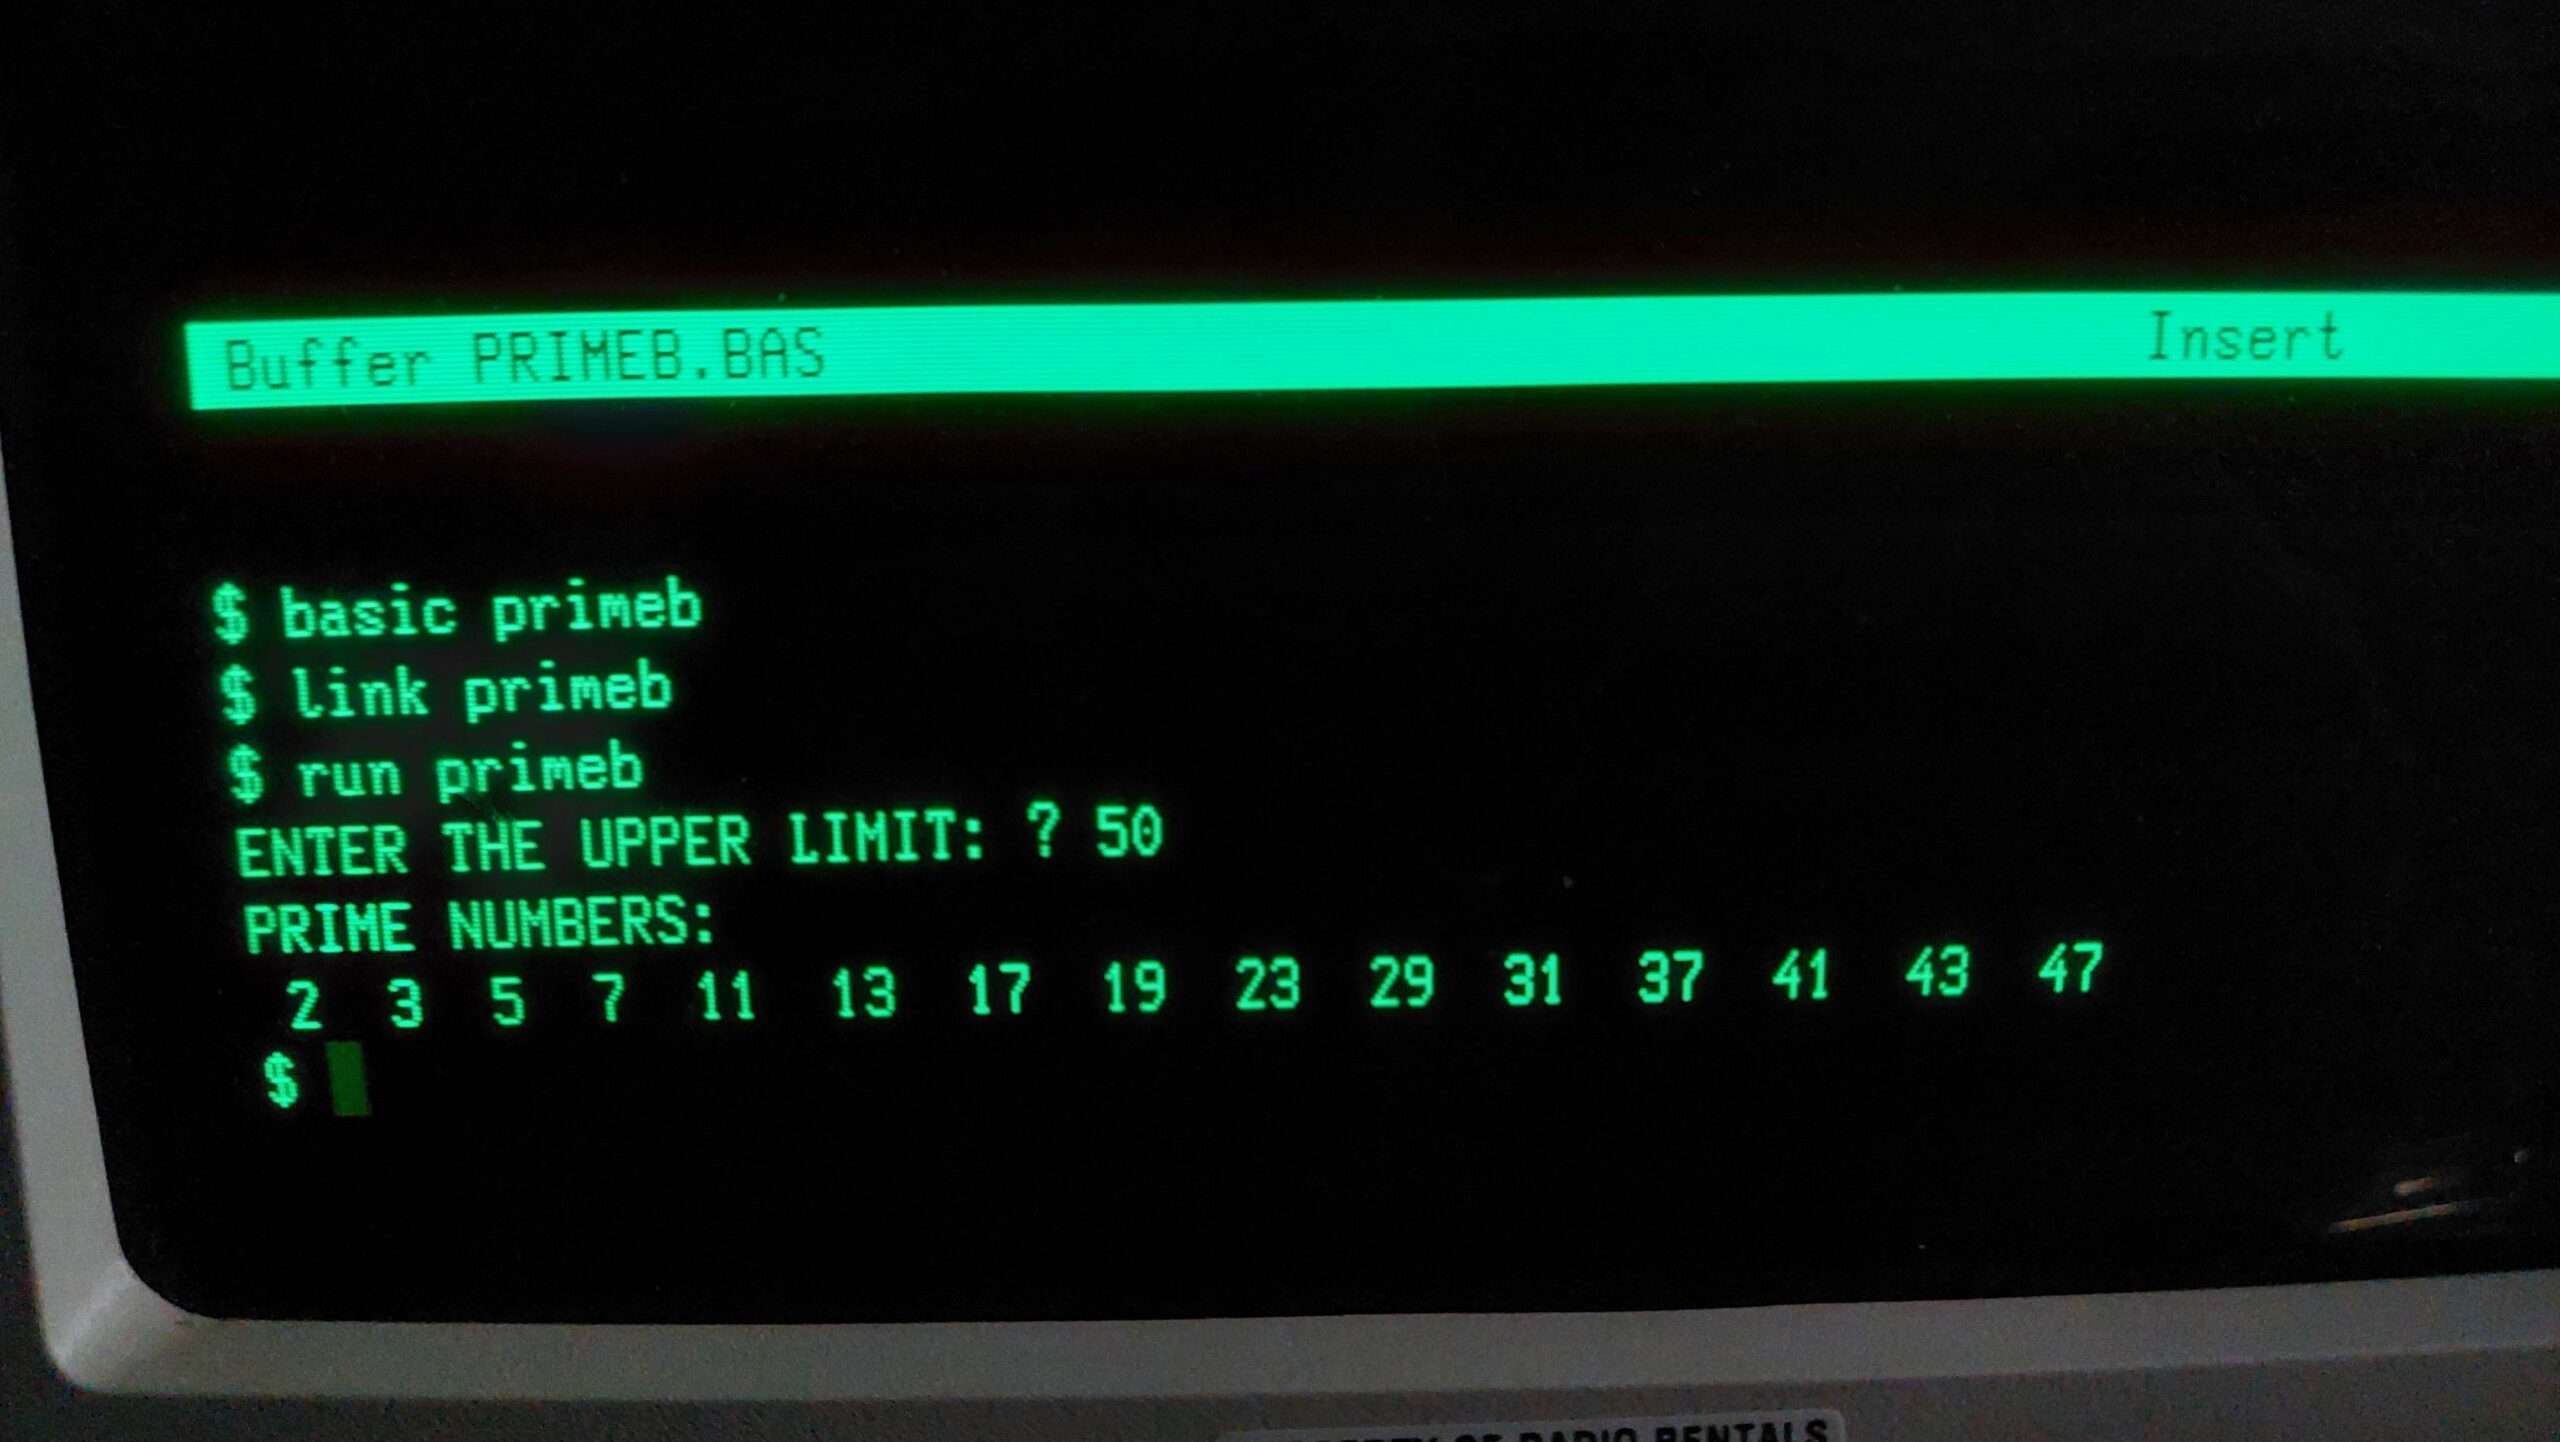
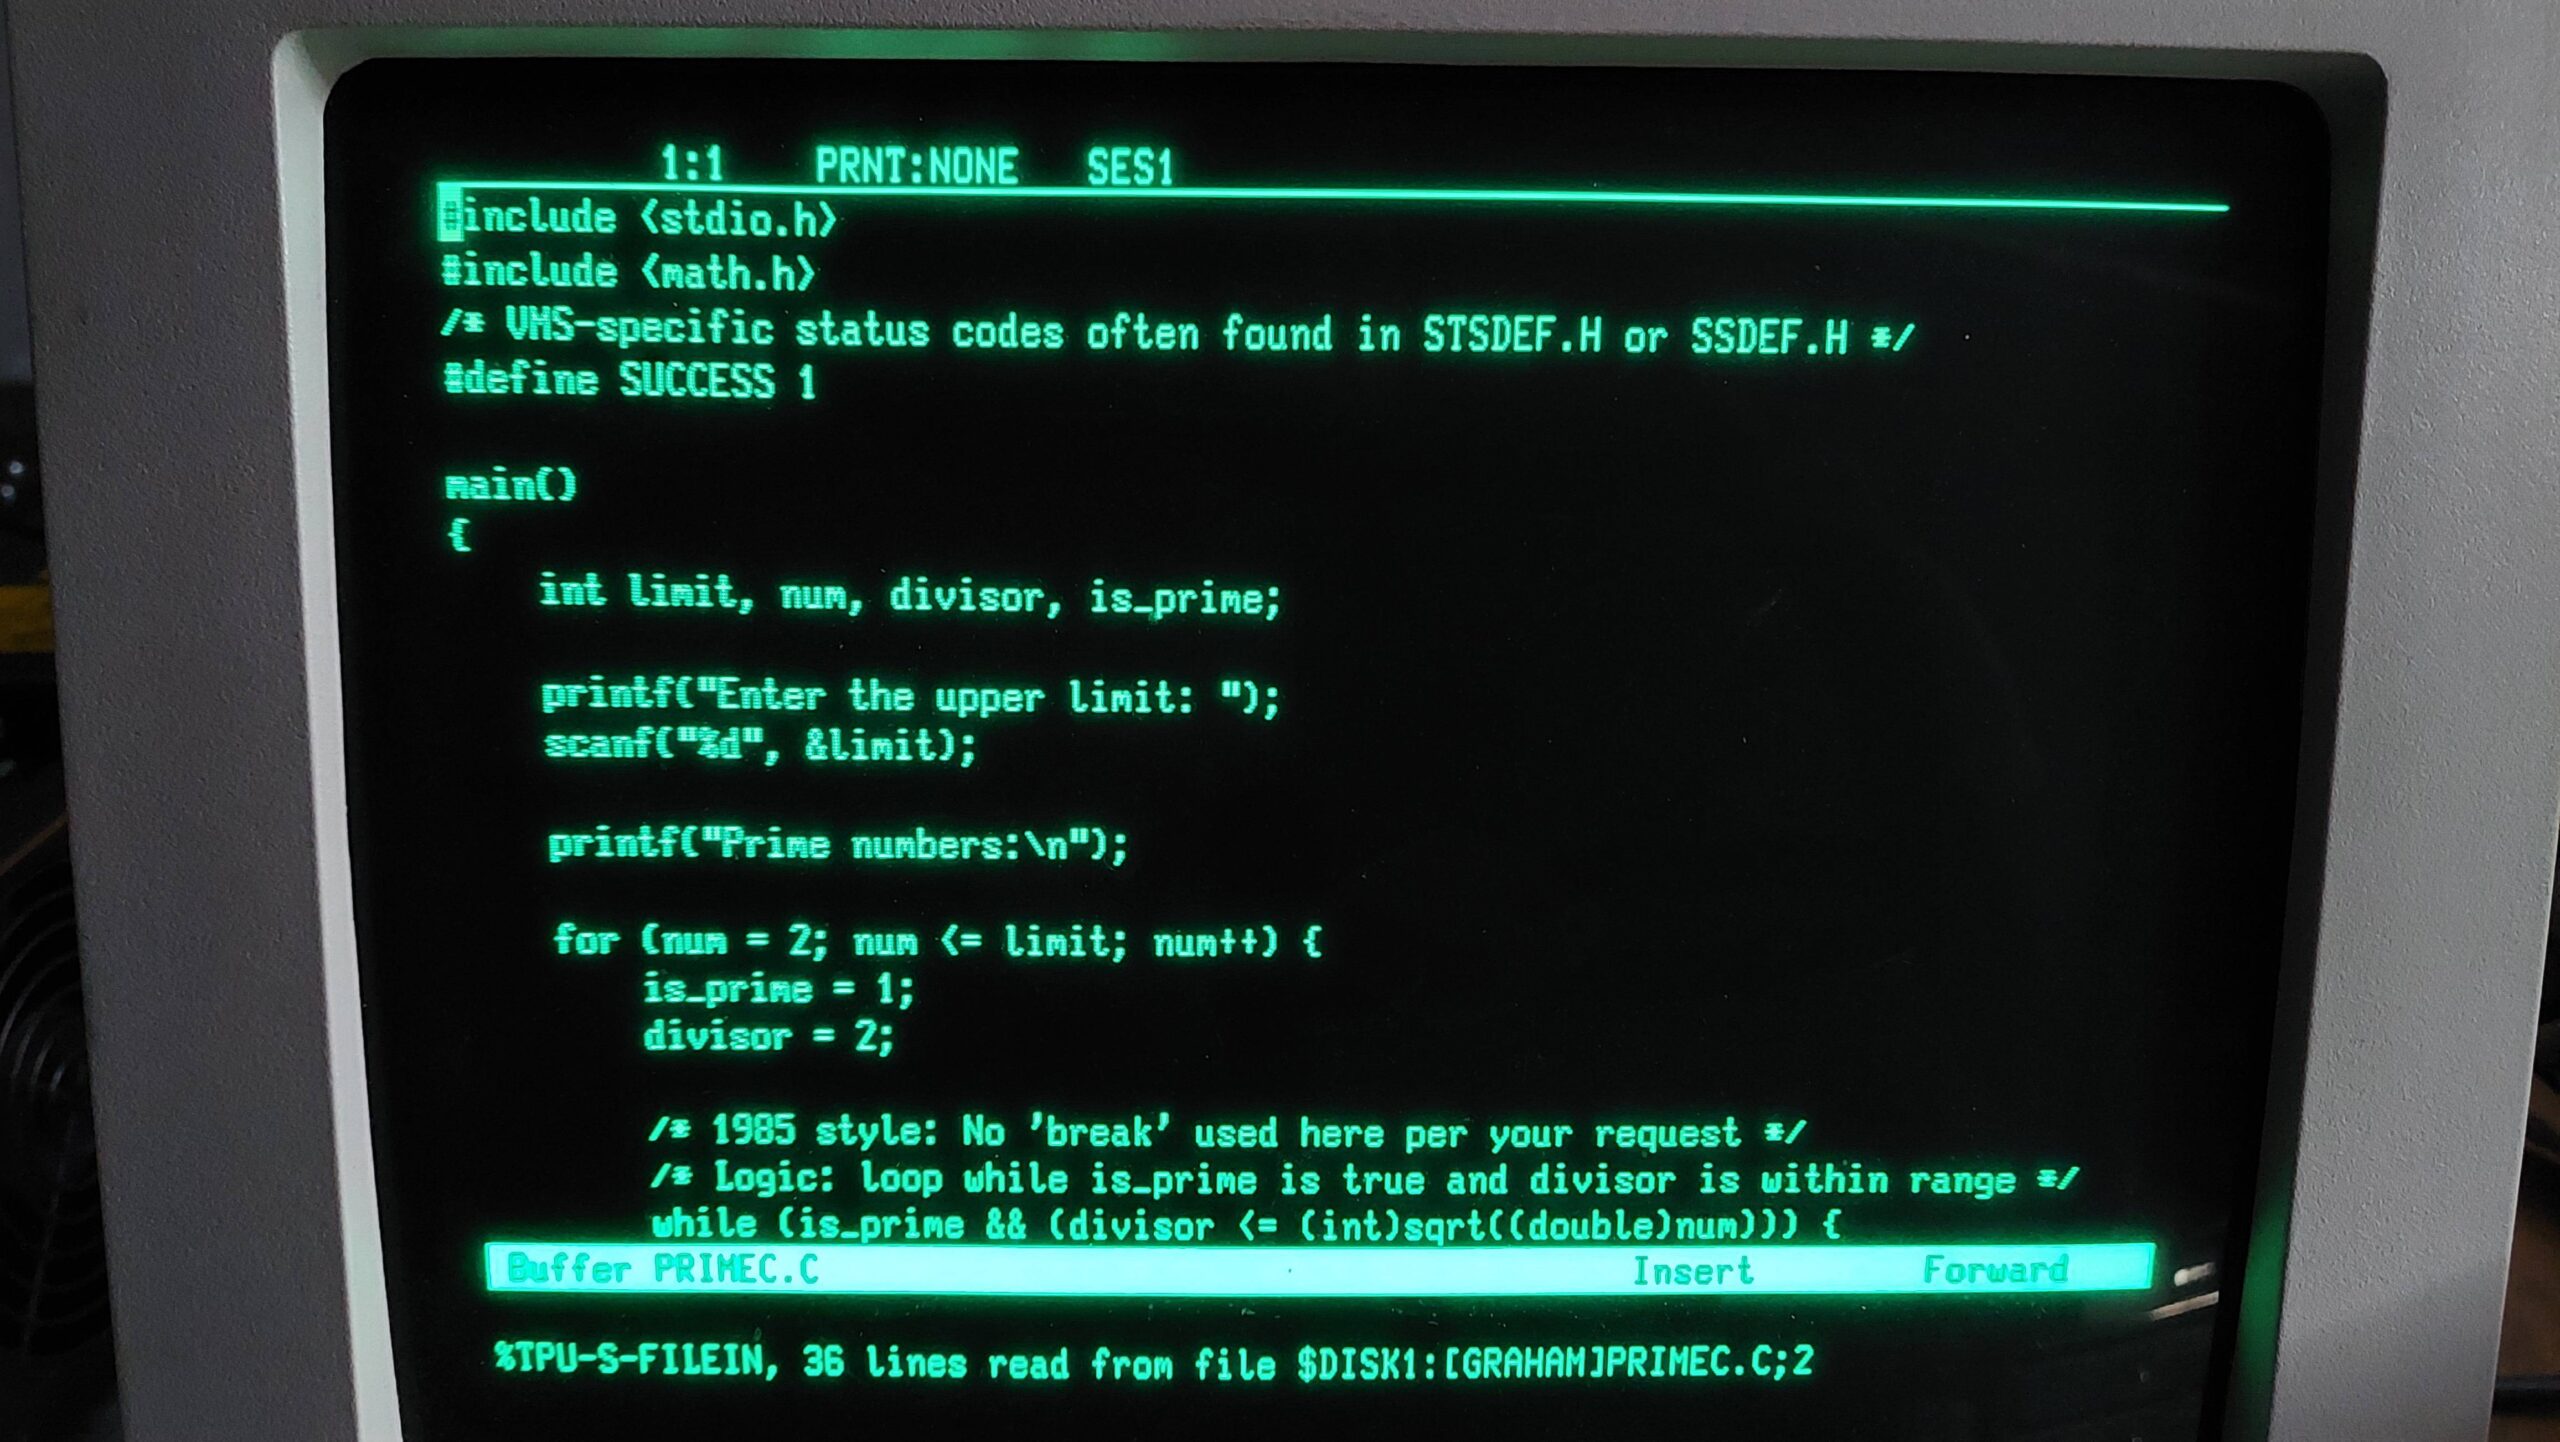
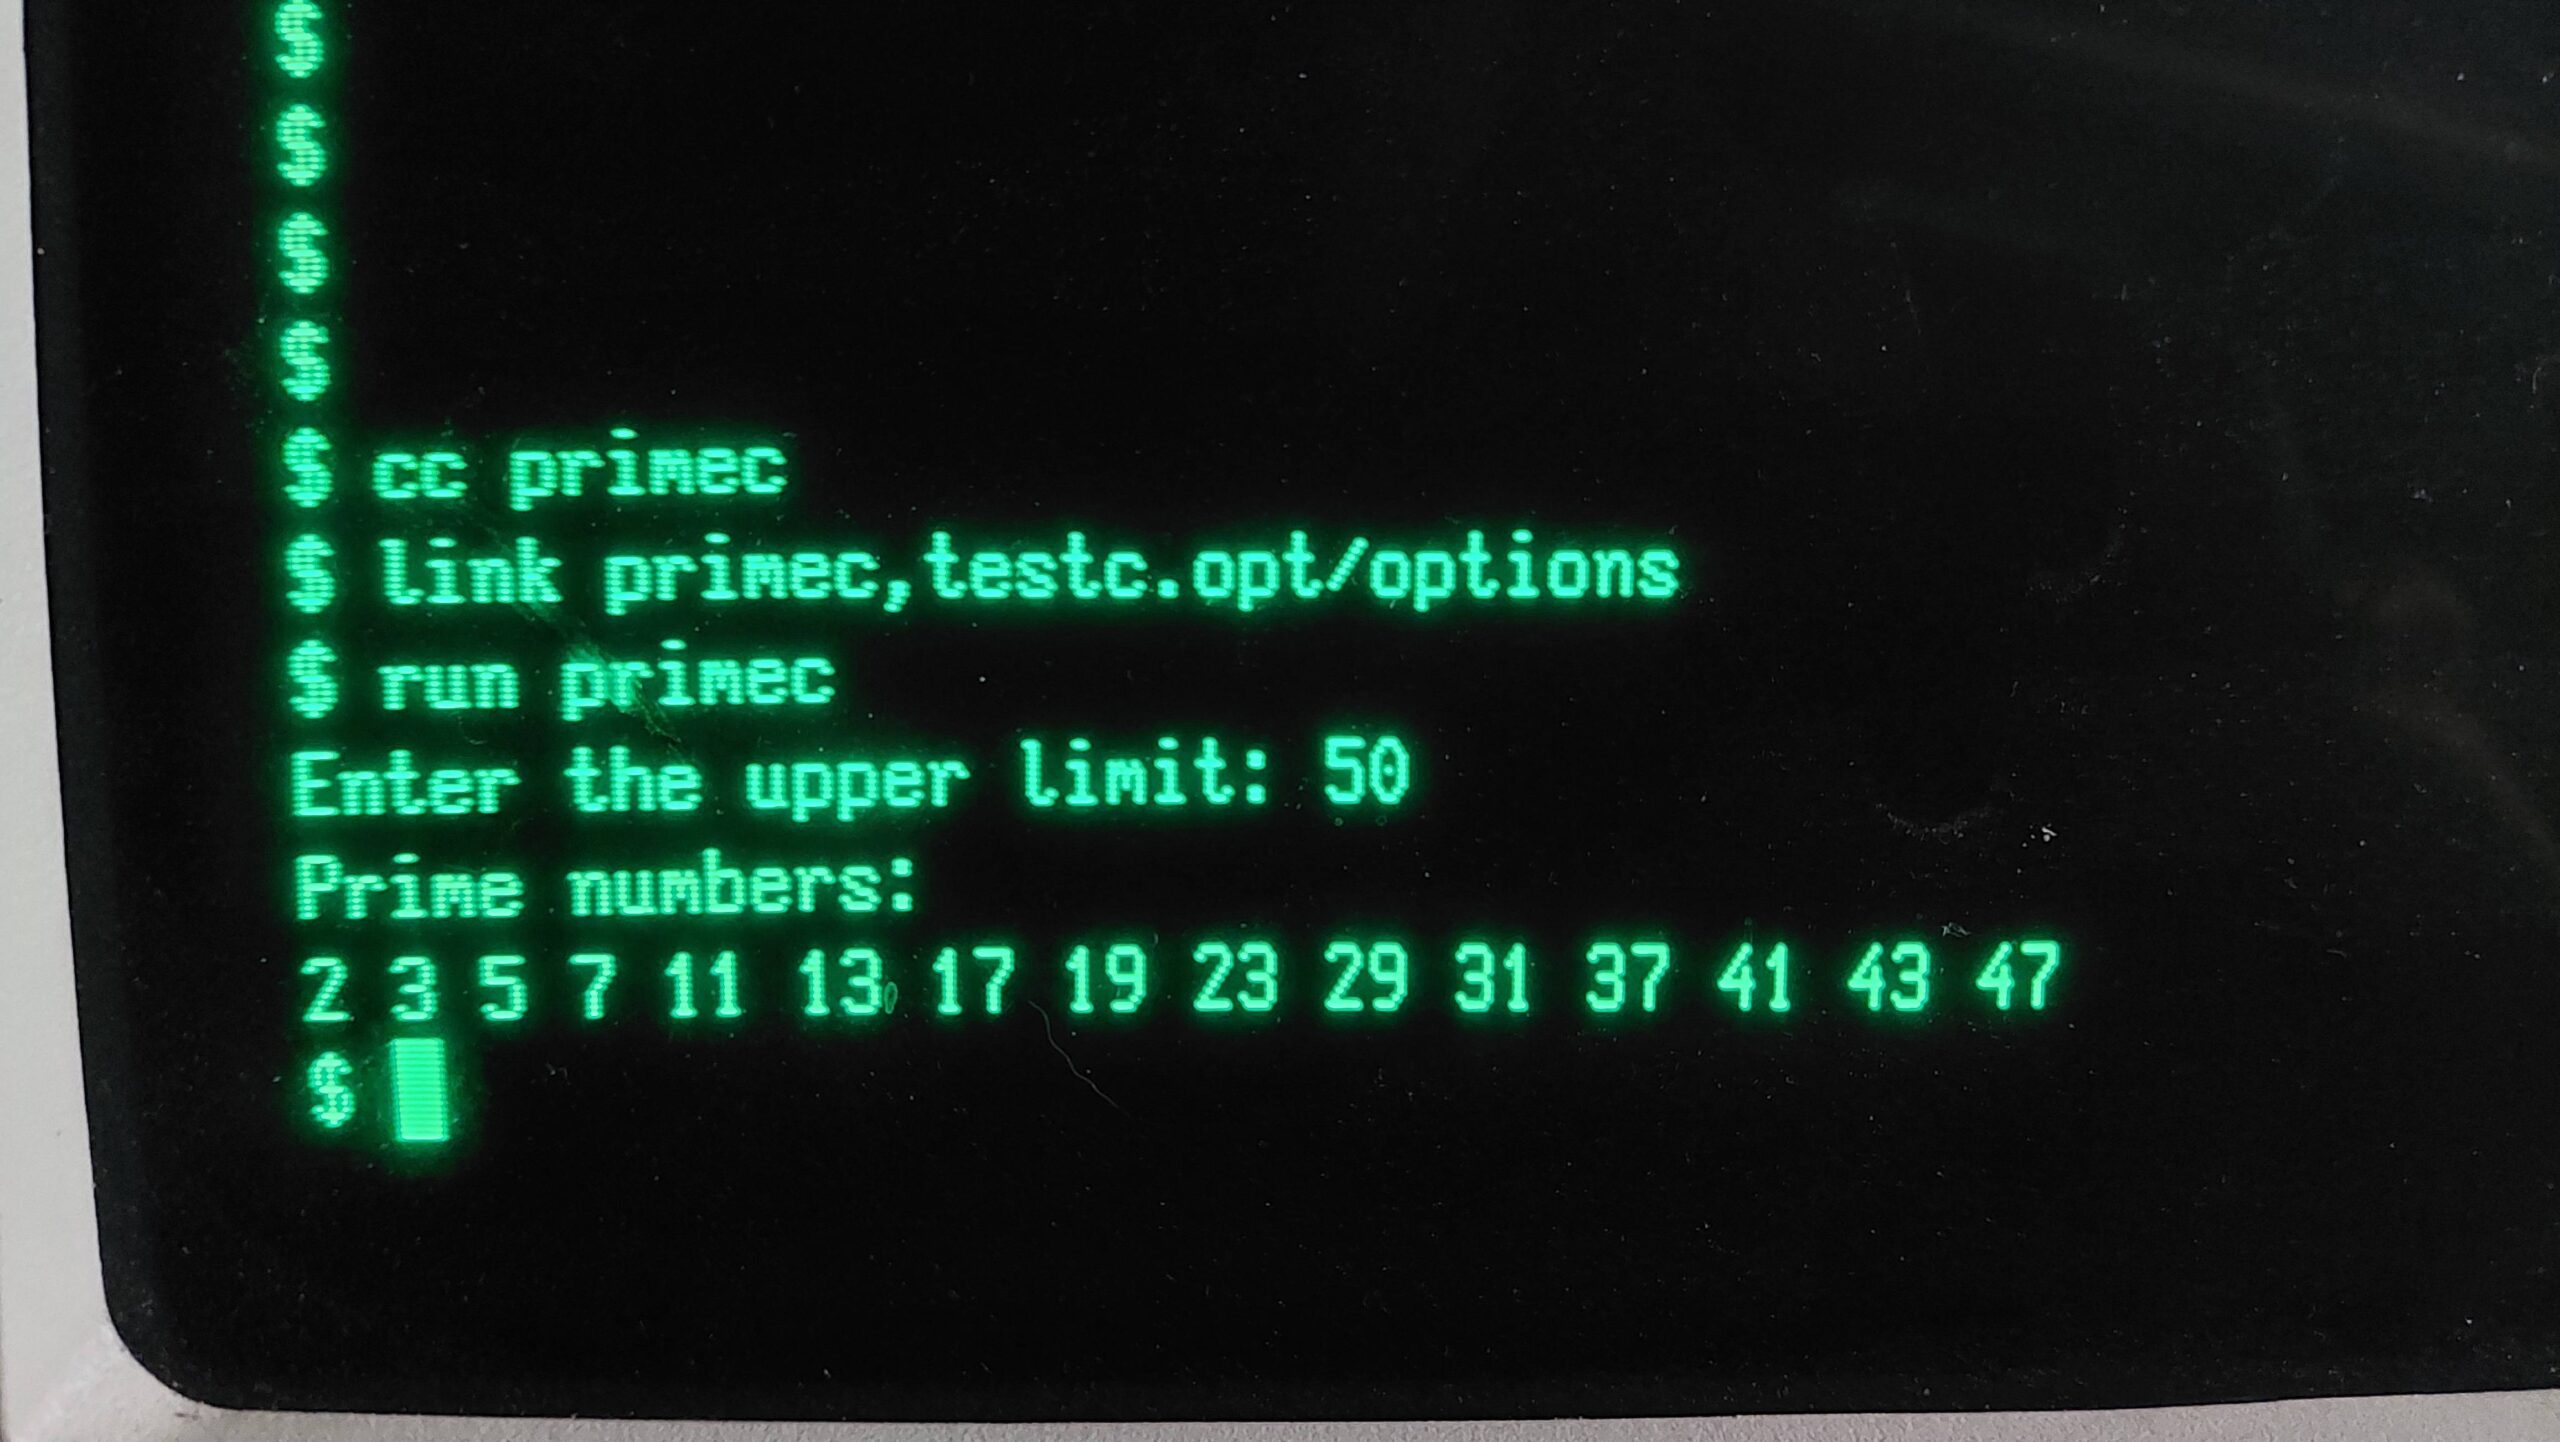
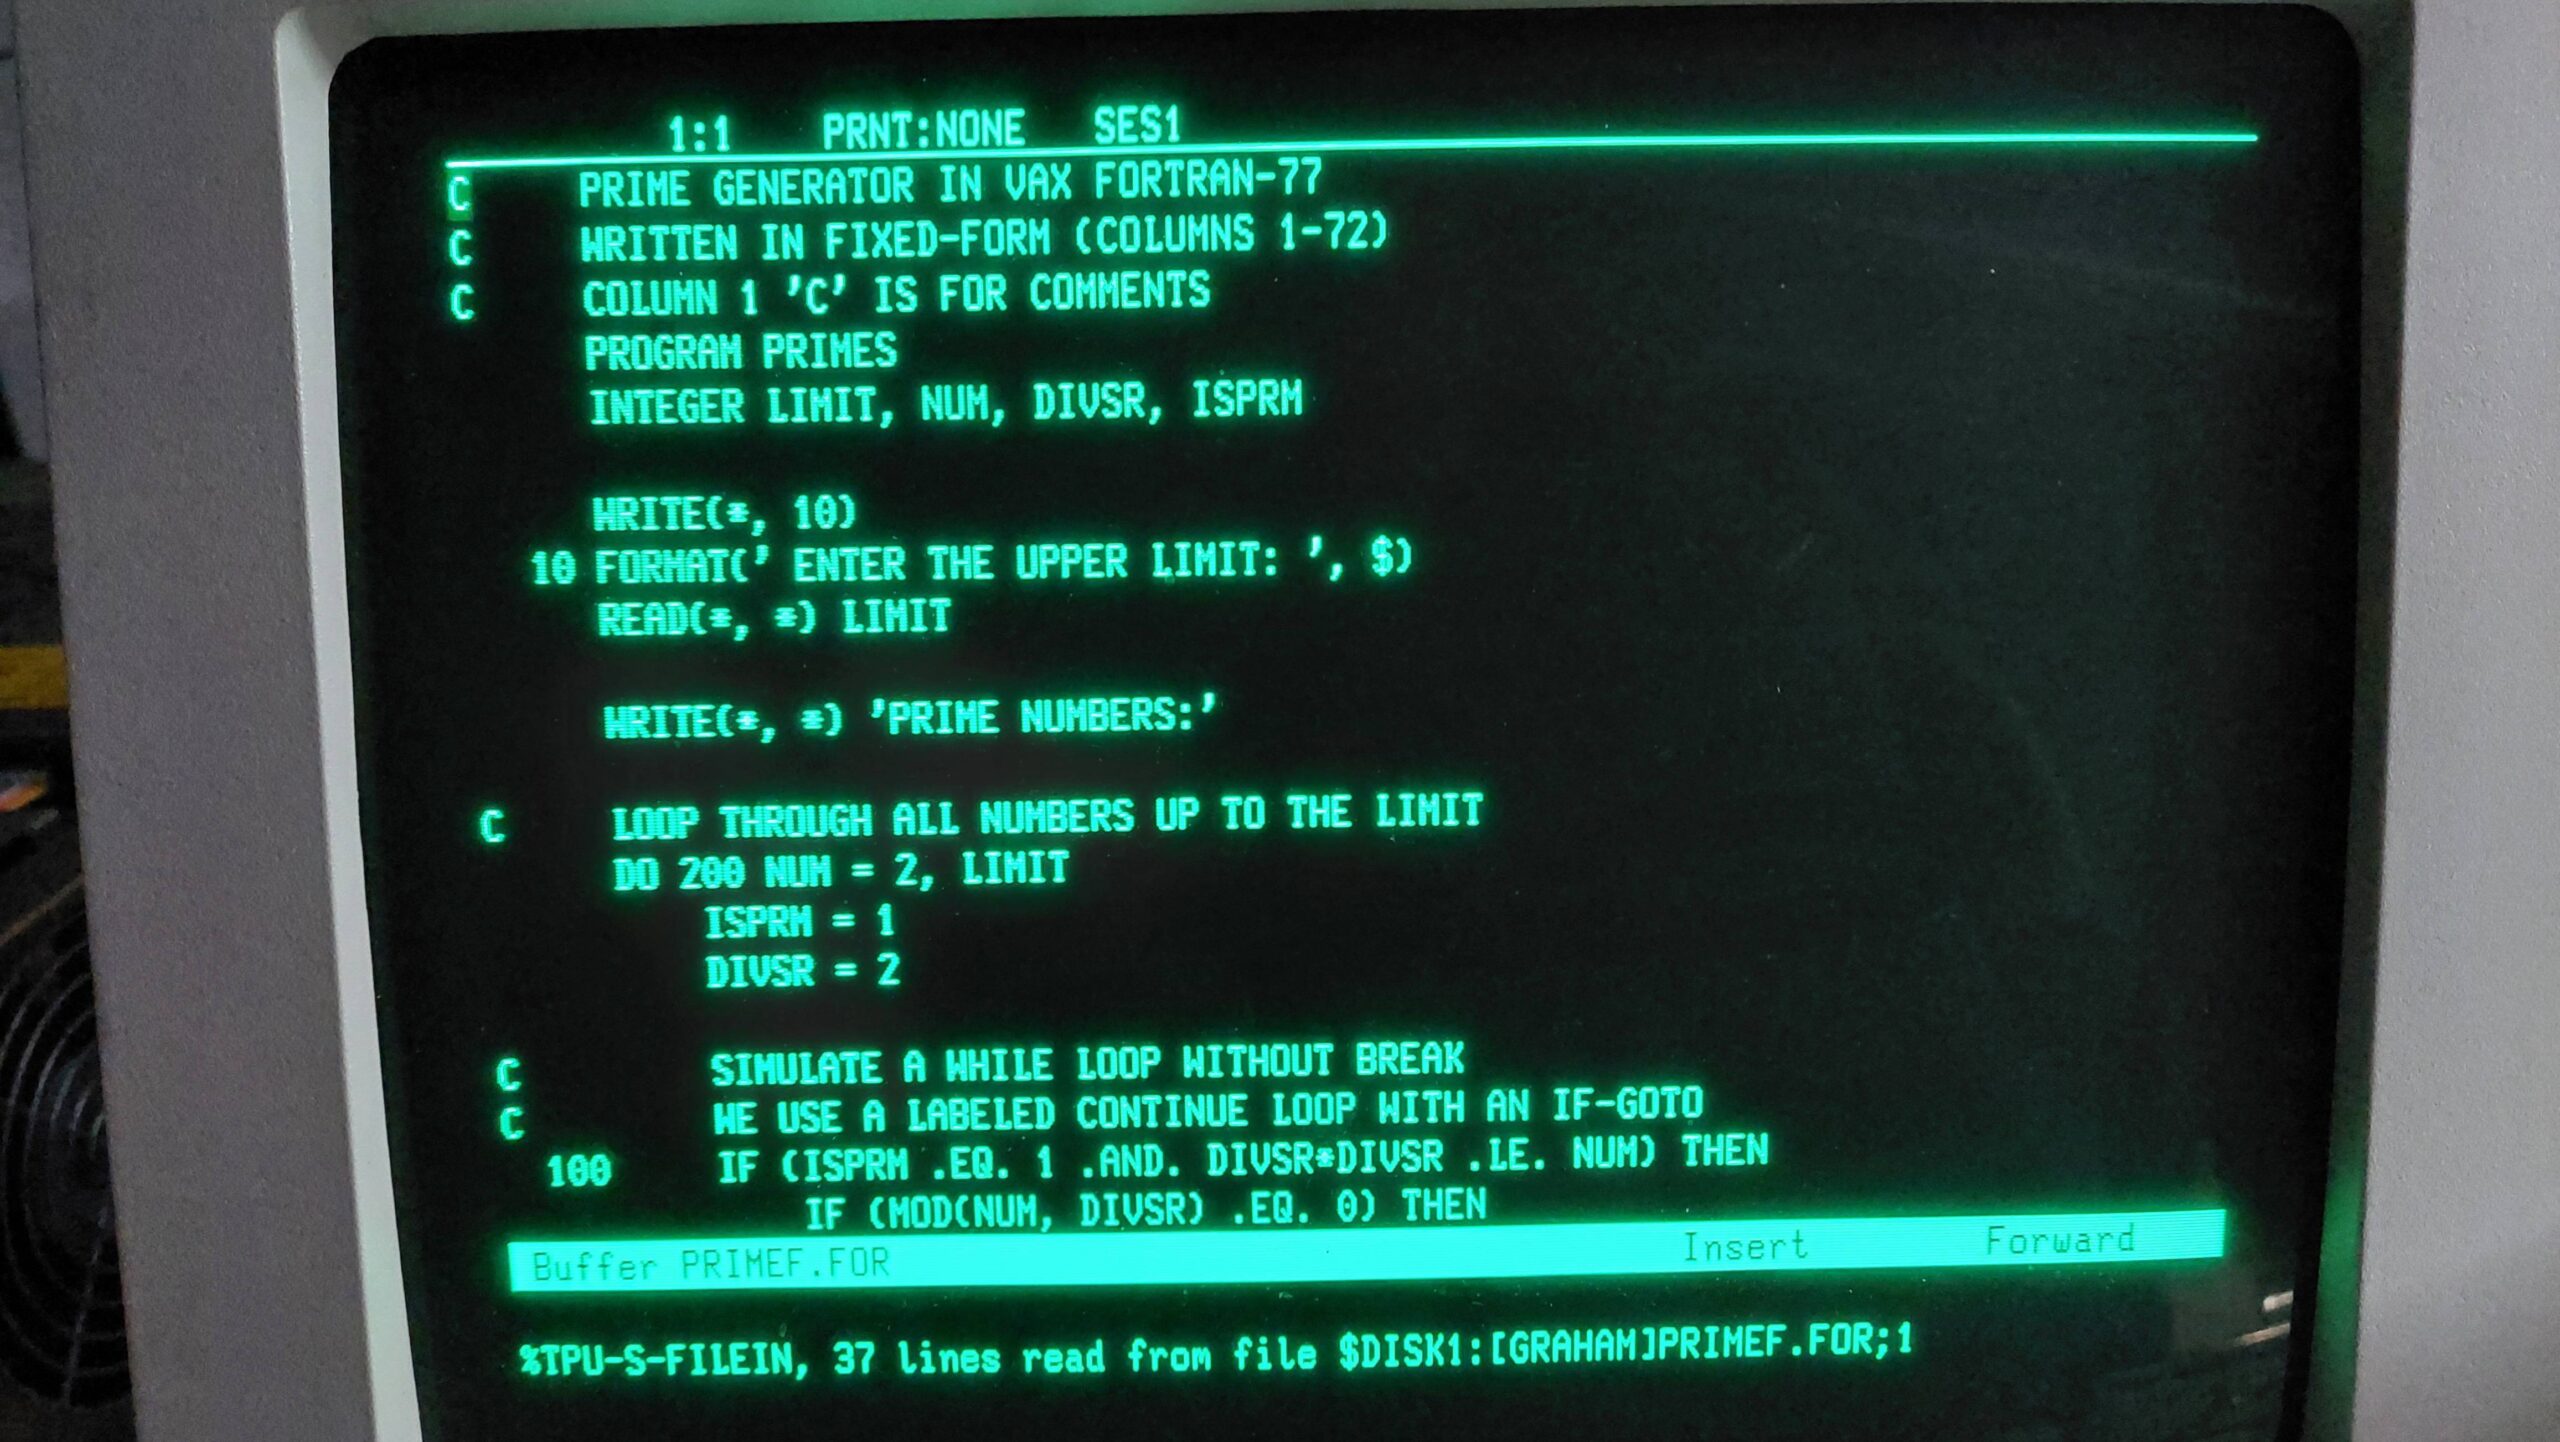
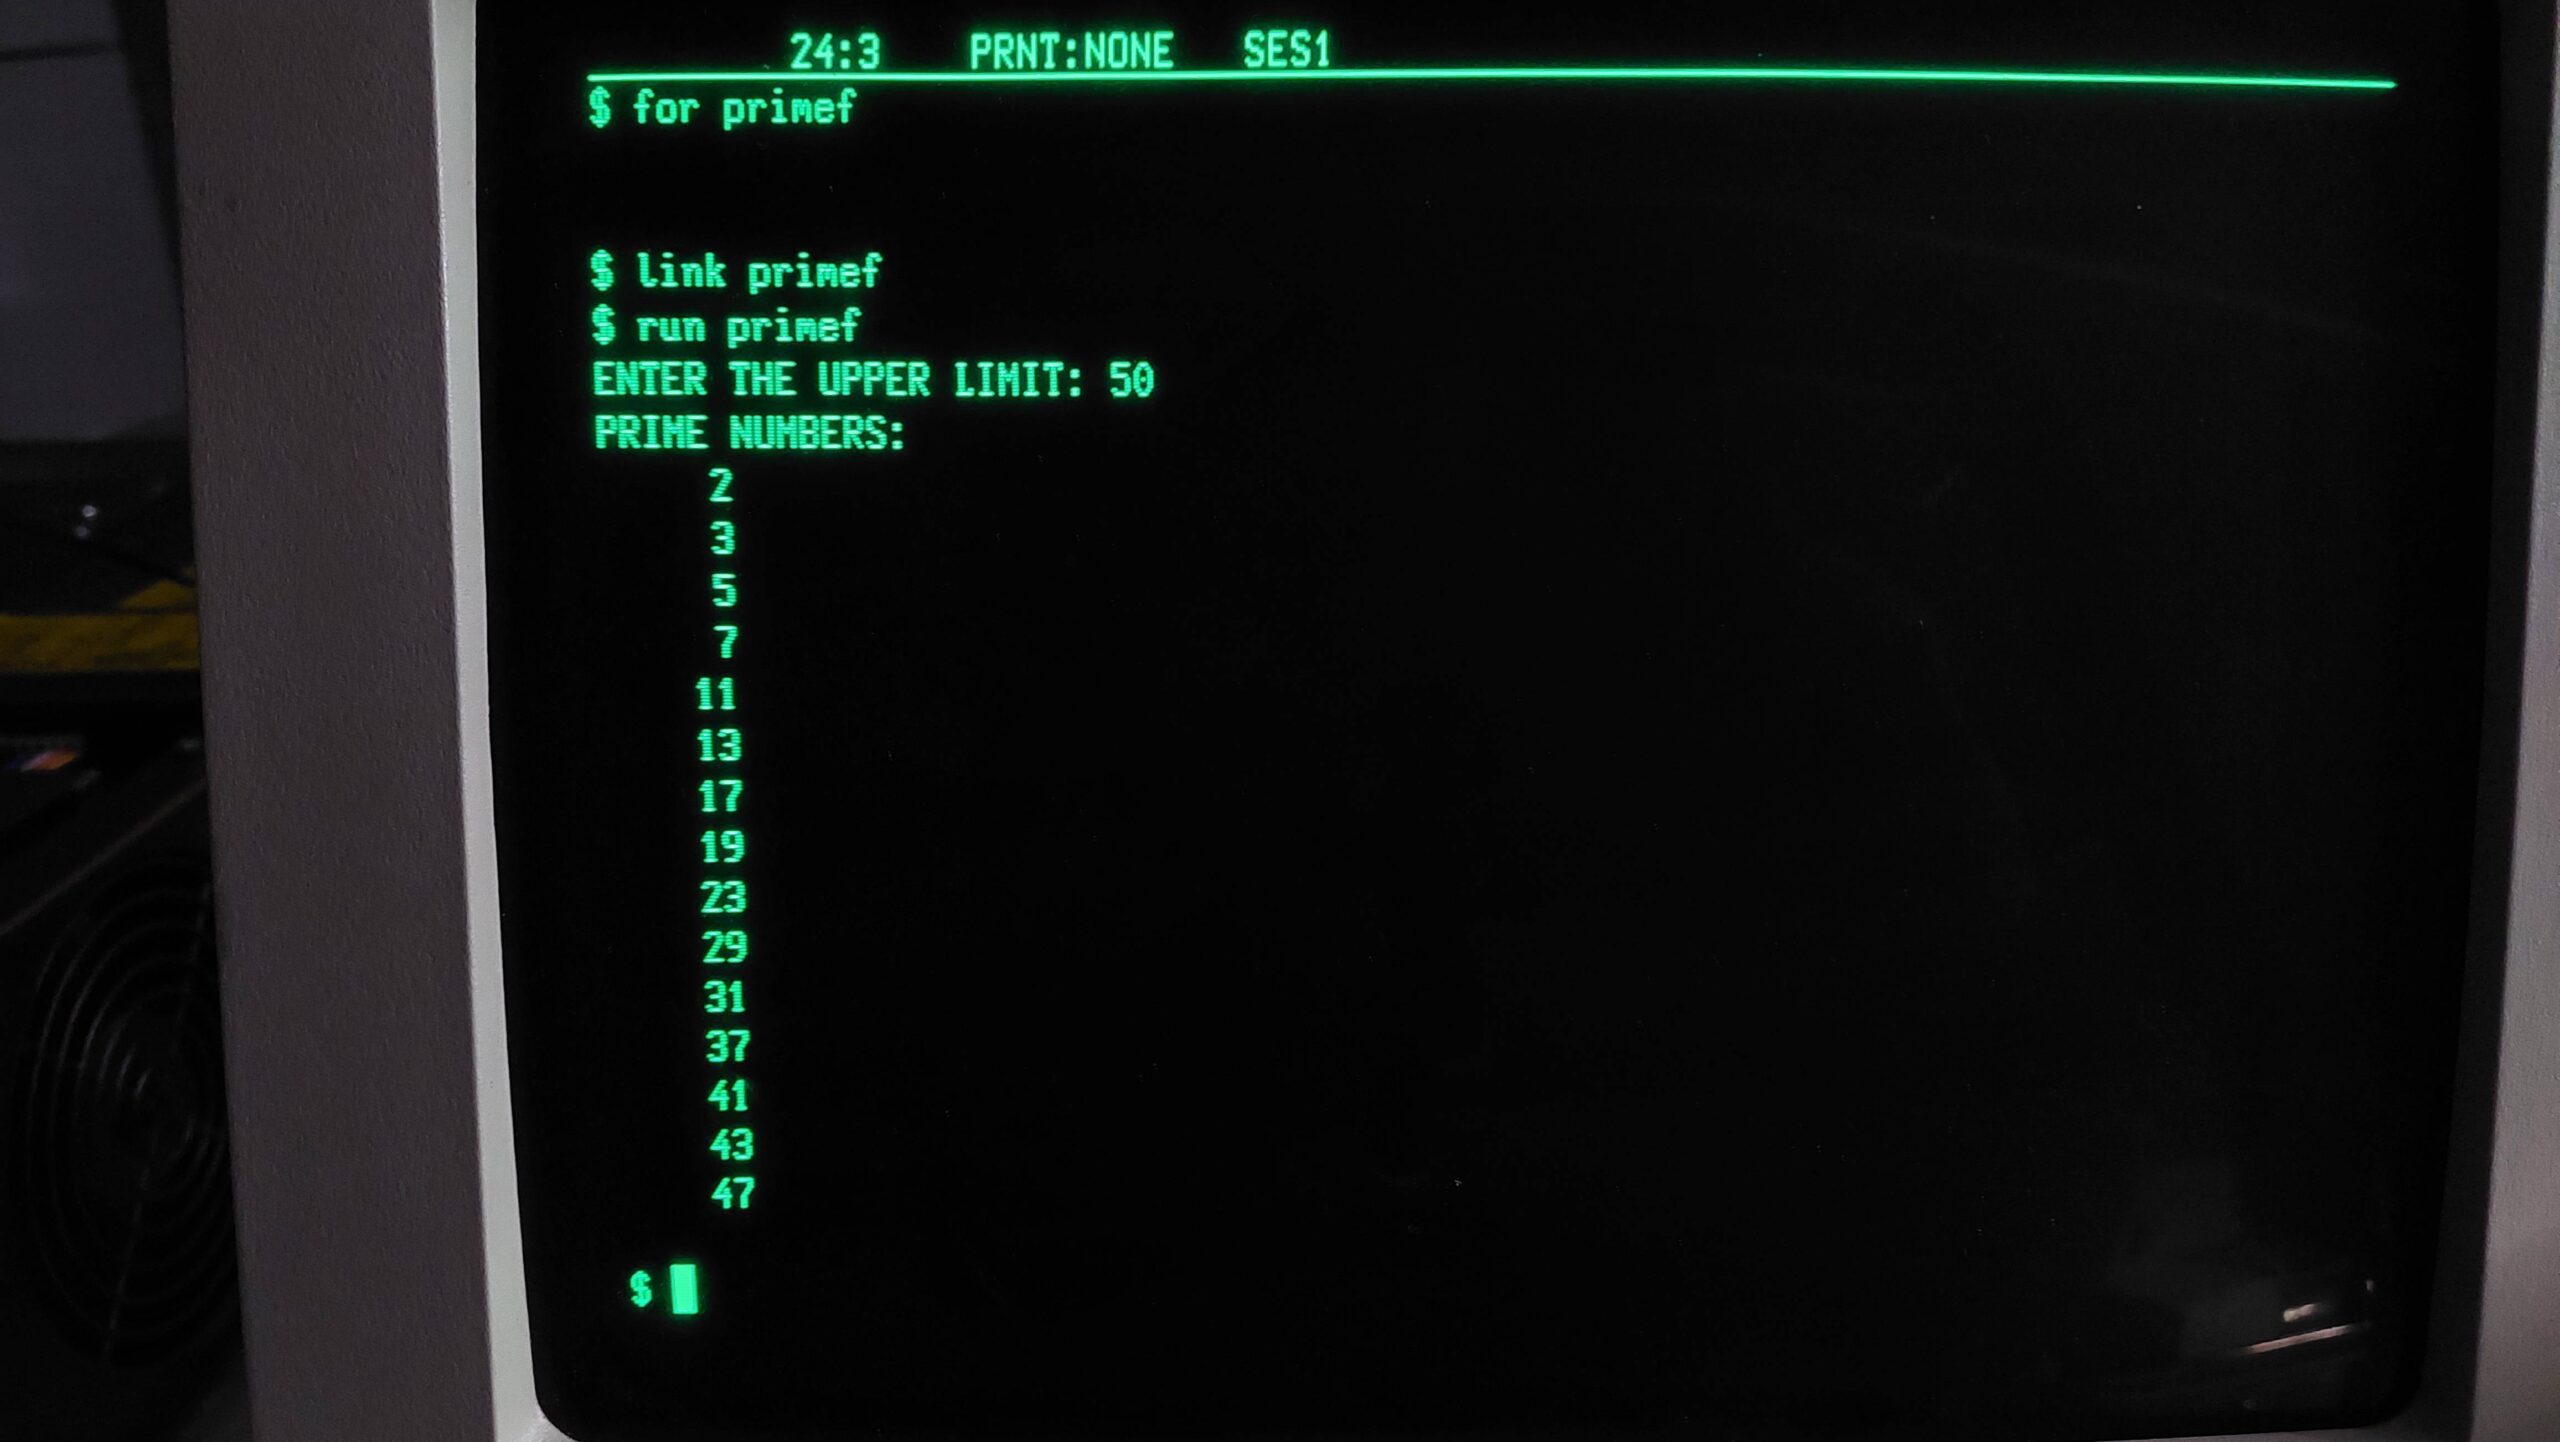
I created (ok AI created) a program to calculate prime numbers in Pascal, C, Fortran, and Basic. They all compile, link, and run just fine which is rather pleasing. Curiously, Basic is a compiler, but has an editing mode that looks and behaves much like an interpreter. The macro assembler that ships with MicroVMS is also present, so there are a total of 5 languages to choose from.

I think this is now ready for the long journey to the physical Microvax I.

MicroVAX I Transfer of New Image

This is really the step that would show whether i had completely wasted my time!

Much of this is the same as the process used to create an image of the original hard disk.

I created a new standalone backupkit on the MicroVAX I /MicroVMS 4.7 emulator. Then i completed a full backup of the system disk

$ backup/image/log dua0: dua2:newhdimage.bck/save_set

This backup consisted of 63 floppy disk images.

These disks (including the standalone backup kit) were then converted from the DSK to IMG to DSK using simh2dsk.py as described here. These images were copied to USB sticks for the Gotek/Flashfloppy.

I booted the MicroVAX I using the new standalone backup kit in drive 1 (dua1:) and then restored from the disk images on drive 2 (dua2).

$ backup/image/log dua2:newhdimage.bck/save_set dua0:

It was very cheering to reboot and have the new image come up and run just as it had on the emulator.

When the management menu came up after logging in as system the menu was mashed. This turned out to be just because the terminal had no tabs set up.

I was able to compile programs which, after all, was my goal.

NEC PC-8201A

I first used one of these machines back in the 1980s. Back then i used it as a very portable serial terminal. A few lines of basic allowed it to be stretched to serial conversations for running tests. This was very handy for the embedded computing kit that i was working on at the time.

I bought this machine a few years ago and have used it for much the same purposes and will continue to do so. It’s capable of more though, and with some additional software i thought it might have more of a chance to shine.

This machine is similar to the Tandy Model 100; they share the same Kyocera base design. The Model 100 was very successful and there is a lot of software available for it. The NEC was less successful and has smaller software catalogue. It will run some of the Model 100 software, but there are hardware and firmware differences that limit compatibility. In some cases this can be overcome with some utility programs.

My unit came with 16k of RAM which can be used to store text files and basic programs. These files can be created on the machine but can also be loaded via the serial port using the ROM based terminal program. There is also provision for a floppy disk drive but i don’t have one. Programs can also be saved to and loaded from tape.

The easiest way to demonstrate the capabilities of the machine is to store programs on the machine so that they are read to go. 16k is very limiting though so, practically, more memory is required. An expansion pack is out of reach, but the unit does have provision for another 48k of memory using 8kB memory modules.

These modules are unobtainium, but a kind soul has designed a modern replacement and has made the design available to all:

https://www.pcbway.com/project/shareproject/Model_T_RAM.html

A bought some PCBs and the required components, and set about applying my awful surface mount skills to their construction. Don’t look too closely!

The expansion of bank #1 from 16kB to 32kB was immediate but recognition of the second bank of 32k proved troublesome. It requires a Shift-Bank command followed by Shift-Ctrl without lifting the Shift and with just the right timing. I got there in the end.

I could then transfer in some more programs from the interwebs (https://www.club100.org and https://www.web8201.net) via the serial port using a PC.

The machines were connected with a null model cable. I set up both machines to use 1200 baud with Xon/Xoff flow control. For the PC that looked like:

mode com1: baud=1200 parity=N data=8 stop=1 to=off xon=on odsr=off octs=off dtr=off rts=off idsr=off

On the 8201A it looked like:

stat 5n81xs

The transfer just requires Term followed by Download on the 8201A and then a file copy on the PC. The copied file must be text – binaries won’t work with Term. The file extension given to Download must be DO ie a document.

After receiving a basic program as a document, invoke BASIC and then convert it to tokenised basic by:

load "wumpus.do"
save "wumpus"

The DO file can be deleted afterwards to save space. It does not take long to fill the available space on both banks. It takes less than 10 minutes to fill 64k even at 1200 baud. The storage relies on batteries, so there is every chance that this exercise will be repeated regularly!

Wumpus went the same way as normal.

Starfighter was fun.

Frogger requires graphics characters to loaded for Model 100 compatibility by running chr100. I’m really not sure that the characters are quite right, but the game seemed to play ok.

Fireworks

Lexitron VT1303

It was never my intention to buy this machine.  I drove out to Lewiston (just north of Adelaide) to collect another purchase, and the seller asked if i would be interested in this mammoth. It had apparently come from a South Australian government department, but had been subsequently used by the seller and his family for several years during the eighties.

I did some quick research and found that it was a word processor – not really my cup of tea.  In the end, i bought it for about the value of the two drives.  It also came with a daisy wheel printer, a long and heavy-duty printer cable, a couple of manuals and some beaten up looking disks.  The screen looked like it had some kind of disease, which was later identified as CRT cataracts.

I was happy to find that the drives were Shugart SA400 drives because these are the first really successful 5.25″ drives.

Backing up the disks was an exercise in itself, but once done, i set the machine to work.  I replaced a shorted tantalum and gave the drives some love. I started the machine up and, surprisingly, the machine booted into its word processing program.

Mild joy was short-lived: the keyboard did not work, and it was the microcontroller that had failed.  At this point i should have pulled the drives and some other spares and sent it off to the recyclers.  Instead, i built a teensy based replacement for the microcontroller and reverse engineered the keyboard.  This act of madness yielded a system that was close enough to demonstrate the machine as a word processor.

Along the way, i had picked up hints of CP/M being available for this machine.  I periodically did google searches to see if there might be some images kicking around and to my surprise about 3 years later they appeared on archive.org (thanks to the person who did that – dasher perhaps).

Once written, with some help from an Adelaide Retro Computing Group member (thanks Mick S), the machine was able to boot to CP/M and take on a new life as a computer.

If the success of a vintage computing purchase is measured by the hours endured to get it working (the primary entertainment value), then this machine has certainly delivered.

For a little history of Lexitron see the video here:

VT1303 Inspection

This machine is not easy to manoeuvre; it takes two people to lift it. And this is with a switch mode power supply.

The screen looked to have deteriorated.  There were what looks like mould spots all over it.  I thought that the CRT may have been broken, but casting light on it showed the spots were not on the phosphorous but just below the surface of the glass.

It looked like it may have been under a protective layer.  A check on the web confirmed that this is a case of CRT cataracts where the adhesive holding protection screen on deteriorates.  It’s not terminal; it can be repaired.

The owner showed me how to take the top cover off – just two screws at the sides that need to be loosened.

Inside there is a long baseboard with a terminal block at one end and a passive backplane at the other. It was not clear to me whether each of the 7 cards had to be in a particular location.

The primary power supply is located on the right and the secondary low voltage supply, providing regulation of various voltages, is on the left.

The backplane did not appear to correspond to any bus that i had seen or read about.

Top view

The CRT is at the front left and is driven by the board at the far left of the card cage. The drives are mounted in a frame at the right.

Left side with Secondary Power Supply and CRT
Right side with Floppy Disk Drive frame and Primary Power Supply

The primary supply is a switching unit. It provides several unregulated outputs to the secondary power supply to create all the required voltages for the backplane and the drives. I could not see any of the infamous Rifa line filter capacitors. All other caps looked fine.

The floppy drives were removed, cleaned, lubricated and refitted. The thumb screws up the top retain the drives.

The main processor is an 8085. The card doesn’t have a lot on it but includes the printer interface, the keyboard interface, and the boot ROM. I don’t have any schematics or technical documents, so exactly how this card works is a bit of a mystery.

The date codes include 1981 so i’m thinking this was quite a late unit. There seems to be a lot of kynar for a design that i’d expect to be a few years old.

8085 Processor Card

The DRAM card provides 96kB of memory so it must have some form of windowing going on. It uses 16kb DRAM chips which worried me a bit because they are often unreliable.

96kB Memory Card

There are two floppy disk controller cards, which is unusual; normally a controller card would look after multiple drives. This was either very inefficient, or there was some scheme that allowed concurrent reads and writes.

There is a switch on each board near the 34 pin connector that sets the controller for Drive 0 or Drive 1.

Floppy Disk Controller 1
Floppy Disk Controller 2
Video Card 1

There’s a character ROM at the top of Video Card 2.  Character memory on the right of it: 6x256x4bit SRAM. That doesn’t seem like enough for a 24 x 80 display, so something else must be going on.

Video Card 2
Board Connections
CRT Driver
Rear Panel

The only I/O that i could see was the printer port. No serial port is sad. (See VT202/1303 Comms Card & Kermit.)

Both the printer and the computer have 110V rating plates but the seller assured me that they had always run both units from 240V and the accompanying power leads certainly supported that proposition. 

I thought that the supplies had almost certainly been converted, but I didn’t want to leave it to chance. I checked each unit and went looking for some evidence of the conversions.  There is a wire on the power supply which has been moved from 100V to 200V.

The keyboard is secured by two screws underneath the unit, and the board is screwed to the surround. It uses a D8748 microcontroller.

All up, the machine struck me as being in pretty good shape. Sure, it’s just a word processor, but underneath it’s a computer looking for an operating system.

VT1303 Power & Fault Finding

I wasn’t particularly vested in this machine but, i wanted to see if there was life and if so how much life.

I turned on the machine using the circuit breakers at the rear of the machine. These felt a bit clunky but gave a satisfying click and the fans came to life with quite a lot of noise.

The drive lights flashed regularly, as if beckoning me to pop in the boot disk. I answered that call, but there was no attempt to read the disk.

I still had the unit open, and I could see an LED on the power supply flashing with the drive LEDs, so I figured it was probably a power fault.  The CRT wouldn’t switch on.

I pulled all the cards from the rack (except the CRT supply which was a bit tricky) and the supply came up fine – solid LED.  This prompted me to measure all the power supply lines and work out which supplies go where, including the computer bus. 

The CRT still wouldn’t switch on, but I thought that it might need one of the cards that I’d removed.  (The front panel switch is wired via the keyboard, as it turns out.)

Replacing the cards and connectors progressively went well until I connected the keyboard.

I checked which “pins” on the processor board edge connector provided power, –5V and 15V, and found that the keyboard did indeed have a short from 15V to ground.  I cut a track to narrow it down.  There was a tantalum on the remaining piece so, I took a wild guess that it would the cause.  It was.  I replaced it and made the cut track good.

After that, the unit fired up.  The screen turned on, and the unit requested a boot disk.  I gave it the only one that I had, and it booted.

Unfortunately, it wasn’t picking up anything that I typed. That led me back to the keyboard.

The keyboard is a Cortron unit.  The company still exists and still makes keyboards, but I can’t see them lending much support.

The unit is almost certainly a custom unit made for lexitron.  I was able to find some documentation for another computer that described how the cortron keyboards worked.  I also had a good poke around the board. The working description for the other keyboard seemed to accord with what I could see on this unit.

The keys use contactless magnetic cores.  When they are pressed, a pulse can be transmitted from one winding to another. 

It’s all controlled from a microcontroller.  The switches seem to be arranged in a 10 x 10 grid.  The microcontroller addresses the array via two decimal decoders.  I expect there must be a sense line back – I need to find that. The micro controller presents a byte to the host processor reflecting the key that’s been pressed or released.  I imagine there’s some debouncing, and they must have done something about “shift”.

The keyboard also presents the state of the front panel switches.   A mux routes either the keystroke or the switch state to the 8085 board depending on a select (address line) from the 8085 board.  I suspect that the processor sends a “come and get it” strobe (maybe an interrupt) when a key press is detected.

The keyboard also has status LEDs (eg caps lock) and those are written by the 8085 board to a register on the keyboard.  Ie the keyboard seems to just be a peripheral device on the 8085 bus rather than be accessed via, say, a serial port.

The bad news is that I could see no strobes.  The micro controller looks dead to the world, although it is happily clocking.  It is almost as if it has lost its program.  That’s a real problem because I doubt that I’m going to be able to find that ROM binary.  It is a UV erasable part rather than a mask program – there must be some kind of finite life.

This is going to be a bit of a problem to remediate.  I don’t fancy writing that code using the original processor – it was probably in assembler. 

At this point the sensible thing to do was to say, “well i tried” and then grab the drives and the RAM and chuck the rest into recycling. I put it down for a while before deciding that i could make a replacement based on a teensy board using the Arduino development environment. This board is vastly more powerful than the microcontroller, so i’d be able to work in c.

There are two pieces to be solved:

  • the protocol and character coding (maybe ASCII) to the 8085 board
  • how to detect keystrokes

This was a genuine case of suck it and see, and i knew it would be time-consuming.  I decided to park the project until i could find a way to duplicate disks. In 2019, i don’t think greaseweazle had entered my conciousness.