I was probably a bit silly to buy my first Lexitron word processor, but to buy a second was bordering on madness.
I was thinking that i would grab some spares for my existing machine, perhaps including a keyboard with working microcontroller.
As with my first purchase, this was a secondary item – i went to collect an IBM 5160. These machines seem to find me because when i got there, i found that there were two of them.
They were located very high up on top of two bookshelves in a shed that was so full of stuff that they could barely be accessed at all. My back survived.
Naturally, they turned into a project, resulting in one good unit, a set of spares, and some answers to unanswered questions.
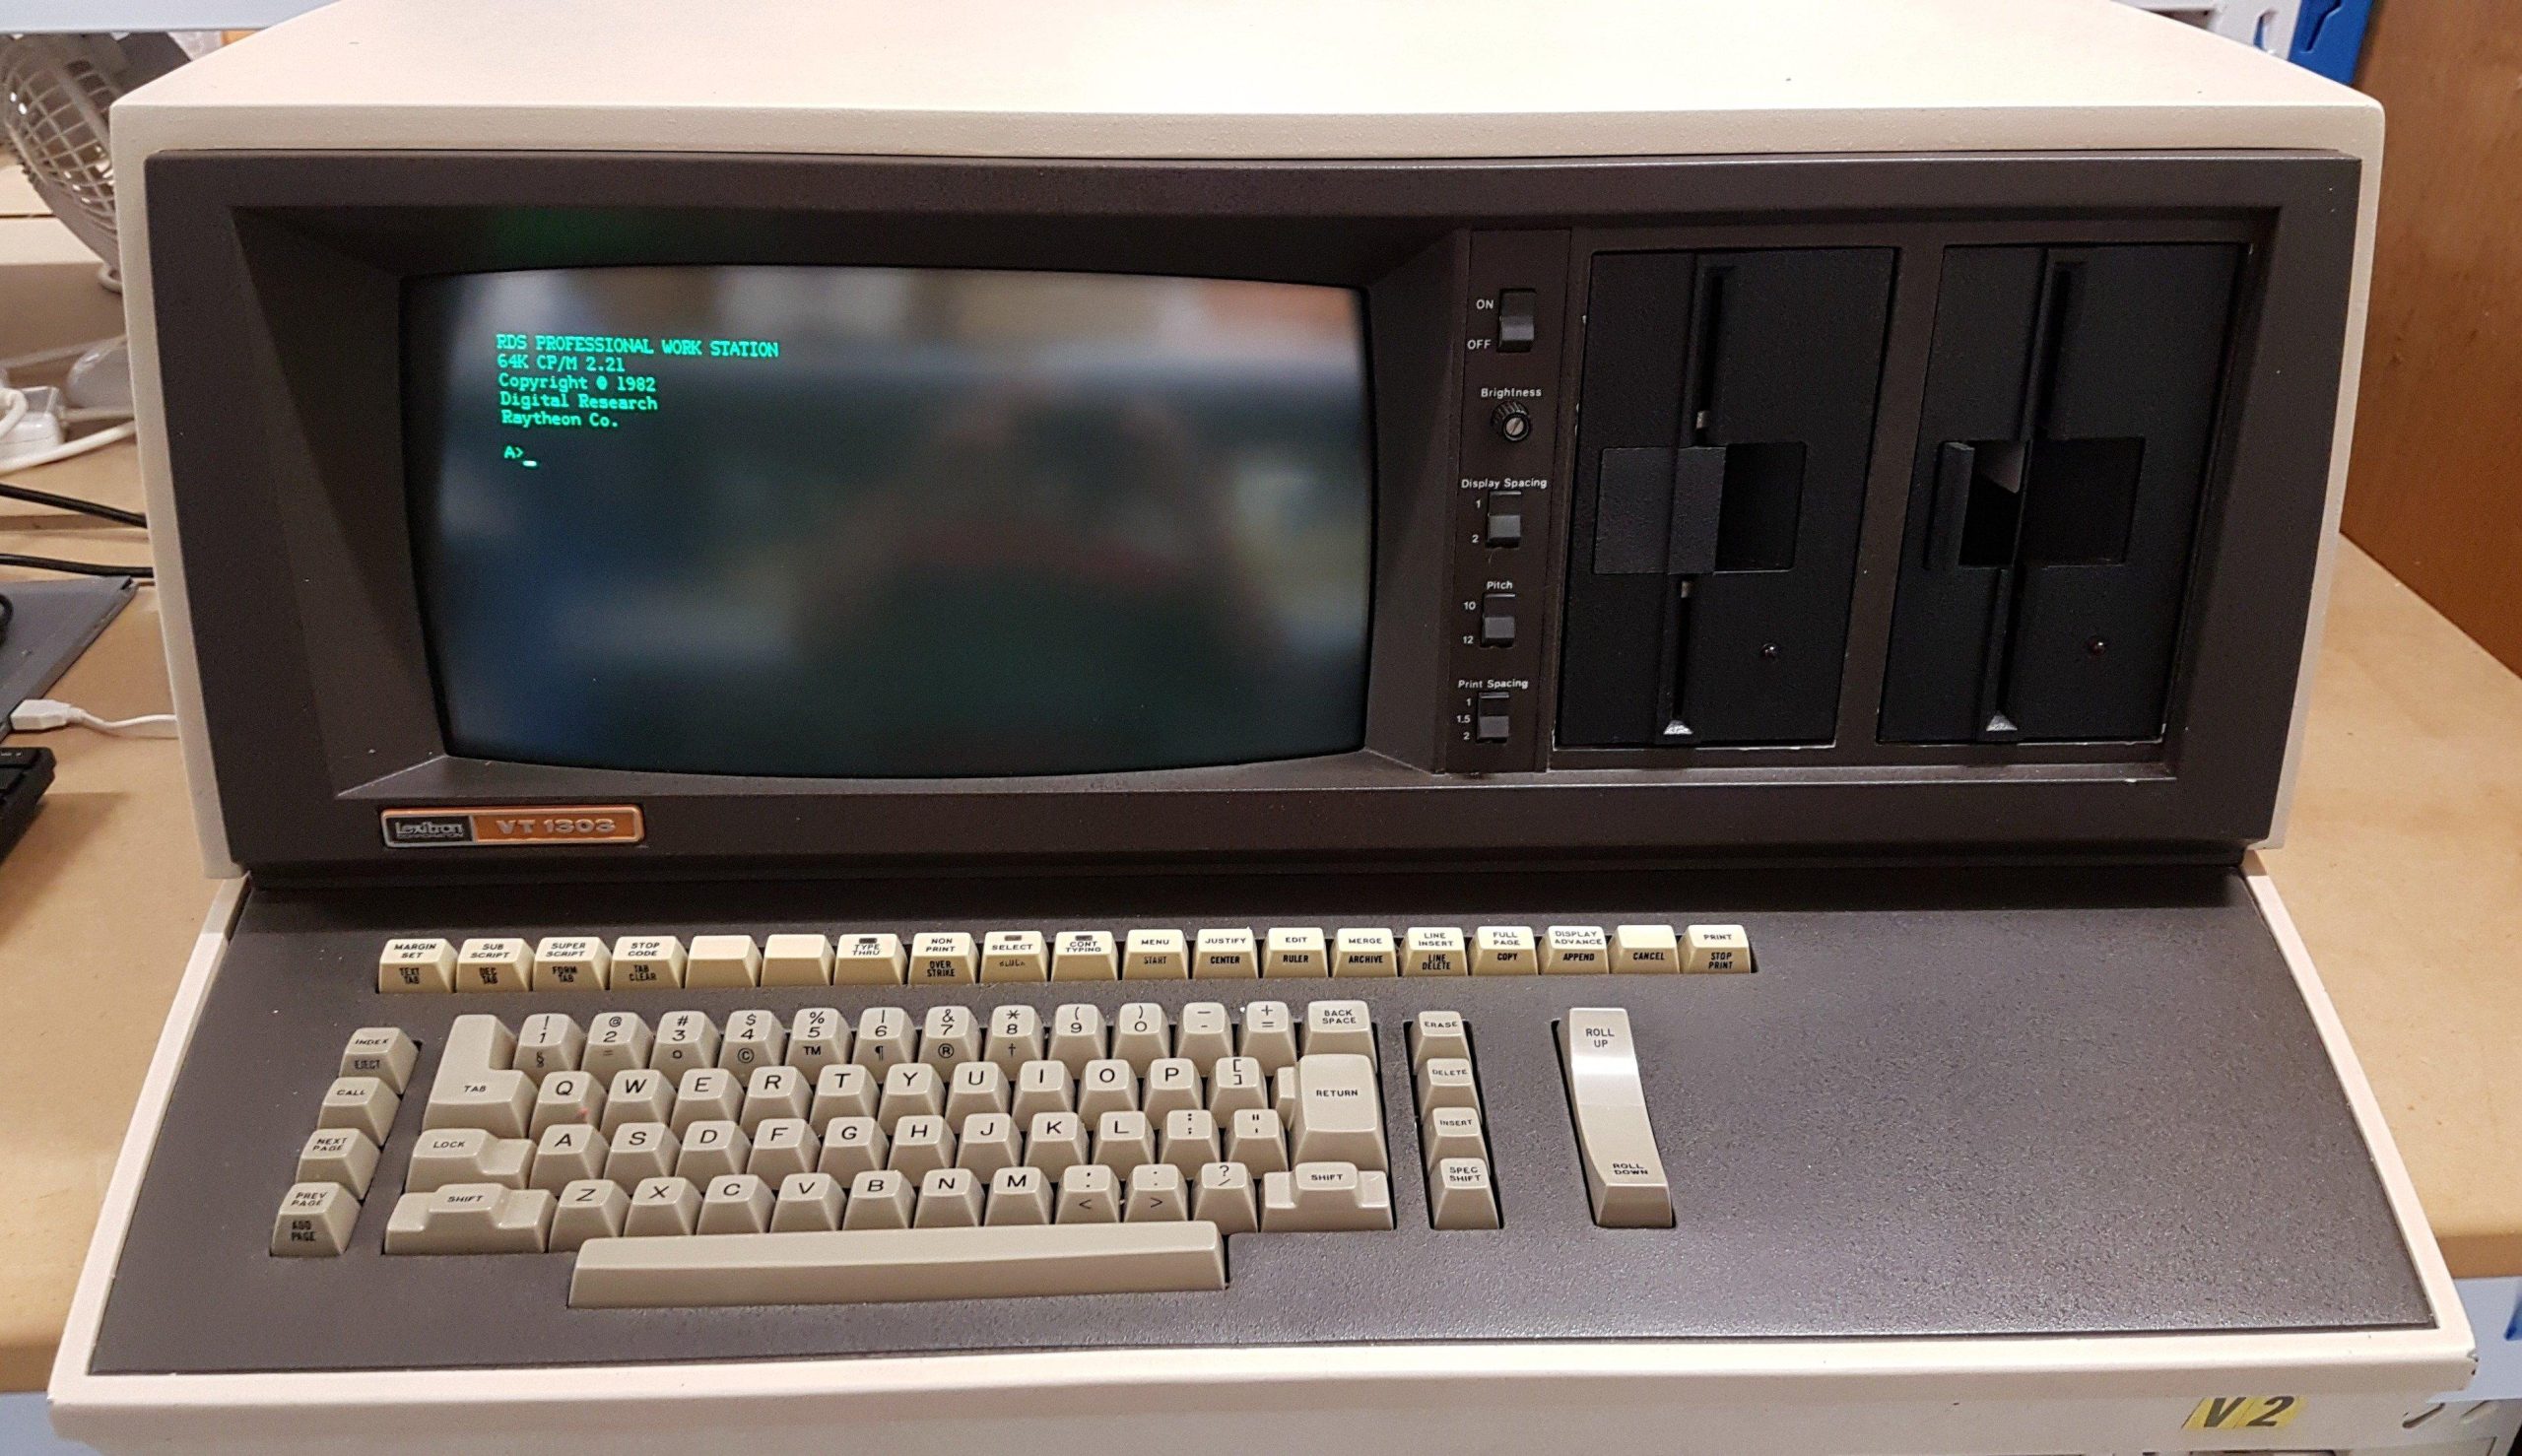
It was never my intention to buy this machine. I drove out to Lewiston (just north of Adelaide) to collect another purchase, and the seller asked if i would be interested in this mammoth. It had apparently come from a South Australian government department, but had been subsequently used by the seller and his family for several years during the eighties.
I did some quick research and found that it was a word processor – not really my cup of tea. In the end, i bought it for about the value of the two drives. It also came with a daisy wheel printer, a long and heavy-duty printer cable, a couple of manuals and some beaten up looking disks. The screen looked like it had some kind of disease, which was later identified as CRT cataracts.
I was happy to find that the drives were Shugart SA400 drives because these are the first really successful 5.25″ drives.
Backing up the disks was an exercise in itself, but once done, i set the machine to work. I replaced a shorted tantalum and gave the drives some love. I started the machine up and, surprisingly, the machine booted into its word processing program.
Mild joy was short-lived: the keyboard did not work, and it was the microcontroller that had failed. At this point i should have pulled the drives and some other spares and sent it off to the recyclers. Instead, i built a teensy based replacement for the microcontroller and reverse engineered the keyboard. This act of madness yielded a system that was close enough to demonstrate the machine as a word processor.
Along the way, i had picked up hints of CP/M being available for this machine. I periodically did google searches to see if there might be some images kicking around and to my surprise about 3 years later they appeared on archive.org (thanks to the person who did that – dasher perhaps).
Once written, with some help from an Adelaide Retro Computing Group member (thanks Mick S), the machine was able to boot to CP/M and take on a new life as a computer.
If the success of a vintage computing purchase is measured by the hours endured to get it working (the primary entertainment value), then this machine has certainly delivered.
For a little history of Lexitron see the video here:
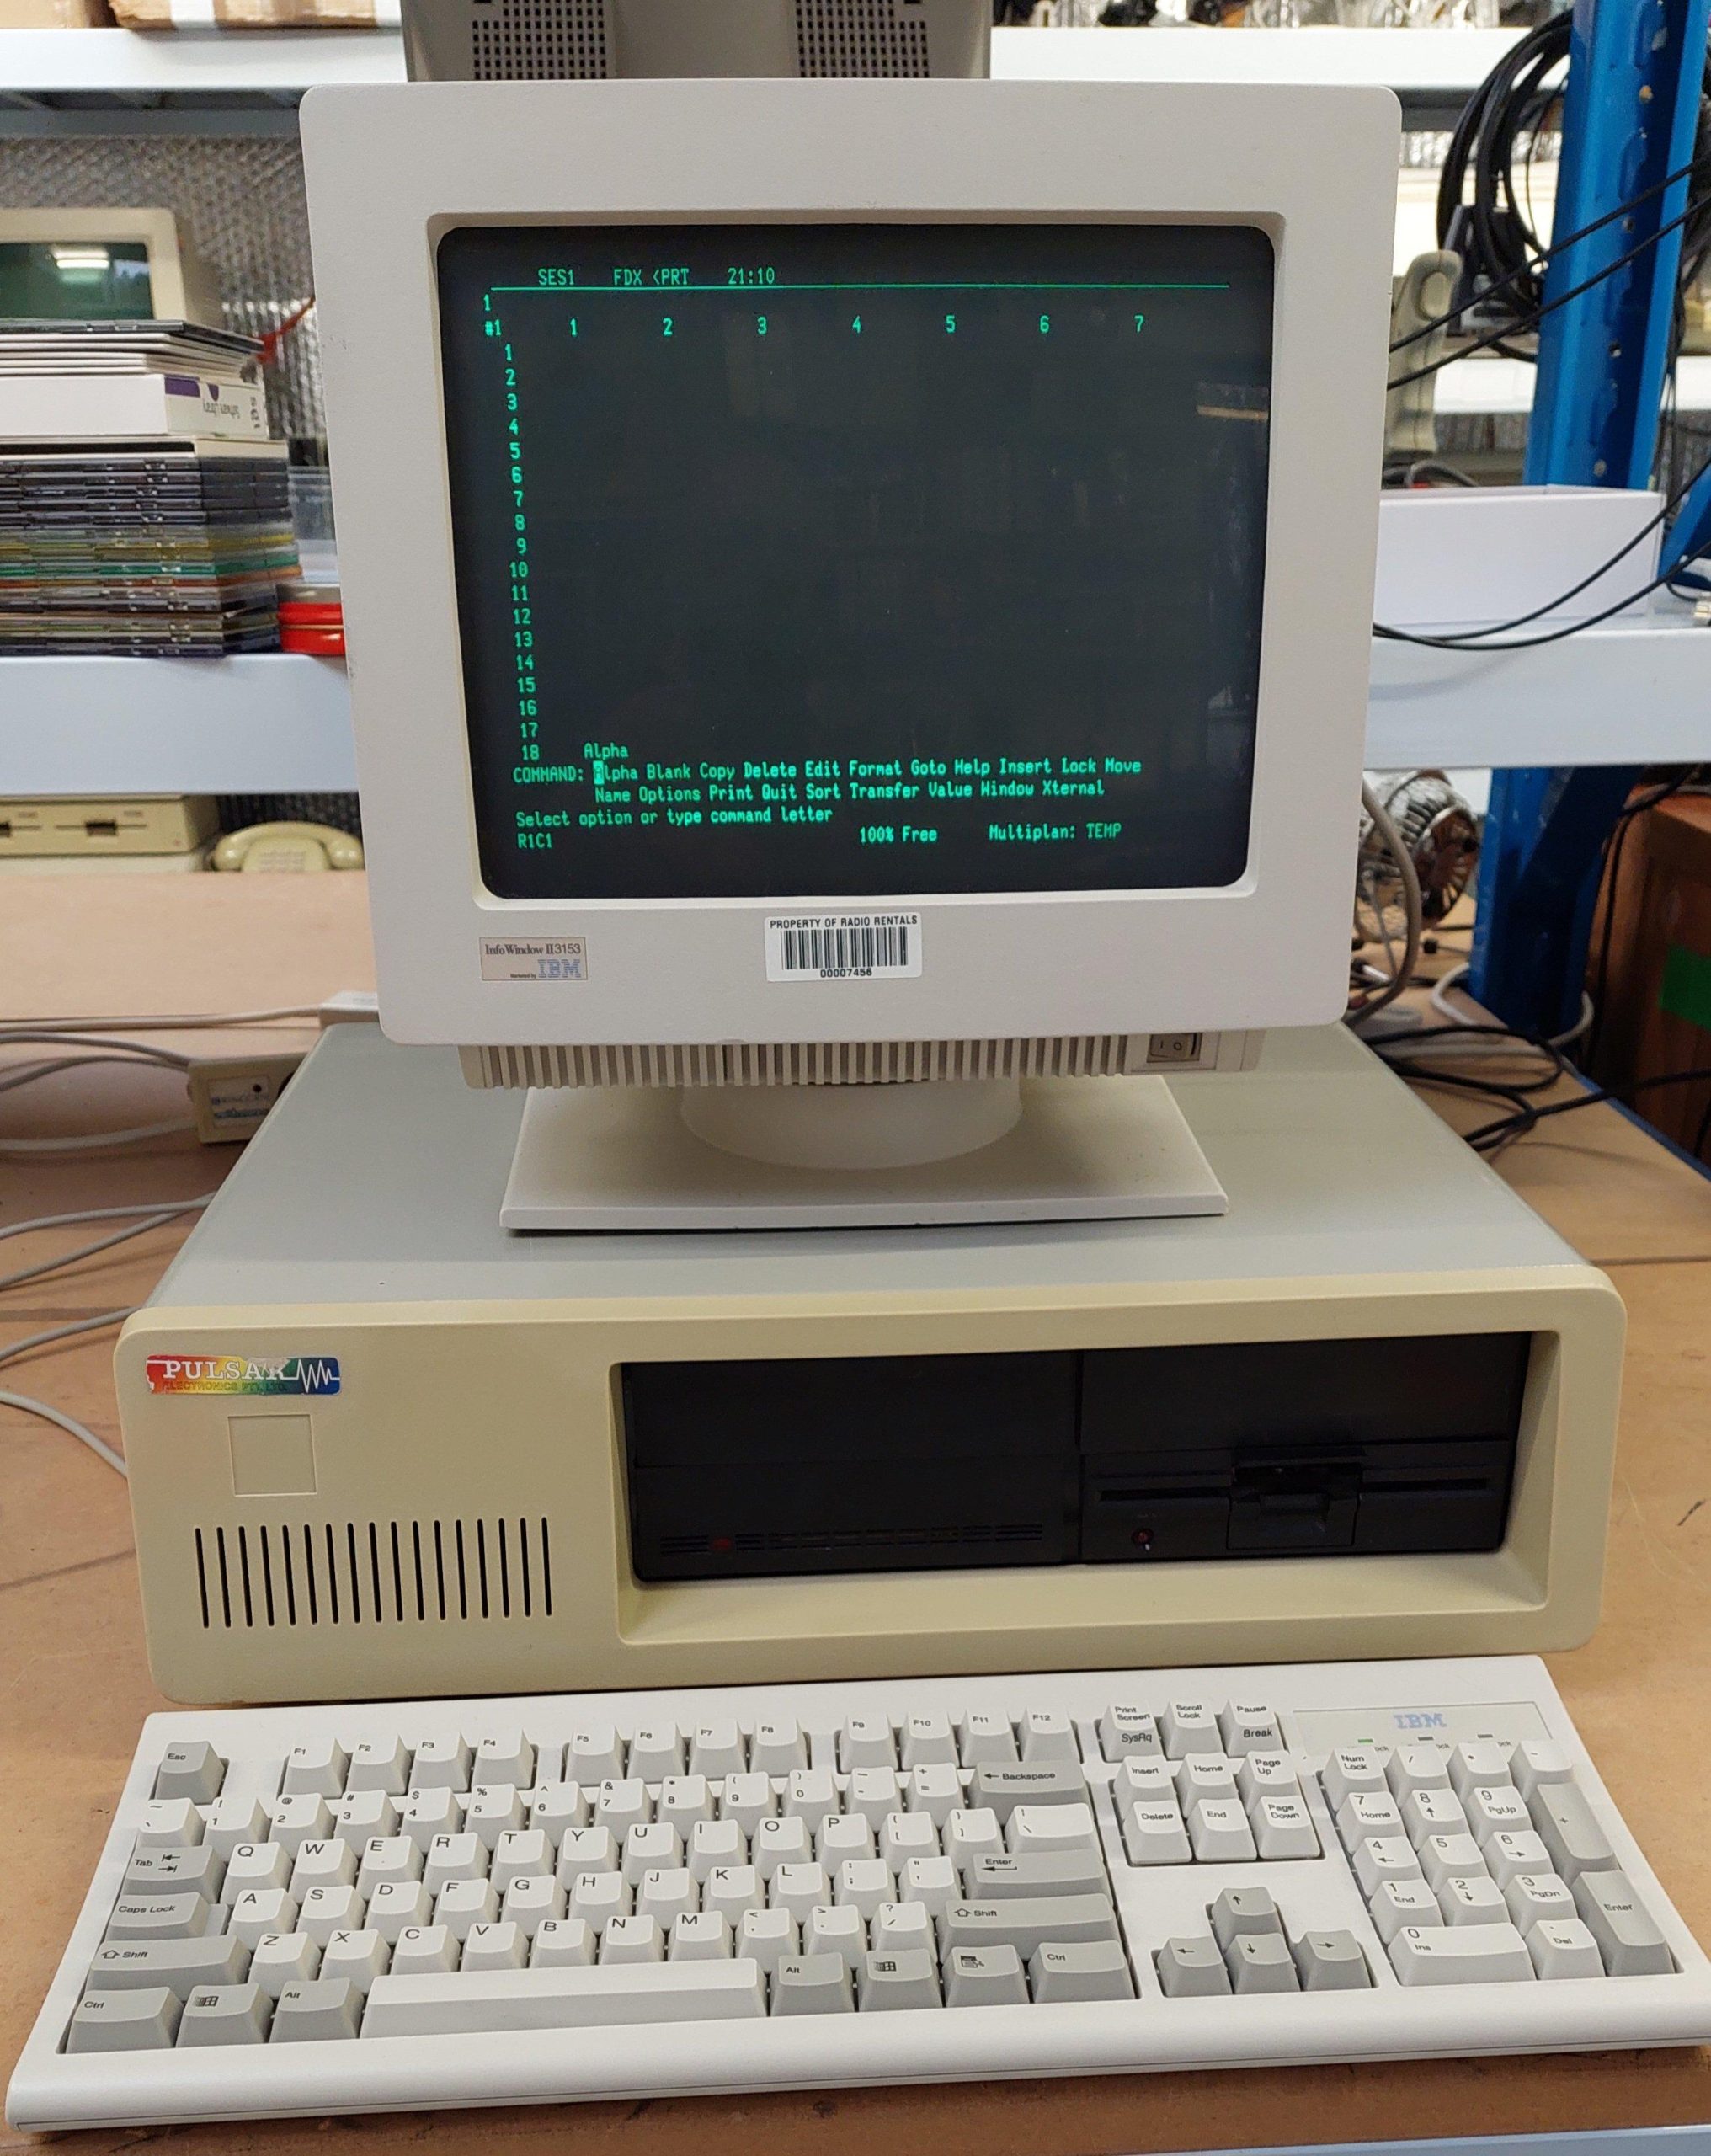
Inside the IBM PC style enclosure are 5 little big boards – one of which acts as a master to control drives and printers. The monitor is an IBM terminal, which is much younger than the computer.
The other four little big boards support 4 users via serial terminals. Each of these is connected back to the master via a serial line. These cards all run Turbodos. Each provides 64kB of memory for running CP/M programs.
The master provides access to a floppy disk drive and a SCSI hard disk – emulated with a SCSI2SD.
I connected it up to a serial terminal, but I couldn’t get anything out of any external serial port. The hard disk did not spin, so it may be a lost cause.
I had no boot disks for the floppy disk, although i thought it may be possible to create some from the 8″ disk collection. Many of the disks were related to Pulsar – both CP/M and TurboDOS.
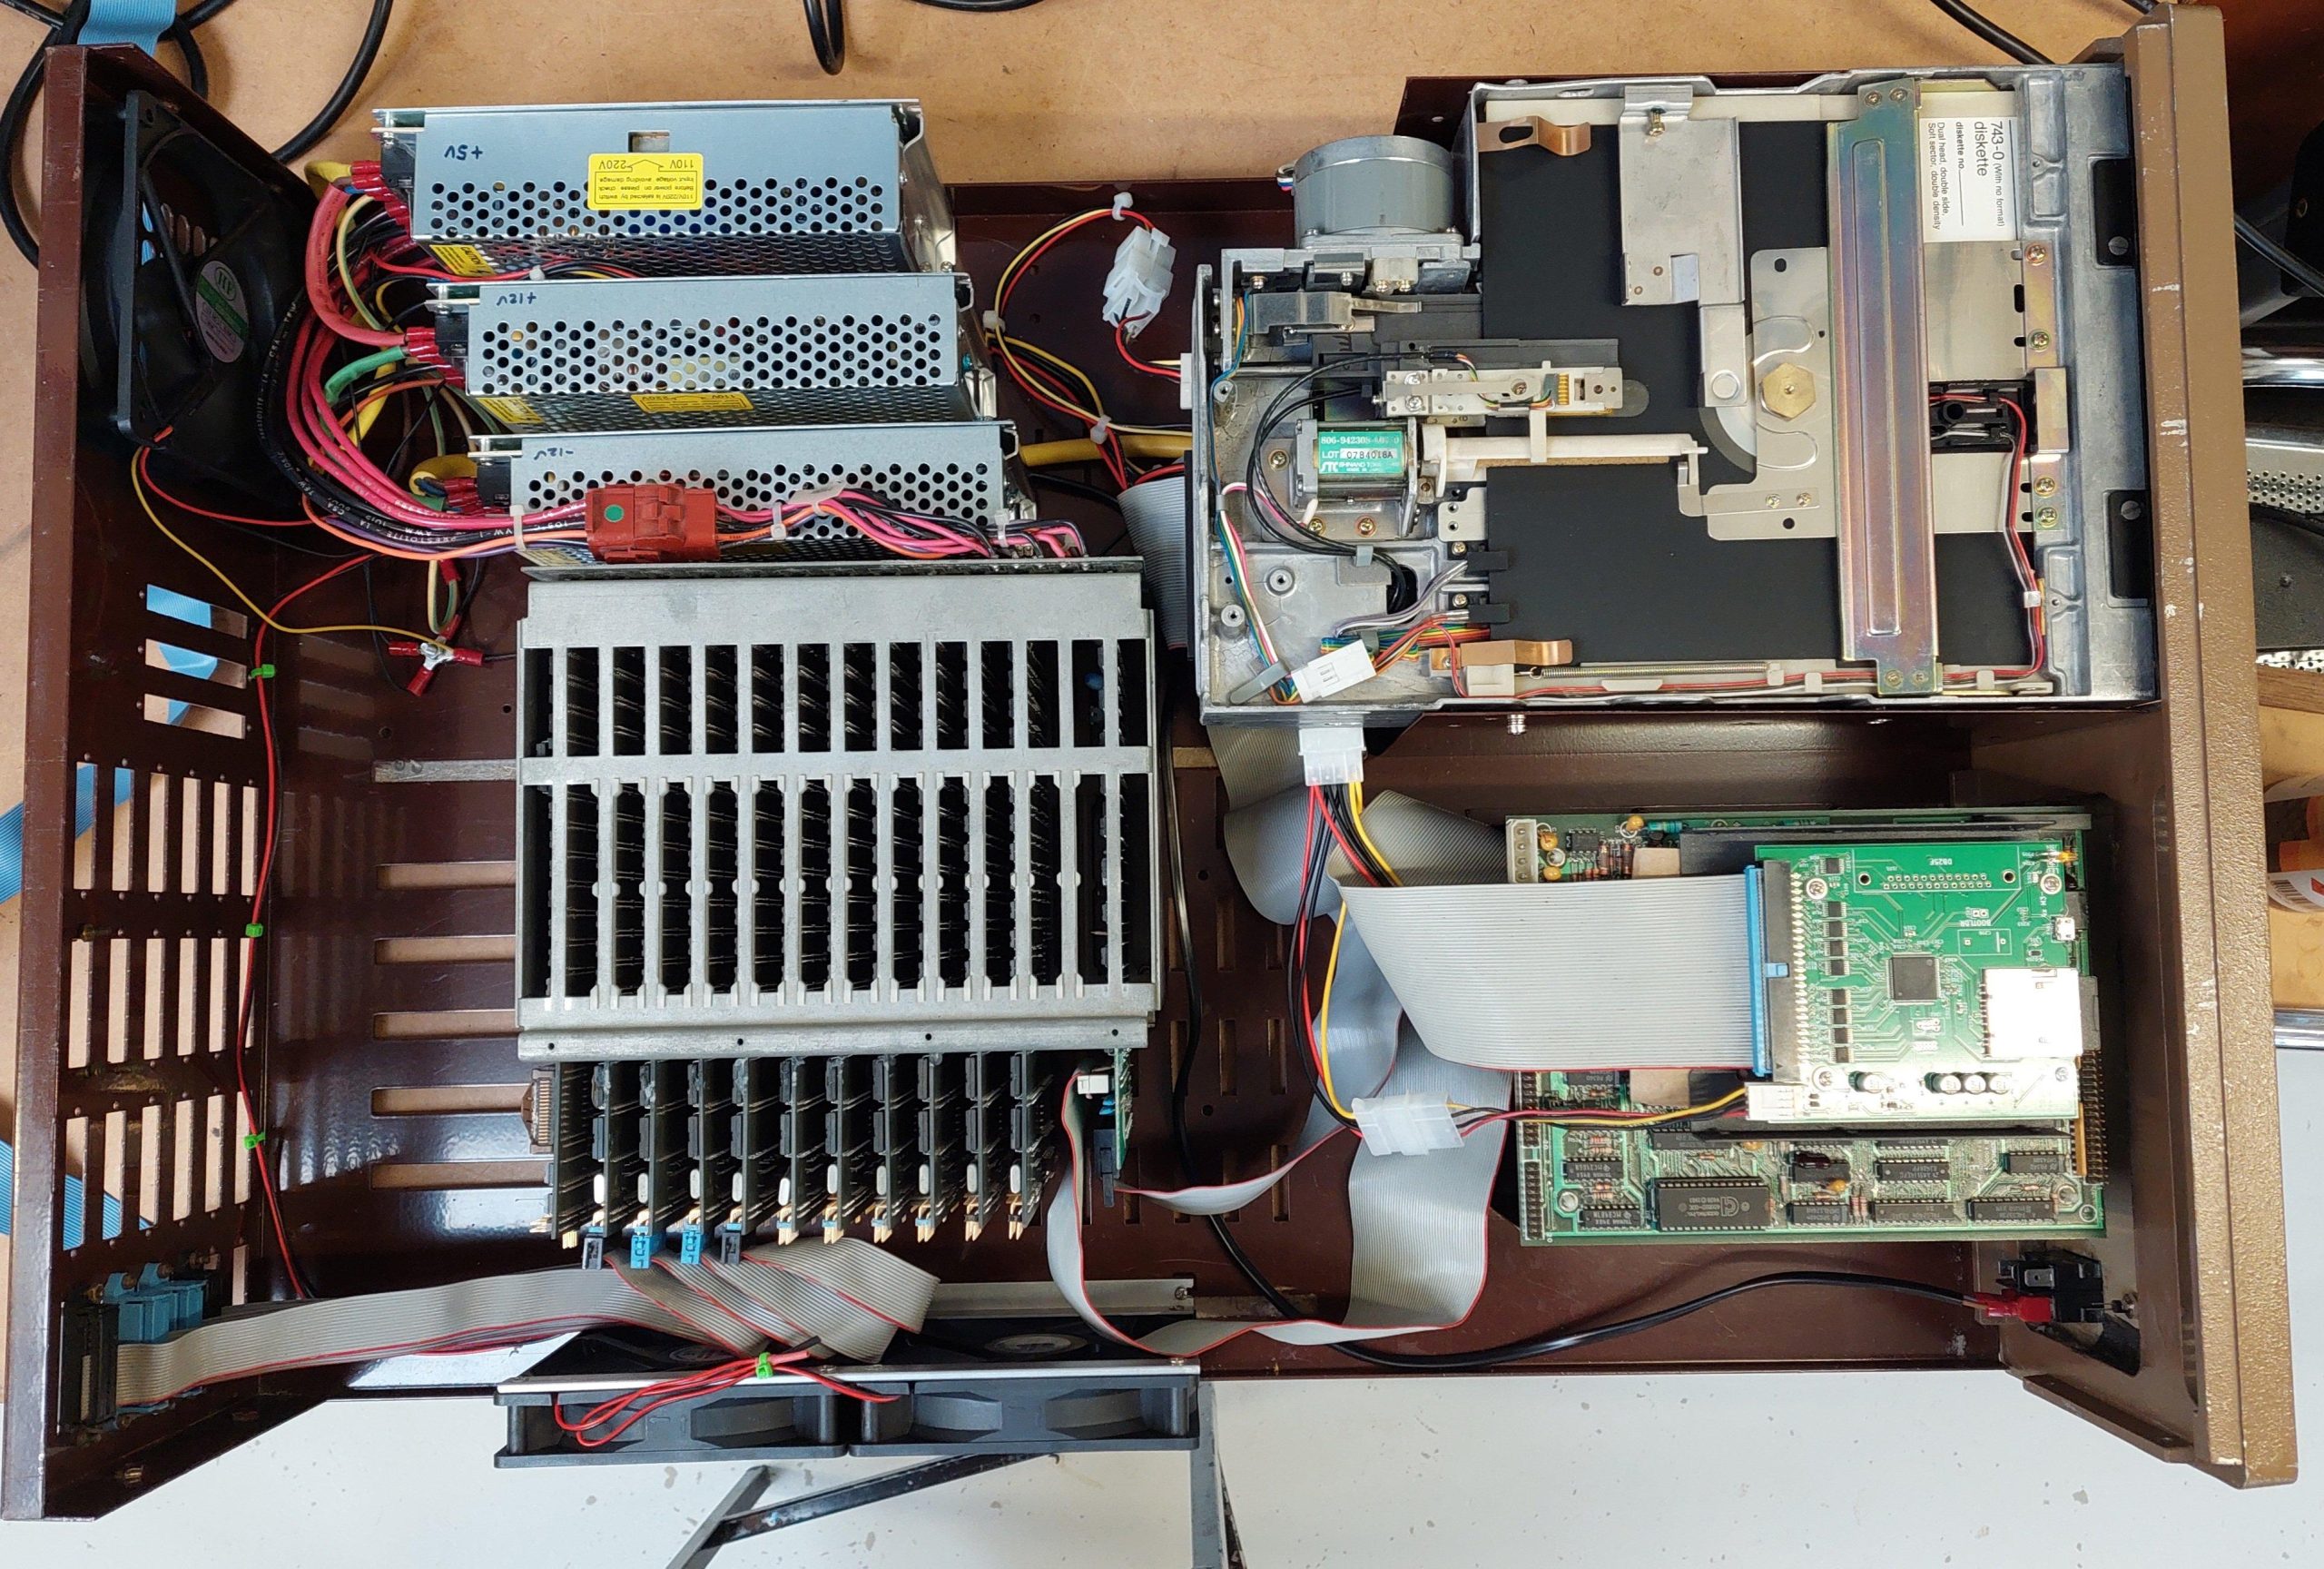
Working in the case was a little cumbersome, so I pulled the system right down to the boards:
It consists of:
1x Master LBB with STD and Floppy Drive Interfaces
4x Slave LBB (with a variety of options which are probably not used)
2x SASI/Dual Serial Boards
1x Mitsubishi M4854-342 High Density Floppy Disk Drive
1x NEC LR 56913Hard disk drive with Adaptec ACB-4000 SASI adapter
1x Sysquest removable disk drive with Adaptec ACB-4000 SCSI adapter (external to computer and mounted on it’s own baseplate)
There is a lot of variation amongst the slaves. Perhaps from card swaps over the years, or perhaps this machine was put together using whatever was in stock. Serial port connectors can be straight or right-angled, a bare header, or a shrouded header, sometimes with release levers.
Each of the slaves is connected via serial to the SASI/Serial cards. The master owns the bus and therefore the SASI/Serial cards. The slaves must not attempt to use the STD bus, so where the interface is loaded it has to be nobbled with track cuts.
There seems to be no reason why the slaves need to be in the unit – they could just as easily be located elsewhere but there is not a lot to be gained as either way a serial connection is required.
The serial ports on the master were used for printers.
I tested each of the boards with an MP7A Monitor ROM in a different chassis.
The master little big board does come up ok, so probably it was silent at switch on because that’s how the boot ROM rolls.
Two of the slaves were ok, but the other two were not working. One had a bad solder joint and the other had lost 12V connectivity because the track is very close to the board edge was severed. The damage would have occurred when I levered the board out of the backplane (there was no other way).
I could not get the master to boot from the floppy disk, even after adjusting the phase-locked loop as per Pulsar instructions. I parked that board and used a spare, which did boot.
From there the configuration tool was used to setup the slaves. There are a lot of questions about each slave. I took the easy options with automatic login of the privileged user.
The 7500 system uses a 5.25” drive rather than an 8″. As it turns out, the floppy disk drive in this unit, Mitsubishi 4854-342, is intended as an 8″ replacement – it even claims to be a 77 track drive although i suspect it’s good for 80.
The 50 pin host interface is connected to the 34 pin drive interface via a simple adapter. All up, this means that the 8” images can be written to HD 5.25” disks.
Looking at the simple 50/34 adapter board, I suspect that the drive has a couple of signals that may not be present on a 5.25” interface – Ready and 2Sides. I imagine that 2Sides is always asserted because there is no way for a 5.25″ drive to know if a disk is single sided. 8″ drives can.
The drive was cleaned and lubricated and tested ok with Imagedisk.
8” Pin
8” SIgnal
5.25” Pin
5.25” Adapter
Comments for Emulation with Gotek
2
TG43_L
Not used
4
6
8
10
2SIDES_L
2
REDWC_L
Not driven by controller or gotek. Pull down
12
14
SIDESEL
32
SIDESEL
16
18
HEADLOAD_L
4
Not Used
20
INDEX_L
8
INDEX_L
22
READY_L
34
DISKCHG_L
24
26
DS0
10
DS0
28
DS1
12
DS1
30
DS2
14
DS2
32
DS3
6
DS3
34
DIRC_L
18
DIRC_L
36
STEP_L
20
STEP_L
38
WDATA_L
22
WDATA_L
40
WGATE_L
24
WGATE_L
42
TRACK0_L
26
TRACK0_L
44
WRTPRT_L
28
WRTPRT_L
46
RDATA_L
30
RDATA_L
48
50
16
MOTORON
I wrote an HD floppy disk from 8″ disk image 8_257_02 (Pulsar Turbo V1.3 Master Configuration Sys 14 Config V24 Single User) using greaseweazle.
Pulsar was an Australian computing company located in Melbourne, Victoria. They made STD cards and computings systems based on the STD bus and often using TurboDOS.
TurboDOS is a multiuser/multiprocessor operating system that can execute CP/M programs.
Eight Z80 processors and two 80186 processors share an 8″ floppy drive and a SASI/SCSI hard disk, supporting 9 concurrent users. Each Z80 user gets their own 64k in which to run CP/M-80 programs, while the lucky 186 user scores 256kB in which to run CP/M-86 programs.
The master board, a 80186 board, loads the operating system from disk and, once it is up, it transfers the operating system to each of the slave cards.
All the rack-mounted cards are bona fide eighties cards. The rack and the 8″ drive are also of the time. The re-construction is new. I was able to find only very scant details of the Pulsar 9000, but i did have a complete set of cards and some software handbooks. It looked like a project!
This took me a bit longer than I expected because I didn’t read the instructions. CP/M needs to be configured to have some hard disk buffer space, otherwise the format fails mysteriously. I changed it from 60k to 56k. That allows room for the maximum 88MB of total disk storage.
The hformat program allowed for different controllers but after some experimenting I found success with the Seagate ST-225N hard disk.
+-----

Form                 5.25"/HH              Cylinders     615|     |     |

Capacity form/unform    21/   25 MB        Heads           4|     |     |

Seek time   / track  65.0/20.0 ms          Sector/track   17|     |     |

Controller           SCSI1 SINGLE-ENDED    Precompensation

Cache/Buffer               KB              Landing Zone      670

Data transfer rate          MB/S int       Bytes/Sector      512

                      1.500 MB/S ext ASYNC
I set up sd2scsi with 7 drives each with 615 x 4 x 17 = 41820 sectors of 512 bytes.
I used hinit (with burst mode) to set up 2 partitions on drive 0 and drive 1:
8192k
8192k
This needs to be done on every boot (really? yes) but an alias can be created:
alias

HINIT YD010 AF8192 AG8192, YD110 AF8192 AG8192,.

hardinit
then another alias that does this and swaps the drives over:
alias

HARDINIT; SWAP AF BG CH DI; STARTUP

HSTART
Startup can contain whatever is wanted, eg a menu program.
HSTART can be run on boot by adding at item 5 in the config program.
Copy the system track from the boot floppy to the hard disk using SYSGEN (watch out for the letter swapping).
Less than obvious (it’s in a separate section of the hard disk software manual right at the end) are instructions for autostart, noting HGEN in particular.:
When the system starts, it looks for a boot floppy. If it finds it, then it will boot from it. If it doesn’t find it, in about 10 seconds it will boot from the first hard disk partition. For some reason it keeps looking for a disk in the first floppy disk drive. If you give it one it stops but does nothing with the disk.
The Micropolis disk system uses hard sectored disks. This is particularly challenging for disk imaging systems.
Release 1.20 of Greaseweazle included hard sector support, so i gave it a try. I was able to read and write disk images with moderate success. Without a codec for the disk formats the software could not check each track and retry if necessary.
The Greaseweazle developer, Keir Fraser offered to add the fluxengine codec into the code which he did very rapidly.
I tried it out and found it worked very well.
I did find that some of the default parameters didn’t work well with my drives, but these were changed with the delays option.
The relevant commands are:
Get help
gw -h
Speed test
gw rpm –-drive=0
Head clean
gw clean –-drive=0
Set some safe drive parameters
gw delays –-step=30000 –-settle=10
Reads a micropolis disk into an scp file. The raw option keeps the sector pulses and allows reprocessing. Without the raw option the files are more easily viewed with the HxC tools.
CP/M files are read with the 256 byte option format=micropolis.100tpi.ss
When creating the image files, the sector integrity is checked and if the sector is bad it is retried. It was common for multiple retries to be required.
I did try to adjust some parameters (i had to with fluxengine) but i could not get much improvement. Nevertheless, it was quite satisfactory.
The actual system does better, so it often helps to make a fresh copy of a disk on the Sorcerer before trying to image with either FluxEngine or Greaseweazle.
I also tried using Greaseweazle to write micropolis images to soft sectored disks with a Virtual Sector Generator. It also works fine.
What i have not been able to do, so far, is to trick the Sorcerer into using a Gotek/Flashfloppy either with or without the Virtual Sector Generator.
As at V1.22 Greaseweazle includes the micropolis codec.
I use Greaseweazle a lot so i really appreciate the effort that Keir and others have put into its development.
Some of the basic games that have been stored as CP/M com files are missing from the sorcerer archives at Microbee Technologies (Alan Laughton is the curator) so i went through the process of transferring them back to audio files.
These were translated to wav files as follows:
At monitor GO BC00 to boot up CP/M.
Load the basic rompac (LDRAM).
Reset – starts basic.
Bye to return to monitor.
SE T=1 to set 300 baud.
GO BC00 to boot up CP/M.
Load up the game eg A>LAIR to load up LAIR. This starts up the ROMPAC basic.
Load up Audigy on a PC.
Set recording gain to max and the input to mono.
Connect LINE IN on PC to AUX on Sorcerer.
Start recording and enter CSAVE LAIR.
When the sorcerer comes back with READY stop the recording and trim if necessary.
Apply a good 20dB of gain to maxout and square up the waveform.
Export the audio to a wav file.
Check as follows:
Connect the PC LINE OUT to the input of the external amp.
Connect the external amp output to the EAR input of the Sorcerer.
Set Audigy playback volume to max.
Watch the EAR input with a scope and back off the Audigy volume until the waveform is clean and square.
CLOAD LAIR.
Hit play on Audigy.
The title should be shown in less than 30 seconds.
By the time the audio is complete, the sorcerer should say READY.
RUN and enjoy.
If you want to do another then breakout with ^C, BYE to return to monitor and GO BC00 to boot CP/M.
There were a number of games on the Sorcerer disks that fired up fine, but there were a large number that did not.
I got some help from Alan Laughton (Microbee Technologies) to work out what was going on. He spotted that the files contained basic. They were com files – so quite different from the basic files that you would load into the disk basic.
Browsing through the manuals and other data, it became clear that the ROMPAC BASIC work area had been set up in such a way as to allow programs to be saved and loaded with CP/M.
The ROMPAC basic has a lot more memory available to it than the disk basic. It doesn’t waste space on the interpreter or the operating system.
The first entry in the com file is a jump to the warm start area of the basic ROMPAC. This failed on my machine because i had no ROMPAC.
What i did have, though, was a 8k S-100 RAM card (Solid State Music MB6) which i could locate at the same address as the ROMPAC at C000.
The card, predictably, failed the Sorcerer Monitor RAM test, but the offending IC was found and replaced.
I tested it out by using ddt to load the ROMPAC which was moved up into the RAM card. Following reset, the “RAMPAC” was found and basic fired up.
“bye” at the basic prompt returned to the Sorcerer monitor and GO BC00 started CP/M again. One of the previously failing com files was loaded and sure enough it ran!
After that, i wrote a very short program that replaced the ddt step. This allowed another 23 games to execute.
I’ve since created to couple more which load the development and word processor ROMPAC code into the RAMPAC.
The memory card had a facility to write protect the contents, so i added a switch to the expansion unit to enable it.